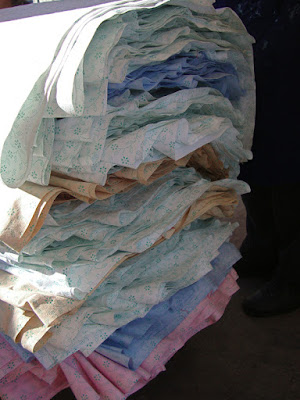
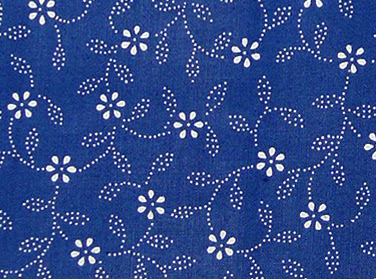
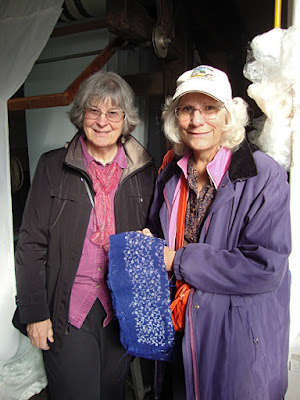
This fabric is called Kékfestö in Hungarian, a word that roughly translates as blue-dyed or blue-dying. Producing these fabrics is a cottage industry in Hungary, which dates back several centuries. The dye is indigo; the cloth is cotton; and the long, arduous process results in a type of batik fabric. The photo above shows a small fold of each of the fabrics I bought at the blue-dyed studio shown below. (As always, please click on the photos if you'd like to see more detail.)
When in Hungary in October, 2016, my quilting/travel friend (Lunnette) and I, as guests of my Hungarian bead sister, Anna Fehér, had the very exciting experience of visiting the hand-dying studio of Miklós Kovács in the little village of Tiszakécske, SE of Budapest. The studio, located behind his home, includes two rooms, one for printing the raw cloth with a wax resist, and the second for dying the printed cloth with indigo. In front of the building, you can see rods above the deck, which are used for hanging the fabric to dry after it is dyed, and a wagon loaded with printed cloth ready to be dyed.
Meet Mr. Miklós Kovács, now in his 80s! Charming and animated, he is explaining his traditional, hand-dying process to Anna. Blue-dying has been the Kovács family's livelihood since 1878, each new generation being trained by the previous Master. It is strictly a family affair. Miklós, his wife, Margit, and their two daughters, Gabriella and Mária, currently produce about 10,000 meters of Kékfestö (blue-dyed) fabric every year. When Mr. and Mrs. Kovács retire, the business will pass to their daughters. This post shows how they turn plain white cloth into beautiful fabrics with white motifs on an indigo background.
First, they need thousands of meters of fine-quality, tightly-woven, raw cotton cloth, which is rinsed to remove impurities, then carefully ironed and rolled onto wooden rods which fit onto the printing machine. This pile of untreated cotton cloth, manufactured in Turkey, is the remainder of a big shipment purchased at the start of the year.
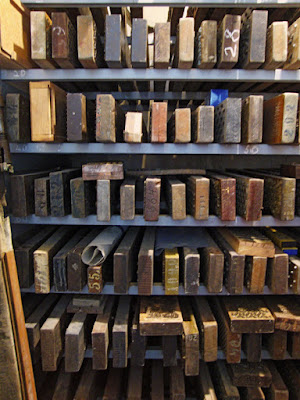
Next they need a print block or plate. These are made with wire pins of various diameters, which are pounded into blocks of dense wood. Here you see the many plate choices available in the Kovács studio, each yielding a different motif on the fabric. The length of each print block is the same as the width of the fabric; the width is the width of the pattern repeat, generally designed to be about 4.5 inches..
This is the end of one of the print blocks, showing how the design is formed by setting metal pins of different diameters into the wooden block.
And here is the fabric (after dying it with indigo, and removing the wax resist), which was printed with the block in the photo above it. Naturally, a half-meter of this one came home with me!
This is the machine which is used to print the motif on the raw cotton cloth with a wax resist. Mr. Kovács keeps his printing machine, built in Germany 120 years ago, in good running condition with machinist skills he learned alongside his father.
You can see the sprocket, lower right, which is adjusted to advance the fabric through the machine in increments exactly the length of the pattern repeat. For most motifs, the fabric advances 4 to 5 inches after each time the print block is applied to the fabric, thus revealing the next short stretch of un-printed cloth.
Here you can see many meters of raw cotton cloth, suspended on a metal rod at the back of the printing press. There is a leader of waste cloth stitched to the end of the roll which has been fed through the rollers of the machine to get the process started.
At the front of the printing machine, a worker swipes a tray with wax resist, which is tinted green so that it will be visible on the printed cloth. The printing block touches down on the waxed tray, picks up a coating of was, and then presses firmly against the fabric.
After being imprinted with wax resist, the fabric is wound up and down through a drying rack located behind the printing machine.
When it is dry, the printed fabric is folded and stacked until there is a sufficient quantity to begin the dying process. You can see that some of the raw cloth in this pile was pre-dyed pink, blue, or beige. After over-dying with indigo and removing the resist, the motif on these pieces will be pink, blue or beige with an indigo background, rather than the much more common white motif with an indigo background.
This close-up photo shows how the fabric looks after the wax resist (tinted green so that is shows on white cloth) is dry. This is the motif being printed while we were there. Liking the design a lot, I was very pleased to find finished fabric in this pattern available to purchase.
And this is how the cloth will look after it is dyed with indigo, the wax resist removed, and the fabric washed and ironed. As you might have already guessed, a half-meter of this one came home with me!
As we watch the cloth passing slowly through the rollers of the printing machine, Lunnette holds a scrap of dyed fabric which was tied to the machine, indicating the motif currently being printed.
At last, we get to the dye pot! Here on the burner, a concentrated indigo dye formula is being readied to pour into the dye vat.
Don't forget to wear those heavy rubber gloves, or the skin on your hands will be tinged with blue for a long time.
Mr. Kovács gave a long, animated talk (all in Hungarian, which I only slightly comprehend) about the whole process of blue dying. You've already seen how the cloth is printed with wax resist. The next step is to dye the background.
The cloth is dyed in a vat with the indigo dye-bath at 85 degrees
C., then washed to remove the wax and rinsed to remove the excess dye.
After rinsing, the cloth is looped over racks to dry outdoors, which
completes the dying process. Sadly, he did no dying while we were there, so I don't have pictures
or first-hand experience with precisely how it is done to share with
you.
However the fabric is not yet ready to use. It must be starched, dried,
and then pressed using both steam and steel rollers with heavy pressure,
in order to create the traditionally desirable shiny finish on the
cloth. Finally, the fabric is folded onto bolts for distribution to
shops and end-users.
We learned how they hand-print motifs on cloth using a template, such that after dying, the fabric can be cut out and hemmed as a finished table cloth. You can see the templates hanging on the wall. The desired template is placed over the fabric, and a pencil used to mark the registration points for lining up the printing block. Fabrics which have already been printed are stacked in front of the templates. After being dyed, this fabric will be made into table cloths and runners of various sizes.
This is a section of cloth which as been marked with a template, and hand-stamped with wax resist. After dying with indigo and removing the wax, it will be made into a rectangular table cloth with a lovely double border all the way around.
Mrs. Kovács demonstrates for us how she lines up the print block with the penciled registration marks, and then lowers it onto the fabric. With the stamp resting on the cloth, she lightly pounds it with her fist to set the wax into the fabric. It was obvious to us that carefully making each wax impression all the way around the cloth takes a lot of time and concentration. As you an see below, the results of her hand-printing are stunning!.
Here is an example of a hand-stamped, indigo-dyed fabric made into a round table cloth. Obviously, it came home with me, and is perfect for my kitchen table! This fabric is quite wide, and takes a great deal of space and time to print. Yet, the prices were very reasonable!
After spending several hours in the studio, we were invited to the house for a shopping bonanza! Fortunately, hoping ahead of time that we would be visiting a Kékfestö studio when we got to Hungary, we had saved our allowances for some months, and were prepared to shop for future quilting and sewing projects. The prices, ranging $10 to $15 per meter depending on the width, seemed very reasonable considering the quality of the fabric, and the extreme amount of work that goes into producing it.
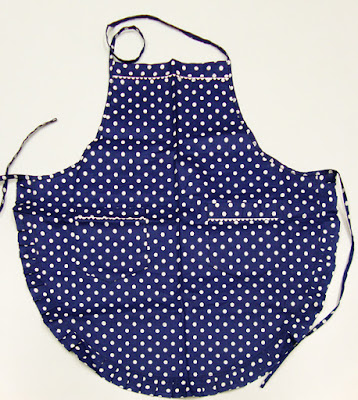
In addition to yardage, both of us bought a table cloth and an apron. Mine is shown above.
What a totally delightful experience we had! Mr. and Mrs. Kovács are as friendly and nice as can be! If you ever get to Hungary, you can find their fabrics and finished products in the picturesque town of Szentendre, just a short drive or train ride north of Budapest on the Danube River. Here is a website link.
To end our visit at the Kovács studio, here is a tribute photo of the elder Mr. Kovács, who during his boyhood in the 1920's was immersed in the world of his family's blue-dying business, and who continued producing Kékfestö indigo-dyed fabrics for his entire life, while training his own son to continue the trade.
Like his father, the younger Mr. Kovács has trained his daughters to continue when he retires, although I'm sure he has many more years to go, probably well into his 90s..
My last two photos in this post are a little surprise for you. Before falling in love with beading and quilting, my main passion was Hungarian folk dancing. I danced in a performance group for 10 years (and later became one of the group's choreographers), performing at many events in the Seattle area, including Bumbershoot and the Folklife Festival. We also performed at the World's Fair when it was in Vancouver, British Columbia. I and several of the other dancers in the group made most of our costumes using Hungarian fabrics and original costumes as patterns.
It was folk music and dance that first called my heart and soul into Hungary, where I have since spent a cumulative total of well over a year of my life, spaced over 14 different visits so far.
So, here you go. This is me, wearing a costume I made with Kékfestö fabric for performing the dances of the Szatmár region, located in northeastern Hungary. This photo was taken in September, 1986 at the World's Fair in Vancouver, Canada, where we performed on two separate occasions.
And this is me on stage at a festival in Redmond, WA, happy as can be, Hungarian folk music, song and dance, filling me with joy! Michael Kappleman and I are the second couple from the left.
So you see... Kékfestö and I go back a long way. Next, I'll be quilting with it!
*****
My apologies to Hungarians for not using the correct accent mark for the last letter of the Hungarian word Kékfestö. I spent 4 hours trying to do it, but could not get Blogger to accept anything I tried.
Wednesday, December 21, 2016
Tuesday, December 06, 2016
My Quilt for 2017 La Conner Quilt Museum Challenge
To be honest with you, the past two months (Oct. and Nov.) have been miserable for me because of the election campaign and results. Now, finally, the cloak of despair, the fog of depression, is lifting a little.
One evening, as I noticed the challenge kit from the La Conner Quilt Museum on top of my quilting to-do pile, a flicker of an idea passed through my brain. Then, as I awoke the next morning, the flicker became a small flame, which in turn lead me to accept an invitation to spend an afternoon quilting with some friends, which (in order to have something to work on) got me rooting through my fabric stash.
Now, quilters, beaders, and artists of all types, will recognize the phenomenon caused by physically touching your materials, supplies, and tools. Suddenly your wearisome thoughts of the election (or whatever else got you down) are gone! You fondle your stuff lovingly, and with great anticipation, you make the first cuts, fanning the flame, turning it into a nice warm fire. Ah, saved from the chilly fog, at last!
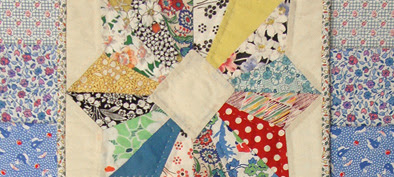
My journey out of the fog began with this vintage block from a quilt that someone, somewhere, started long ago, but never finished. It, along with many others, was donated to the La Conner Quilt Museum. The Curator, Kathleen Kok, not knowing what she would do with all the vintage blocks donated over the years, just kept them in a corner waiting for an idea to form. And form it did!
Every year the Museum has a challenge as a fundraiser, showcasing the entries at the annual Quilt Festival. For 2017, the challenge theme is "Time" and the material provided in the kit is one of the vintage blocks from their collection. The block above is the one I picked. It is just so cheerful... how could I resist? Hand pieced, it wasn't perfectly sewn, but still I fell instantly in love with it. Mine for a $10 contribution!
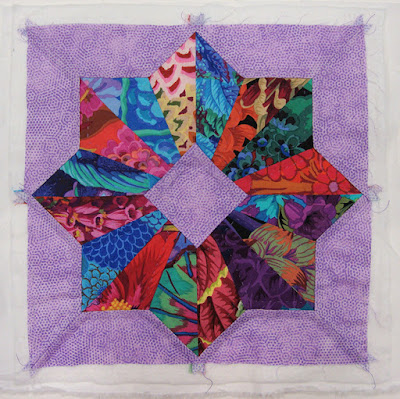
Of course, it was just the block. In the photo above, I have already layered it with backing and batting, and then hand quilted it.
My idea is two-fold. (1) Since the "time" theme can be portrayed by a transition from these early fabrics to modern fabrics, I decided to repeat the block using Kaffe Fassett fabric scraps left over from my shimmer quilt. (2) Feeling powerless in the face of impending doom after the election, I had to find some ways to assert my beliefs, and this quilt was to be one of them. I've long been concerned about the ever-increasing world population, about all the small, yet constant ways overpopulation is damaging and destroying the natural systems of the planet. So the title will be: Under the Quilts, Time Flies, and Population GROWS. My idea is to illustrate this concept using both color and beads. You'll see.
First though, a few words about making the modern block. At first I tried to make a pattern for the "flower/star" by tracing one of the triangles from the back side. I hand-stitched the required 16 pieces together FOUR different times, varying the seam allowances each time, trying to get it to lie down flat. Obviously, I did not correctly copy the original, because when I finally sewed it so it was nice and flat, it was also too small. Grrr.
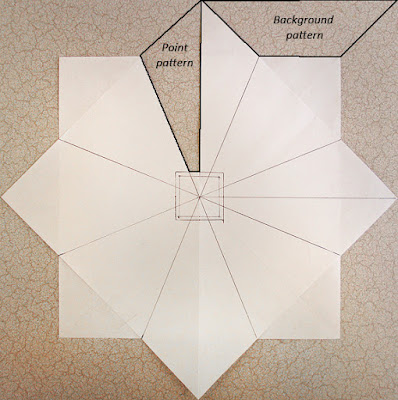
A smart quilt friend (thanks Tori) suggested I trace a section from the right side of the block and add 1/4 inch seam allowances all around. Good idea, but there were small differences between the sections... which one to trace? Trying to answer that question, looking at the block, I finally saw how the pattern was derived! (Light bulb!!!)
It's two overlapping squares of the same size, one on point and one not. All it took was to measure the sides of the squares on the original block (which averaged 8.5 inches), cut them out of paper, fold the diagonals and sides, put a pin through the centers to join them, rotate the top one until the folds lined up, tape the two together, and draw along the fold lines. Voila! Now, all I had to do was cut out one of the half-points, add my quarter-inch seam allowances, and there was the perfect pattern for my new block. The rest went quite quickly, and below you can see the quilted result. (Note: I added quarter-inch seam allowances to each of the pattern pieces shown above to get the final cutting pattern.)
You might be wondering why I've layered and quilted these blocks. How will they be joined to form the quilt? The answer is they won't be joined! Instead, they will be bound as separate little quilts (each 11 inches square), and then appliqued to a separate "background quilt."
Here is how they look with the binding.
Notice that the over-all color of the modern block is darker. This matches my concern about over-population of the planet. Time flies, and the population GROWS, making the world a darker place for me, as many species become stressed and obsolete, as the desert lands grow and the forests shrink, as potable water becomes polluted and scarce, as crowded people war with each other. You know. If you watch the documentaries and contribute to various environmental causes, you know. Darker.
Thus, the quilt also becomes darker as the eye travels from top to bottom. Here is how it looks with the two blocks on the background quilt, the transitioning colors from light to dark, representing about 70 years in time passing (estimating the date of the fabrics in the vintage block at approximately 1946). This is an extremely tiny period of world history, but one in which world population sky-rocketed from 2.3 billion to 7.4 billion.
You can probably see the little heart beads, but if you click to enlarge the photo, you'll see them more clearly. The pair at the top represents a couple. They dive under the quilt, have some fun, and produce four lovely children (between the two blocks). These four pair up, dive under the quilt, resulting in 16 children. Under the quilts, time flies, and the population GROWS. That's m' story, and I'm sticking to it.
Now, here's a question for you loyal readers who have come so far with me on this thing. The quilt looks really pretty the way it is. But originally, I had planned to do more beading on it. I planned to bead several vines circling the outer border of the quilt (not the binding). Across the top of the quilt, the vines would be light green, with many green leaves, bright-colored flowers, and some critter beads/charms (bees, birds, bears, fish). As the vines trailed down the sides, they would become darker, until at the bottom they would be beaded with dark brown, black, and darkest greens, with no critters, and only a few dark flowers. The visual message (I hope) would be, "this is what happens when we overpopulate the world." What do you think... leave it like it is now or bead the borders?
Evidence of heavy population demand on resources is all around us. Global aquifers are being pumped 3.5 times faster than rainfall can naturally recharge them. Eventually they will run dry, perhaps as soon as 75 years. Topsoil is being lost 10-40 times faster than it is formed. Feeding all 7+ billion of us is increasingly difficult, impossible actually.
There is no technology solution to accommodate the increasing demand of uncontrolled global population growth. The only solution is voluntary one child per couple for a couple of generations, on a Global participation level. If all countries followed the lead of countries with the lowest birth rates (Taiwan, Spain, Portugal, South Korea, and Poland), we could reach a more sustainable Global population of 3 billion by 2100!
Please, talk about this with your child-bearing-aged kids, grand kids, students, etc. We teach environmentally sound practices in most schools, write books and make documentary films about issues like clean water, over-fishing, fracking, etc. But rarely does the topic center on overpopulation. Be proactive. Make it happen.
If you are willing to read (or listen to an audio book) to learn more about Global population, Count Down is an excellent read.
Here is a link to the previous bead embroidery pieces (and poems) I've made concerning population growth.Thank you for reading all the way to the end, and for anything you can do to help people understand what we need to do.
One evening, as I noticed the challenge kit from the La Conner Quilt Museum on top of my quilting to-do pile, a flicker of an idea passed through my brain. Then, as I awoke the next morning, the flicker became a small flame, which in turn lead me to accept an invitation to spend an afternoon quilting with some friends, which (in order to have something to work on) got me rooting through my fabric stash.
Now, quilters, beaders, and artists of all types, will recognize the phenomenon caused by physically touching your materials, supplies, and tools. Suddenly your wearisome thoughts of the election (or whatever else got you down) are gone! You fondle your stuff lovingly, and with great anticipation, you make the first cuts, fanning the flame, turning it into a nice warm fire. Ah, saved from the chilly fog, at last!
My journey out of the fog began with this vintage block from a quilt that someone, somewhere, started long ago, but never finished. It, along with many others, was donated to the La Conner Quilt Museum. The Curator, Kathleen Kok, not knowing what she would do with all the vintage blocks donated over the years, just kept them in a corner waiting for an idea to form. And form it did!
Every year the Museum has a challenge as a fundraiser, showcasing the entries at the annual Quilt Festival. For 2017, the challenge theme is "Time" and the material provided in the kit is one of the vintage blocks from their collection. The block above is the one I picked. It is just so cheerful... how could I resist? Hand pieced, it wasn't perfectly sewn, but still I fell instantly in love with it. Mine for a $10 contribution!
Of course, it was just the block. In the photo above, I have already layered it with backing and batting, and then hand quilted it.
My idea is two-fold. (1) Since the "time" theme can be portrayed by a transition from these early fabrics to modern fabrics, I decided to repeat the block using Kaffe Fassett fabric scraps left over from my shimmer quilt. (2) Feeling powerless in the face of impending doom after the election, I had to find some ways to assert my beliefs, and this quilt was to be one of them. I've long been concerned about the ever-increasing world population, about all the small, yet constant ways overpopulation is damaging and destroying the natural systems of the planet. So the title will be: Under the Quilts, Time Flies, and Population GROWS. My idea is to illustrate this concept using both color and beads. You'll see.
First though, a few words about making the modern block. At first I tried to make a pattern for the "flower/star" by tracing one of the triangles from the back side. I hand-stitched the required 16 pieces together FOUR different times, varying the seam allowances each time, trying to get it to lie down flat. Obviously, I did not correctly copy the original, because when I finally sewed it so it was nice and flat, it was also too small. Grrr.
A smart quilt friend (thanks Tori) suggested I trace a section from the right side of the block and add 1/4 inch seam allowances all around. Good idea, but there were small differences between the sections... which one to trace? Trying to answer that question, looking at the block, I finally saw how the pattern was derived! (Light bulb!!!)
It's two overlapping squares of the same size, one on point and one not. All it took was to measure the sides of the squares on the original block (which averaged 8.5 inches), cut them out of paper, fold the diagonals and sides, put a pin through the centers to join them, rotate the top one until the folds lined up, tape the two together, and draw along the fold lines. Voila! Now, all I had to do was cut out one of the half-points, add my quarter-inch seam allowances, and there was the perfect pattern for my new block. The rest went quite quickly, and below you can see the quilted result. (Note: I added quarter-inch seam allowances to each of the pattern pieces shown above to get the final cutting pattern.)
You might be wondering why I've layered and quilted these blocks. How will they be joined to form the quilt? The answer is they won't be joined! Instead, they will be bound as separate little quilts (each 11 inches square), and then appliqued to a separate "background quilt."
Here is how they look with the binding.
Thus, the quilt also becomes darker as the eye travels from top to bottom. Here is how it looks with the two blocks on the background quilt, the transitioning colors from light to dark, representing about 70 years in time passing (estimating the date of the fabrics in the vintage block at approximately 1946). This is an extremely tiny period of world history, but one in which world population sky-rocketed from 2.3 billion to 7.4 billion.
You can probably see the little heart beads, but if you click to enlarge the photo, you'll see them more clearly. The pair at the top represents a couple. They dive under the quilt, have some fun, and produce four lovely children (between the two blocks). These four pair up, dive under the quilt, resulting in 16 children. Under the quilts, time flies, and the population GROWS. That's m' story, and I'm sticking to it.
Now, here's a question for you loyal readers who have come so far with me on this thing. The quilt looks really pretty the way it is. But originally, I had planned to do more beading on it. I planned to bead several vines circling the outer border of the quilt (not the binding). Across the top of the quilt, the vines would be light green, with many green leaves, bright-colored flowers, and some critter beads/charms (bees, birds, bears, fish). As the vines trailed down the sides, they would become darker, until at the bottom they would be beaded with dark brown, black, and darkest greens, with no critters, and only a few dark flowers. The visual message (I hope) would be, "this is what happens when we overpopulate the world." What do you think... leave it like it is now or bead the borders?
Global Population Information
Think of it this way. Every single month increasing world population adds another Los Angeles AND another Chicago to the planet. That's 24 gigantic cities worth of people added EVERY year; more than 240 giant cities every 10 years. Imagine how many cities full of people will be added in your life time. Crunch the numbers and see what you think.Evidence of heavy population demand on resources is all around us. Global aquifers are being pumped 3.5 times faster than rainfall can naturally recharge them. Eventually they will run dry, perhaps as soon as 75 years. Topsoil is being lost 10-40 times faster than it is formed. Feeding all 7+ billion of us is increasingly difficult, impossible actually.
There is no technology solution to accommodate the increasing demand of uncontrolled global population growth. The only solution is voluntary one child per couple for a couple of generations, on a Global participation level. If all countries followed the lead of countries with the lowest birth rates (Taiwan, Spain, Portugal, South Korea, and Poland), we could reach a more sustainable Global population of 3 billion by 2100!
Please, talk about this with your child-bearing-aged kids, grand kids, students, etc. We teach environmentally sound practices in most schools, write books and make documentary films about issues like clean water, over-fishing, fracking, etc. But rarely does the topic center on overpopulation. Be proactive. Make it happen.
If you are willing to read (or listen to an audio book) to learn more about Global population, Count Down is an excellent read.
Here is a link to the previous bead embroidery pieces (and poems) I've made concerning population growth.Thank you for reading all the way to the end, and for anything you can do to help people understand what we need to do.
Subscribe to:
Comments (Atom)


