
Stitching my Bead Journal Project piece for July on neckties I had made for my Dad (here), gave me the idea to create a Memory Box I can use to safe-keep letters, photos and other remembrances I have of my parents.
The box, made from scratch using book board, fabric, thread and beads (no glue!), is 10" x 13" x 5" high, which should be large enough to hold most of the dearest things I have.
I'm going to show pictures and write about how I made it.
But first I just want to say that it's not so much a tribute to my parents (although that's part of it). More significantly, this box, with thousands of hand stitches and hundreds of hours in its making, represents a connection with them. In my mind and heart, each stitch binds us together - birth, memories, history, love, good-bad-ugly-quirky-beautiful, death - all that we were and are to each other symbolized by all the stitches in this box. I put me in the box too, in the form of quilted rabbits and hearts all around the inside. You'll see.
Many Ways to Make a Box ~ Here's One of Them
To make the box... I used a rather improvisational or just do it approach, since I've never made one before and didn't have a clear idea about how to do it. One step at a time... do what I know and figure out the rest later. That's one of my guiding lights. The other is: it doesn't have to be perfect.First I decided on the finished size. Using a box-cutter, I cut the pieces for the box and lid from heavy, dense, book board (Davey board). The lid pieces are about 1/8" larger all around than the bottom pieces.
Then I chose some fabrics that I loved and picked one of them to cover the inside bottom of the box. I happened to be going to an all-day quilting sewcial at our local Sr. Center and needed something to do. So I decided to quilt the bottom of the box. I sandwiched thin cotton quilt batting between the bottom fabric and some muslin and then stitched using embroidery floss.
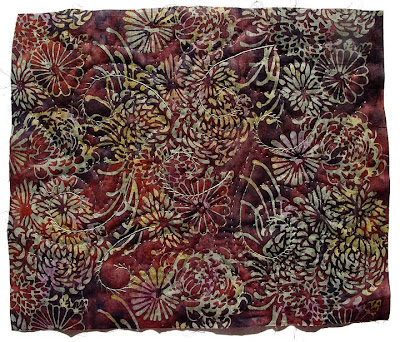
Here's how it looks. It's improvisational quilting... I just made a spiral shape in the center and worked my way out using a running (quilting) stitch and some embroidery stitches.
Some of the quilters wondered why I was bothering to quilt the inside-bottom of the box (where it won't show) and with a thread color that hardly shows. I didn't really know why at the time... now I think it's part of that stitching Mom, Dad and me together thing I mentioned above. Seeing it isn't as important as doing it.

This is a detail.
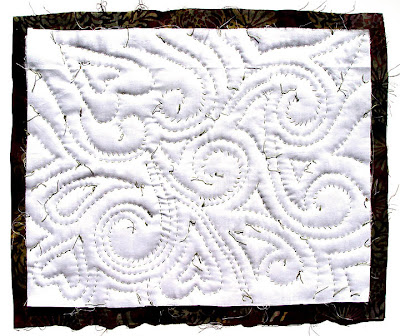
This is how it looks on the back side.
Quilting the bottom was fun! I enjoyed it so much that I decided to quilt the inside of the sides too!
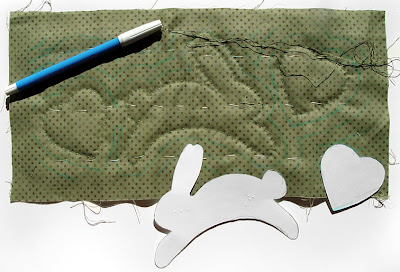
I cut a template of a rabbit (my totem animal) and a heart (my favorite symbol) from stiff paper and drew around them on the fabric with a water-erase marking pen. This is the start of one of the sides.

Above is one of the finished sides. Again, my quilting was fairly improvisational and I added some embroidery stitches as well. Each side is different.

This shows the back of the same side. To add a little more dimension to the rabbits and hearts (so they would show more), I cut the shapes out of stiffened felt and whip-stitched them to the back as you can see above.

Stiffened felt (Easy Felt), such as I used to pad my quilting, is also great for beading - inexpensive, stiff and easy to stitch through. I get it at Michaels.
Now came a part that I didn't photograph... sorry.
I made a tight-fitting sleeve for the bottom of the box and each of the four sides. To do this, I cut the outside fabric, laid the cut out book board on the wrong side and drew around the book board. Then I put the quilted inside fabric and the outside fabric right sides together and sewed just outside the drawn line on three sides. After turning it so the seams were inside, like a pillow case, I slipped the book board into the sleeve.
The fit needed to be snug. One sleeve was too snug and I had to rip one of the seams. Another was a tad too loose and I had to re-stitch inside the previous stitching on one seam. It was a learning process... I got better at it by the time I did the lid. These seams I stitched by machine.
Next, I turned under the remaining edges and whip-stitched the sleeves closed by hand, completely covering each of the box pieces.

To attach the sides to the box bottom, I decided to use the picot edge stitch. Above is a drawing showing how to do this stitch. I first attached one side to the bottom. With each stitch I tried to catch 4 tiny bits of fabric - one from the inside side, one from the outside side, one from the inside bottom and one from the outside bottom. Although this took quite a bit of time, I think it made a strong join.
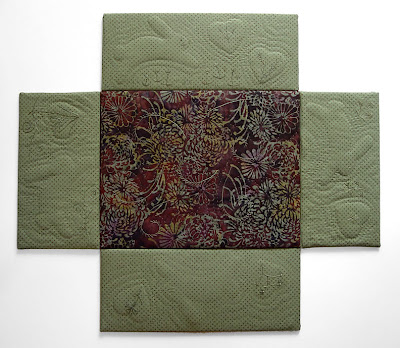
Here's how it looks with the four sides attached to the bottom. This is the inside.
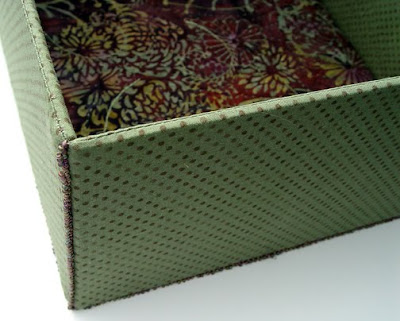
Then using the same method, I joined the side pieces together. Above is a detail showing one corner of the completed box. If you click to enlarge, you can see the picot edge stitch on the sides and bottom. I am satisfied with how this looks and think it will be as strong as any other method. I like it that I didn't have to use any glue.
Making a Lid for the Box
Now the lid! Oh boy, I was terrified that my calculations about the size of the lid would be off and I wouldn't know it until I finished the whole thing... Hours and hours of work! It was only because I wanted to finish the box in time to enter it in our County Fair that kept me going.
Before making the fabric sleeves for the lid pieces, I had to figure out how to attach my two bead journal pages to the top of the lid. First I needed to finish off the two pages. I decided they needed fabric borders made with the same fabric as the sides of the box.
So I cut narrow strips of fabric and hand-stitched them to the sides of my beading. The pictures below show the right and wrong side of two strips sewn to the butterfly piece. This is like log cabin quilting.


Next, I thought it would be good to have my beaded pieces slightly raised on the surface of the box lid. So I turned again to Easy Felt, cutting out a piece just the size of the beaded area (4" x 6").

Then I folded the fabric border to the back side, so that just 1/2" showed on the front. I tacked it down with running stitches to the Easy Felt on the back side. I finished each BJP piece with picot edge stitch around the outside of the fabric border.

Here's Mom and Me ready to attach to the lid.
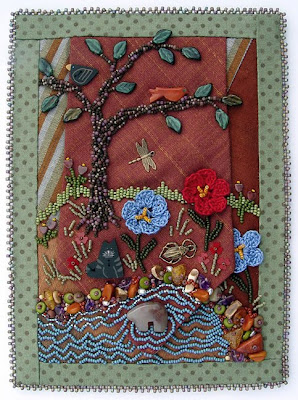
Here's Dad and Me ready to attach to the lid.
Next I stitched the finished BJP pieces to the cut out lid fabric (brown batik), using two lines of tiny running stitches - one at the outer edge and one at the inner edge of the fabric borders.

Before I made the fabric sleeve for the lid top, I decided I needed something to integrate the BJP pieces with the lid. A little quilting might do the trick. So, I made a sandwich of fabric, batting and muslin. I began quilting straight lines of stitches about 1/4" out from the BJP pieces. Nope. It looked too square, too formal. So rip, rip... out came the straight lines and back to improvisational quilting... Ha! Way better... a little spiral, some curved lines, more spirals... It worked!
The picture below shows the quilting, but even if you click to enlarge, it's a bit hard to see since I quilted with the same color thread as the fabric.

Then, finally, I made the lid the same way as the bottom of the box - machine sewn sleeves, whip-stitched closed, sewn together with picot edge stitch.
At last, came the test. Will the lid fit over the box? Will it be too loose? Ah, my lucky day! It fits perfectly. Here is a top view of the finished lid.

Important TIP!!!
My bead embroidery is very textural and both of these BJP pieces have parts that open to reveal books of pictures inside (see pictures at end of post). Think about stitching around these pieces to sew them to the lid fabric and about stitching the lid pieces together. Can you imagine how many times one could get the stitching thread tangled in the beads, around the butterfly wing or the flap of the necktie? It's a nightmare to contemplate.
So here's the tip! I stitched the butterfly wing closed and the antennae down. And I covered the entire necktie piece with fine netting, basted to the surface, as you can see below.

It really helped! The thread got caught a few times around the crystals in the butterfly wing. (Guess I could have covered that piece with netting too.) Yet all-in-all, I had very little hassle. When finished, I removed the stitches holding the wing, antennae and netting.... good as new!
Ribbons at the County Fair
I finished the box just in the nick of time to get it entered in our County Fair last week. I wasn't surprised that it won a blue ribbon (1st place), but blown away that it took Best of Show in the Needle Arts Division!!! Here it is with the ribbons...

Remembrances
Now it's home again and I get to tie olive-green ribbons around packets of letters and pictures, and find my mother's wedding gloves and other remembrances of my parents to tuck into the box for safe-keeping. I also plan to use more of the green polka-dot fabric to make a fabric case to protect the box.
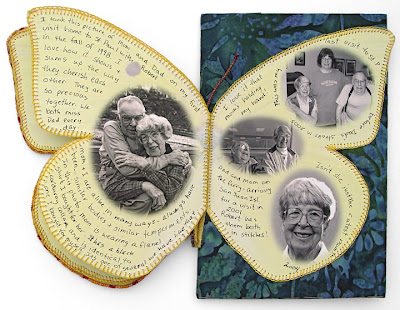
In case you didn't see these pictures in previous posts, here are a couple pictures of the butterfly piece, my November BJP, about my Mom. She's 92 years old and still doing fairly well in assisted living. She lives in St. Paul, MN. I plan to spend a week with her in October.


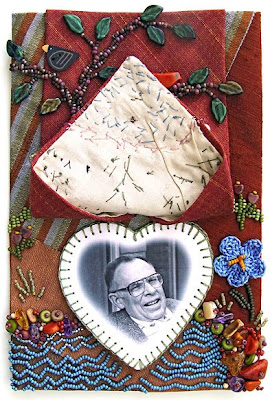
And below are pictures of the necktie piece, my July BJP, about my Dad. He died three years ago on July 13th. Although I miss him every day, more than I can say, the beading and stitching help me to feel connected with him in a way that is special and comforting.

Using Two of My BJP Pieces
Making this memory box required that I take two of my BJP pieces for the year out of sequence. That means I have 10 remaining pieces and can not show them all together in one group as I did last year. I feel a little separation anxiety about this.... But the memory box is important to me, so it's OK.
Now that my BJP set is already in two parts, I may continue with that thought and put the four pieces that have to do with spirituality together (make something with them... haven't decided what yet) and the three pieces that have to do with my relationship with my husband together. That leaves three fairly unrelated pieces... Maybe I'll frame them individually... or??? We have four months between now and when the BJP begins again. Lots of time to see what happens with my 10 remaining pieces!






Wow Robin, what a wonderful tribute to your parents, and a generous gift to your readers. Thank you so much for writing this.
ReplyDeleteRobin, it is beautifull! What a good way to store and cherish dear memories. You are an inspiration.
ReplyDeleteFAN-TAS-TIC!!! Maybe you should have a patent registered for your box construction. So many ideas, such extraordinary craftsmanship! And what a treasure in the end! I better stop commenting, or I will run out of exclamation marks.
ReplyDeleteSabine
Fabulous idea, Robin! And you documented every step so well, too.
ReplyDeleteI am willing to bet you find some other innovative ways to use your remaining BJP pieces, too.
Kathy V in NM
A wonderful and creative idea, this treasure box filled with memories.
ReplyDeleteThank you for sharing!
Such a great idea. It's pretty and lovely. The idea behind it is meaningfull. Thanks for sharing. This would also made a great aniversary gift.
ReplyDeleteRobin - Your box is wonderful - a "treasure chest" of the best kind.
ReplyDeleteGreat tip about using the netting.
This is such a beautiful labor of love. It is wonderful how much meaning you gave the box by including the pieces made in honor of your parents. Congratulations on your award--it was well deserved!
ReplyDeleteThis is beautiful, Robin. My problem with a box like this is I put it "somewhere" to store it and never look at it again. A box like this though, would have to take center stage somewhere, hey? Gorgeous. Love your pics showing the steps. you are a master! Congrats on the ribbons!
ReplyDeleteHow beautiful and touching, Robin. And, thank you for sharing you're techniques. It's interesting that those of us who love needle and thread are loath to use glue!
ReplyDeleteCongratulations on the ribbons, too!
Maryanne
Words fail to describe how wonderful this is, congratulations!
ReplyDeleteWhat a wonderful idea to remember your parents. Congratulations on the ribbons. I'm not surprised.
ReplyDeleteI am so moved by the emotional connection you have to your work...you've become a a major mentor and shining light to me in the creative part of my life...thank you so much for your generous sharing of thoughts, techniques and inspiration.
ReplyDeleteWhat an amazing tribute to your parents....a one of a kind heirloom.
ReplyDeleteThose of us who were lucky enough to see it in person were treated to a spectacle of massive proportions. It is a true work of art. The photos are great but really don't do it justice! It is AWESOME! The judge at the fair did not even hesitate when asked which item was Best in Show for Textiles (non-quilt). Robin won that one hands down!
ReplyDeleteThank you Robin for writing this up and sharing it with this group.
I could never in a million years make anything this beautiful but I loved reading about each step in the process. You have created a family heirloom and a great tribute to your parents. You definitely deserved both winning ribbons!!
ReplyDeleteWhat an utterly lovely idea ! And the making of it is delightful - I am especially fond of the rabbit and heart quilting.
ReplyDeleteWhat a beautiful box! I am not surprised it won Best of Show!
ReplyDeleteOMG...Robin that is so lovely & it gives me flesh pimples just looking at all the love you used in making this box. dot
ReplyDeleteA beautiful box. I'm grateful for the assembly ideas. I love the beaded joining I learned from you but wouldn't have thought to use it to make a box! Kudos.
ReplyDeleteTo All ~ Thanks so much for your support and praise. I appreciate that you took to time to read through such a long post!
ReplyDeleteTo Krispi ~ You make me blush!
To Helene ~ I love the rabbits too!
To Janet ~ You could! You're one of THE most creative sisters I know!
To Pam ~ I don't have anywhere to put it out and would be afraid of dust/soot (we heat with wood stove) accumulation. The good news is that making it was the important part... now it's just a storage box.
To BeadBabe ~ Well, I (and other BJPers) may have gotten you going with an emotional connection to your beading, but you took off quite beautifully on your new path! Thanks for the nod.
To KV ~ We'll see...
Robin, every time you post, you blow me away. Thank you for your inspiration and for sharing your knowledge with the rest of us wanna-be artists. :)
ReplyDeleteI"m so impressed with the whole concept of doing a memory box. It isn't something I think I'd ever do! (You'll notice I didn't say never!) I love the way you did it and your reasons and instructions. I'm pretty impressed. Now, you can see what I'm doing as the vertigo decreases over at my blog.
ReplyDeleteRobin, I skipped over nearly all of your instructions on how to build the box (for the time being) because the most important piece of this post for me was near the top: "It doesn't have to be perfect." I need to stitch that and hang it where I can't miss it! Thank you.
ReplyDeleteBest In Show!! And BEST on the web in my opinion. This post just blew me away -- first of all, i think it's a beautiful way to connect to your parents and to house special mementos. Wow.
ReplyDeleteSecondly, I like thinking that the best in show is for the daughter's love and connection to her parents as much as it is for the needlework.
And lastly, I will be forever grateful for the tutorial because I can just see this coming in handy one day...
Bravo is right! xo susan
Such a wonderful project! Thank you so much for sharing with us. I'm happy that you won ribbons at the fair. Congratulations and I look forward to seeing you in October!
ReplyDeleteSusan Feldkamp
Night Beader
Just to let you know that I have listed you on my site for "one
ReplyDeletelovely blog" award.
Rag Rescue blog. http://ragrescue.blogspot.com
Hope you get some visitors from it. Really enjoy your blog.
Sorry couldn't find your email.
Sandie
I absolute adore your artwork. It's very detailed, and admirably tendered. I look forward to seeing MORE of your pieces!
ReplyDeleteThese kind of projects with connections and secrets are what I adore... I am so glad I found you.. Actually it was Rosy your chicken who guided me..... BTW I am now officially registered as a student in good standing for the Bellevue bead embroidery class..
ReplyDeleteGerry
http://olderrose.blogspot.com
Spokane, WA
nice craft
ReplyDeleteRobin, I love your box. I have been wanting to make a box and your post has given me the inspiration I need to get it started.
ReplyDeleteDawn Patterson
indawnsstudio.blogspot.com
What a special project to remember your parents! It's lovely and so appropriate for your theme, I'd hate to see you pack it away in a bag, but understand the need to keep it clean. If it was me, I would want it close and handy to rifle through. BTW, I thought that I had already commented on this, but I guess it didn't take. Congrats on the ribbons!
ReplyDeleteWords completely fail me. "Wow" or anything like it aren't enough!
ReplyDeleteHi Robin! I'm so excited to have found you! Thanks for visiting my blog. Your work is beautiful and stunning.Congratulations on winning your ribbons.This post is amazing and I look forward to coming back and catching up on all previous ones.Wow.
ReplyDeleteWow, this is so fabulous! Congratulations, what a gorgeous piece! I found your blog via a link from CraftGossip. I'd love to link to this post if you didn't mind.
ReplyDeleteBeautiful. And easy instructions, too.
ReplyDeleteI love your box and am so glad you won both ribbons. When a piece is made for the emotions it's a real added bit to win the ribbons as a sort of agreement to the piece. I love your tip of sewing down the fabric over the piece to keep from snagging your thread so much. I just have to tuck that one away to try for myself.
ReplyDeleteI know that I am one of the lucky ones to have seen your Memory Box in person (in the making!), Robin, and I agree with Krispi that the photos don't do it justice. It is a POWERFUL and heart-touching and sweet and beautifully crafted piece, all at the same time.
ReplyDeleteI could not have said it better than Beadbabe when she wrote, "I am so moved by the emotional connection you have to your work...you've become a major mentor and shining light to me in the creative part of my life...thank you so much for your generous sharing of thoughts, techniques and inspiration."
It is one thing to be an artist and it is entirely another thing to be able to teach those skills & share openly with others - a true gift. You do all of these, Robin. I am so enriched by your deeply expressive and enormously warm & open heart. For this I am extremely grateful. And I can't wait to see what you come up with next!!
Robin you did a wonderful job on the box and thanks for the tutorial you have given us to use. Very generous of you. Your project was well worth the Best in Show ribbon and the First Place ribbon.
ReplyDeleteYou encourage me and so many people who visit your blog. Always wonderful.
Thanks again
FredaB
Thanks for visiting my blog...yours is gorgeous and really intensively useful, nice work!
ReplyDeletelucky you, living where you do, and yes, Cat Bordhi is "some kind of sock queen" Actually, I'm not sure she's from this planet, she has ways of thinking about stuff that is mind bending for the rest of us. She has advanced knitting into several centuries from now as the result. Wow. what a mind. and SO funny too
Wow, congrats on those ribbons!! Thanks for sharing this project, the step by step photos are terrific.
ReplyDeleteI also took a look at your 'Tips' page and have to say a huge thank you! Plenty of excellent practical info on beading, but also lots of food for thought regarding creating and art in general. Many thanks :)
What a wonderful way to store your memories! I second EVERYTHING said above - thank you fro sharing it with us.
ReplyDeleteHugs,
Jasmine in Oz
This is gorgeous! I'm already planning on how to make a box myself. I don't have a emotion to go for yet, but I'll find one.
ReplyDelete~Anne
Wanted you to know I posted a link to this tutorial today.
ReplyDeleteNancy Ward
PaperFriendly
http://www.nancywardcrafts.com