Thursday, June 18, 2009

A Few Thoughts about Visual Journaling

My head is spinning with thoughts inspired by Susan's post:

bead embroidery, BJP by Susan E
Susan E. of Plays with Needles posted about how tea is the Elixir of Life and about how the ritual of drinking tea figured into her mother's death. Tea is the subject of her Bead Journal Project for April, a detail of which is pictured above.

My head is spinning with thoughts inspired by Pam's post:

bead embroidery, BJP by Pam T.
Pam T. of Beads and Other Things posted about Anger and Fear, about her process with cancer and her Bead Journal Project for June, part of which is shown above.

My head is spinning with thoughts inspired by Celticat's post:

bead embroidery, BJP by Celticat
Mary (Celticat) of Contemporary Bead Art posted about Spanish Madonna and about how her beading takes on its own life, different from her sketches. Above is her Bead Journal Project piece for April.

And my head is spinning with thoughts inspired by these books:
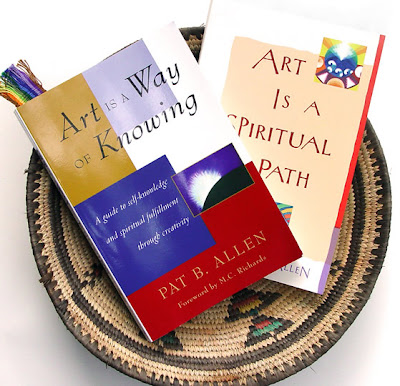
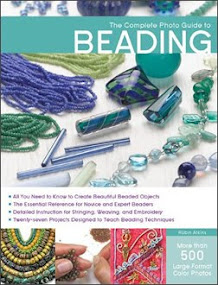
books by Pat B. Allen
Pat B. Allen is an artist who writes about the artistic process, how we can know and express our authentic self and how we can find a spiritual path. Reading her book is changing my world. While this isn't a "book review" post, I am more than smitten with all that she says!

Here are my top 5 inspirational books (not in order, because it always depends on what I need at any given time). These are the books I always grab when I need a creativity boost or tools for banishing the internal critic:
OK, so what I want to write about today is visual journaling...

Let's begin with the root of this phrase... What is journaling? In my youth, it meant keeping a secret diary. Although the idea of writing my thoughts and secrets in a locked book was very appealing to me, I rarely wrote more than a few pages in any of my diaries.

In my middle years, several of my friends became enthralled with keeping journals, recording their thoughts, on paper. When I would complain of some life event or be struggling with a decision, they'd say, "Try journaling about it." I tried sometimes, yet it never seemed to work for me. Why? Maybe because...
  • I was embarrassed by my thoughts.
  • It seemed like too much work.
  • It seemed self-indulgent.
  • I thought I had to write stuff that was "worthwhile" or "important."
  • Writing from my brain (analytically, as I did then) simply repeated my thoughts (boring) and didn't get to the heart and soul of anything.
Who knows... it just didn't appeal to me. Not until Julia Cameron gave us The Artist's Way and permission to write and scribble and draw and cross out and never again read our words... Never, ever again read our crazy thoughts, our fears, our angers, our hopes, our prayers, our forgiveness... And gave us permission to let our hearts speak out, page after page, day after day. Then! That's when journaling seeped into my life and changed it forever, healing festering wounds and opening me to my own creative way.

No, I don't journal every day. I did for a while, when the Artist's Way was new to me... But still, I know when I need to journal. It's when I need to say something from within... something, maybe, that my intellect can not grasp or is not aware of... when I need to hear and acknowledge my own inner voice. That's when I write!

That's also when I bead! Much of my bead embroidery is visual journaling. It happens most easily and deeply when I work improvisationally... without a plan or with only the barest of thoughts tucked in the back of my mind.

So now, with the Bead Journal Project in its second year and 20 journal pieces behind me, I'm thinking today about what visual journaling is and about how we do it.

I believe there are many equally valid ways to use art and beads to journal visually.

For example, in Pam's June BJP, she boldly puts everything on the table... UGLY, FEAR, ANGER... it's all there, obvious and visual. She shakes it out of her pores and her guts and slaps it in our faces, acknowledging and honoring the part of her that normally would remain hidden. Is this not a gift to herself? To show the demon is to tame it!

Less in your face is the way Susan deals with the flow of her life, especially in and around her Mother's death. We don't know about that when we look at her piece. We know only of the peace she finds as she sails along in her cup of tea and plays with her needles. But Susan knows about the death and the missing and the sadness. She allows her heart to be touched by it as she beads about the contentment she finds in the rituals of drinking tea.

Even less revealing is the way Celticat beads and sketches. Her first act of visual journaling is her sketch, using pencils, crayons &/or water colors to record an immediate, impressionistic, gut-level sense of a place, person or idea. Not a photographic rendering of her subjects, Celticat instead allows her emotional slant and her feelings to blossom all over her sketches. This process continues in her beaded versions of the sketches. We don't get an obvious message from her work, as we do from Pam's. But we do have a sense that if we knew her visual language, we'd be reading an inner book when we look at her work.

What about you? Here are some questions for thought....
  • Did you keep a diary when you were young? How often did you write in it? What was it like? Is it important in any way to your artistic process now?
  • Do you keep a written journal? How often do you write in it? What is it like?
  • Do you journal visually? What is your process? What materials do you use?
  • Just curious... Have you read Art Is a Way of Knowing? Did you fill the margins and underline many passages like me?
my marks and notes in Art Is a Way of Knowing by Pat Allen
If you write a post on this subject, please let me know... I'd love to see a dialog about visual journaling!

Sunday, June 14, 2009

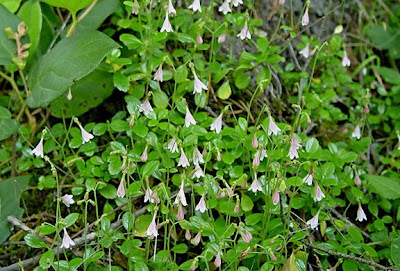
Wildflowers Make Me Happy ~ Inspirations for Fairy Dolls!

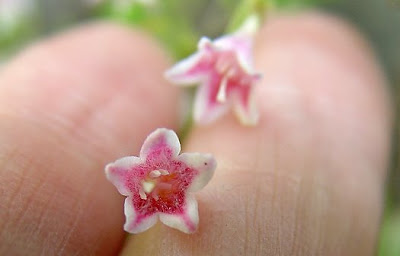
Twinflowers, photo by Robin Atkins
We're nearly at the end of our wildflower season, especially since we haven't had rain for a month. To my great pleasure on our walk yesterday, we discovered that the wee little Twinflowers (Linnaea) are back!!!

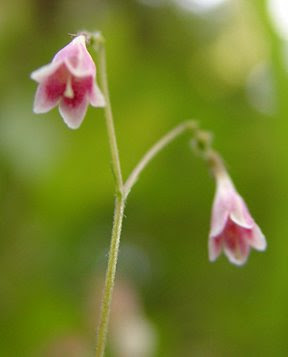
A woodland ground-cover, their slender, upright stalks bear two bell-shaped flowers each... white, tinged with pink and delicately fragrant. You can see how tiny they are below... (my fingers are NOT bulbous)!

Twinflowers, photo by Robin Atkins
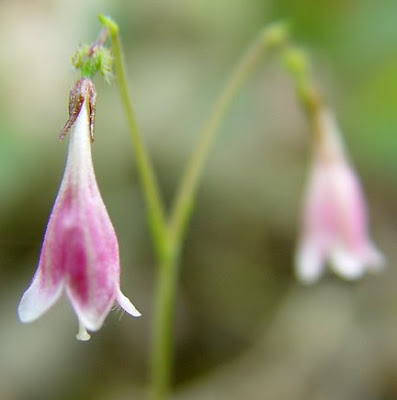
Here are two more pictures...

Twinflowers, photo by Robin Atkins
I guess it's possible to grow Twinflowers, especially in a shaded rock garden. I may have to order some seeds and try to grow them on our property, because it's like being in the presence of fairies to see them.

In the last picture I see inspiration for a doll... The body would be in the shape of the flower. It would definitely be like a fairy doll and very sweet!

Tuesday, June 09, 2009

Bead Journal Project ~ April Finished!

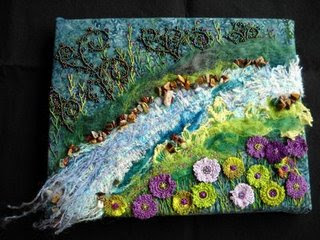
bead embroidery, BJP by Robin Atkins, April, detail
April, the month of new beginnings, is my favorite month of the year. More than the new year in January, it offers a place where I can turn around, take baby steps or giant leaps in a new direction, full of elation and hope! Nothing symbolizes this more than the force of a waterfall and the vitality of skunk cabbage, the first blooming plant of spring! So here you have it, my April BJP (click on picture to enlarge and see details)...

bead embroidery, BJP by Robin Atkins, April
And here's the poem I wrote to go with it.

April

A small creek,
dry in summer and fall,
becomes a miracle
of burbling water
tumbling down
over moss-covered rocks
in April,
the month
foretelling birth,
fresh season
of budding vitality.
Here skunk cabbage
hoists its unfolding,
primordial leaves
and gaudy yellow spathes
through chilly,
muddy waters
of a temporary pond
made wide
by the rushing flow
of snow melt
and abundant rain.
Each day
on our daily walk,
we pause here,
grateful to receive
a nurturing breath
of new beginnings.


Solidly beaded (mostly with size 15s) and textural, this piece took quite a few hours. (Please don't ask... I don't keep track.) The proof is that I'm only just starting to work on May, when I should be stitching June's piece. Oh well, it happens and I shall do my best to catch up before the end of June.

You might want to take a look at April's piece in progress and the photo of the actual waterfall and skunk cabbages that inspired it here (starts about a third of the way down).

I don't know that I'll ever work from a photo again. While I like my piece, especially what it represents, I actually prefer the similar-theme April BJP piece done by Lise Pederson (below)...

bead embroidery, BJP by Lise Pederson, April
I love the spontenaity and joy evident in Lise's work, which is not as strong in mine.... It's OK, I learned something doing my April piece from a photo... been there, done that, don't have to do it again!

If you have an interest in reading more about skunk cabbage, I found a wonderful essay (and drawings) about the Eastern Skunk Cabbage here ... it's quite similar to our western variety!

Saturday, June 06, 2009

Attitude of Gratitude and Crazy Quilt

I've been nominated for the Attitude of Gratitude award by Allie (Allison Aller)!

logo gratefulness award
I really love what Allie wrote about the importance of gratitude in her life... If you didn't already read it, check it out here. Ever since then I've been thinking about the concept ~ Attitude of Gratitude. If you google it, you'll find many thought-provoking and inspirational writings.

This one gives you five tools for cultivating appreciation or gratitude. The suggestions make sense and seem worth the few minutes they would take to do each day. You can read a whole book on this subject here or buy it on Amazon here. Previous to searching google, I had no idea this was a popular concept... It's even discussed in Wikipedia here!

My earliest experiences with Attitude of Gratitude go back about 15 years when I first worked with The Artist's Way, A Spiritual Path to Creativity by Julia Cameron. Writing daily morning pages, I fell into the practice of writing a list of 10 Things for which I'm Grateful. I still do it, not on a daily basis any more, but when I'm feeling down or angry, I find it really helps regain a sense of balance, optimism and warmth.

To mark this day and this post, I decided to write a 10 Things list right now ~ I am grateful for:
  1. Allie, and artists/kind souls like her, who share their love, inspiration and talents so generously. The pictures you will see further down in this post are details from a crazy quilt piece I started in Allie's class.
  2. Robert's sense of humor, eternal optimism and love
  3. That my Mom is still alive and recognizing us
  4. My family and our closeness
  5. Blogging and all the wonderful, creative bloggers I meet
  6. All birds and all flowers
  7. Walking every day with my neighbor
  8. Being able to hear the birds sing with my new hearing aids
  9. Spending time stitching with my dear quilting friends Christy, Lunnette and Trish
  10. Spending time stitching (starting June 20!) with my brother, Thom

Once I get started on a list, it's hard to stop at 10... but I'll spare you any more of my thoughts about gratitude except to pass along this award to two people for whom I am VERY grateful in my life. It's not so much their blogs, although their attitude of gratitude is evident in their blogs, but more just who they are that makes me so grateful to know them.

The first award goes to my sister-in-law, Julie Cook... my middle brother, Jon's wife and the primary caregiver for my Mom. Julie is a two-year member of the Bead Journal Project and one who is relatively new to blogging. Her blog, Jules Beads, is always uplifting to read. Even more, she's great about leaving positive comments on all the blogs she reads. Julie, you deserve this award! Thank you!

The second award goes to BJP member (2 years) and angel (helper), Pam Troug, who has shown me that even in the worst of times an attitude of gratitude and a spunky sense of humor can prevail. Pam's blog, Of Beads and Other Things, is an amazing inspiration to me and one of the best examples I've seen of art as a way of healing. Pam, you deserve this award! Thank you!

Now... my crazy quilt! Here it is... completed (click to enlarge)!

crazy quilt by Robin Atkins, Fossies
The title is Fossies. From my earliest memories to the present, I love flowers... almost all flowers and especially wild flowers. Family stories include several about me and my beloved fossies, as I called them. If ever I slipped away, out of sight, they had only to look for the nearest flowers to find me. Once I picked every geranium blossom by the side of our house, filling all my pockets with them first and then taking the remainder as a bouquet to my grandmother.

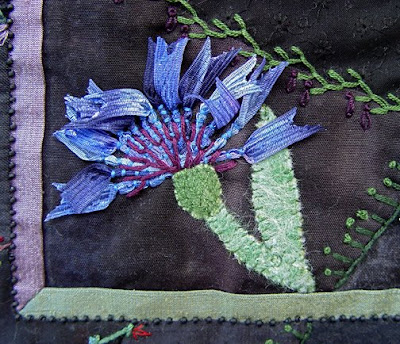
crazy quilt by Robin Atkins, detail
Making this was SOOOOOOOOOOOO much FUN!!! It's my first, but probably not my last crazy quilt. I started it in Allison Aller's workshop for the Needle Arts Guild in Baltimore. Yup, I went all the way to the east coast to take the class... That's because I had taught for this group previously and wanted to see them all again. Allie is a wonderful teacher... If you're a member of a needle arts guild or quilting guild, I recommend her totally! She first taught a 1/2-day class in curved piecing (notice the seams are curved, not straight as they are more typically in crazy quilting). Then she taught a 2-day class in making the flowers in the center of the quilt. OMG, that was so much fun!

crazy quilt by Robin Atkins, detail
We used angelina, silk flowers, silk ribbon, rick-rack, felted velvet and various flosses/fibers/fabrics to make the flowers, leaves and stems. The seam embellishments were not covered as part of the class. Fortunately I had a wonderful book, Elegant Stitches by Judith Montano as a guide. They were great fun to learn and practice.

crazy quilt by Robin Atkins, detail
While the main idea was to work with fibers, thread embroidery and quilting techniques, I still managed to work a few beads into the piece. The hand quilting around the inside edge of the border is a tiny running stitch with a size 15 seed bead on each stitch. I also used beads for some of the flower centers.

crazy quilt by Robin Atkins, detail
With gratitude for stitching and for my hands that are still able to stitch for hours, I wish you all a lovely good evening! Robin

PS Have to include this too:

Rules of Accepting and Sharing the Attitude of Gratitude Award

  1. Put the logo on your blog or post
  2. Nominate a few bloggers that show an attitude of gratitude
  3. Link to your nominees within your post
  4. Comment on their blogs to let them know they've received this award
  5. Share the love and link to this post and the person who nominated you for the award
  6. Tell us how you've come to have an attitude of gratitude

Thursday, June 04, 2009

Christy's BJP (first year) + Finishing Tutorial

bead embroidery, bead journal project, Feb 08, Christy HFebruary ~ Expanding My Constricted Heart


bead embroidery, bead journal project, March 08, Christy HMarch ~ For Little Christy (orange & yellow, colors of childhood)


bead embroidery, bead journal project, April 08, Christy HApril ~ Serenity


bead embroidery, bead journal project, May 08, Christy HMay ~ Blooming


Christy H is a dear friend here on the island where I live. We share passions for beading and quilting. She's been beading ever since she took my class a couple of years ago and is a current member of the Bead Journal Project (BJP). She also participated in the first BJP.

You may recall seeing her first eight BJP pieces. They're posted on the BJP website here... Finally I've gotten around to photgraphing Christy's remaining four pieces (above).

We thought you might also like to see what she did with her 12 finished pieces, which so vibrantly chronicle her life from June, 2007 to May, 2008. She wanted to display them, framed together. Since I have some experience with framing bead embroidery pieces, she asked me to help her.

We decided to mount them on a piece of fabric that would look good as a background for all of the pieces. Being a quilter, she has quite a fabric stash. After auditioning several fabrics, we chose a dark, muted red, striped fabric. We then bought a large piece of archival, 3/16" foam core board (get it here or at your local frame shop). Laying the fabric over the board, we arranged the pieces on top until the spacing looked pleasing. Then we measured the size we'd need and cut the board.

bead embroidery, bead journal project, 2008, Christy H
This is how her pieces look framed! Below is a tutorial to follow for sucessful, no-glue mounting...

A. In a similar manner to stretching a canvas for painting, stretch the fabric around the board and pin it in place:
  1. Cut 3/16" acid-free foam core board to size, being sure to include an adequate margin for overlap of the frame.
  2. Cut the fabric 3 inches larger than the board on all four sides.
  3. Turn under a 1/4 inch hem on the fabric and machine stitch using zig-zag stitch.
  4. Center the foam core board on the wrong side of the fabric.
  5. Starting in the center of the longer side, stretch the fabric around the board and pin in place.
  6. Work your way to the corners on one end, stretching and pinning.
  7. Start again at the center point and work your way to the other end of the board.
  8. Follow steps 5-6 to stretch the fabric around the shorter side of the board.
  9. Now the fabric should be stretched and pinned all around the board.

B. Lace the fabric onto the board:

  1. Use a strong, nylon thread, such as Nymo D. Pre-stretch your thread.
  2. Starting at the center of the longer side, sew from side to side, zig-zagging your way to the corner. (See drawing below.)
  3. Start again at the center of the longer side, and lace in the opposite direction to the other end of the board.
  4. Lace the shorter side in the same way.
  5. Be sure to pull the thread really tight with each stitch. Adjust the pins if necessary. The laced thread should be quite taught, so that you can hear it "snap" when you lift it slightly and let it go.
drawing by Robin Atkins showing how to lace fabric onto foamboard

C. Sew your pieces to the board:

  1. For this mounting method, each piece must have a finished edge. Christy turned under the fabric and finished the edges with a picot edge stitch. (See picture in this post showing back side of finished piece.)
  2. Arrange the pieces on the fabric-covered board.
  3. Pin the pieces in place using a pin in each corner.
  4. Attach the centermost pieces first and work your way to the edges, adjusting placement if necessary.
  5. Select the centermost piece and push the corner pins all the way through the foam core board so that you can see them on the back side.
  6. Mark these four points on the back side of the board. Also mark the approximate center of these four points.
  7. Use a strong, nylon or synthetic thread, such as Nymo D, in a color that blends with the piece you are attaching. Make a large knot at the end of the doubled thread.
  8. Sew through the board from the back side at the marked center point to the surface of the piece, adjusting as necessary so that your needle pierces a place between two beads.
  9. Stitch betwen beads for a short distance and back down through the board to the back side. This is called tacking your piece to the board.
  10. Remove one of the corner pins and tack it in place in the same way as steps 8 & 9 above.
  11. Tack the other three corners of the piece.
  12. Is this enough tacking to hold your piece? How large is it? How heavy? Maybe you need to tack it in more places. Christy's pieces are about 4 inches square. She tacked each of them in about 10 places.
  13. Continue to tack each of the pieces in place the same way.
bead embroidery mounted on fabric-covered foamboard, back
bead embroidery mounted on fabric-covered foamboard, back, detail

D. Framing:

  1. Take your piece to a professional framer and select an appropriate frame.
  2. Use risers in the frame to insure that the glass does not touch textural elements on your beadwork.
  3. Hint: Be sure to cut your foam core board large enough to allow for the frame to overlap the board. The amount will depend on the frame you choose. Most frames will overlap the board by at least 1/2 inch.

This is an excellent way to frame a single piece as well. Because you don't use any glue, you will always have the option to take it apart and do something else with your bead embroidery!

Wednesday, June 03, 2009

Blogiversary Giveaway Winners!

Crazy quilt, detail, by Robin Atkins
Time is whizzing by all too quickly... exactly three weeks ago today, I announced a giveaway in celebration of my 3-year Blogiversary! Ta-dah, drum-roll.... and the winners are...

Carol of Beads and Birds (#13)
Bobbi of Hooray for Needlework (#36)
Vicki of Vicki's Blog (#106)

In case you're curious... I used this random number picker to select the winners from the 119 comments on the giveaway post. Let it be known, that the number of comments blew me away and so did the many kind and supportive messages. It's almost more than I can take, as it feels like such a responsibility to keep it going and improving...

Maybe that's why I've been "hiding out" for the past three weeks. Or maybe, I just needed time to stitch without the distraction of blogging and emailing. Either way, oh joy, a lot of stitching got done!

In the next few days I'll be posting about it.... and, in the meantime, the two pictures in this post will give you some idea of what's around the corner...

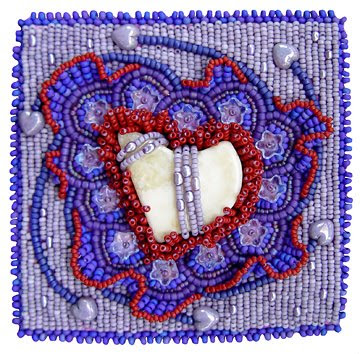
Bead Journal Project, detail, Robin Atkins
Thanks, everyone, for helping me to celebrate three years of blogging with such a delightful abundance of support!