Friday, November 26, 2010

Beadlust as a Book!!!!!

What if your blog suddenly went away,
disappeared into cyberspace
leaving not a trace?

Think about it...
what kind of loss would that be for you?


I don't know how often it happens. But I do know it happened to Allison Aller (Allie's in Stitches) a couple of years ago, all of her pictures, all her words, all her wonderful blog tutorials gone forever. Ever since I heard about her loss, I've wished for a way to back up my blog, a way to keep a hard copy of it.

Now there's a way, a very easy and delicious way!!! Blog2Print does all the work for you and produces a very nice looking book that will include as many of your posts as you wish. I'm going to write a little about the easy step-by-step process. But first let me show you how the first volume of my blog book looks.

my blog as a book, Beadlust by Robin Atkins, cover
This is the cover style I chose from many options. There is an opportunity to upload a picture for both the front and back cover of your book. I suggest using a picture that is sized for printing at about 300 ppi for best results.
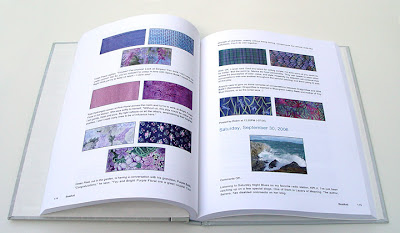
my blog as a book, Beadlust by Robin Atkins, photo page spread
This is how a page spread looks when it's mostly pictures. The page size is 8.5 x 11 inches. You will have a choice of compact or snapshot page arrangement. Compact, just as the name implies, means that pictures will be grouped together to save space, resulting in text and picture alignment issues. Choosing snapshot, as I did for my book, means the layout will be exactly as it is on your blog.
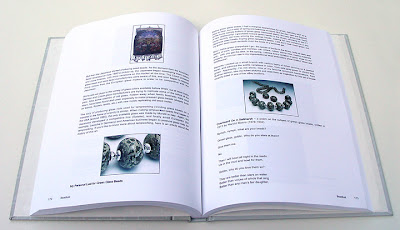
my blog as a book, Beadlust by Robin Atkins, text pages
This is how a page spread looks when it's mostly text. Note that all formatting from your blog (italics, numbered lists, indenting, bold, font style and color, etc.) will appear in the book just as it does on your blog.

My book is 300 pages long and full of color pictures. The high quality paper is thick enough so there is minimal bleed-through and very white, making the pictures and text look quite crisp. The cover is a laminated hard-board and the binding seems sturdy.

Since I've been blogging for over 4 years and tend to write long posts with lots of pictures, I decided to include only the first two years in my book, Volume 1. I can't begin to describe how pleased I am with the results. It makes me happy!!!!! I love having a written journal of my creative process, thoughts, projects, influences and even some non-art related happenings. Too look back, even just flipping through the pictures, is such a treat. And it takes away that nagging little worry about my blog disappearing.

Since it turned out so well, I've gone ahead and made a second book with blog years 3 & 4, another 300-page tome! It should arrive December 6th, an early Christmas gift from me to me!

The cost? Well, I chose the Cadillac version all the way. Yep, it was expensive, but the enjoyment I have from this book is well worth the $110 price tag. You can save quite a bit by selecting the compact page arrangement. The greatest savings results from printing in black and white rather than color. For me color is too important, but it is an option.
Important! If you should decided to make a similar book of your blog, now would be a good time to do it. Through November 29th, Blog2Print is offering a 15% discount. Use this code: b2p4theholidays
Blog2Print works for Blogger, WordPress and TypePad blogs. The process is very easy. You are asked to choose a cover style and indicate color or black and white. Then you enter the date range you want included in your book and decide on the blog order, from oldest to current or the reverse. You indicate whether or not you wish to include the comments.

You can input whatever title you wish to give your book and also optional side text and cover photo. Then you get to write a short introduction or dedication, if you wish. Next you tell it to upload your blog, review the book as a pdf file and order! Oh, yes, there's also a time when you can edit the book, deleting any posts you don't wish to include and a way to add the comments to specific posts. It took me about a half hour to complete everything. I received Volume 1 about a week later!

I don't intend to twist anybody's arm, only to share my deep pleasure at having my blog in print!


Monday, November 22, 2010

Rosie Goes to NY!!!

bead embroidery by Robin Atkins, Rosie The Uncaged Hen, detail
Rosie, The Uncaged Hen, is currently visiting NY, hobnobbing with other bodacious bead art, more than 80 pieces by well-known bead artists from around the country. If you're looking for something really special to do this week, go to the North Country Cultural Center for the Arts in Plattsburg, NY!!! Their exhibition of Contemporary Bead Art opened on November 6th and closes quite soon, on Nov. 29th.

I feel very pleased and honored to have been invited to exhibit my bead art in this show. Included are 11 of my pieces:
  • Forgive, Release and Believe, three of my Bead Journal Project pieces for this year.
  • Madrona and Aqua, two beaded, spirit dolls that are about environmental issues.
  • Beadlust, the beaded-quilted wall-hanging, part of which is shown on my blog header.
  • Blessings, a small, hand-made, hand-bound book with beaded covers.
  • Rabbit Journal and Earth Journal, two hand made books with bead embroidery inset into the cover or pages.
  • Marriage Bag, the beaded bag I made while trying to decide if I had sufficient commitment to get married.
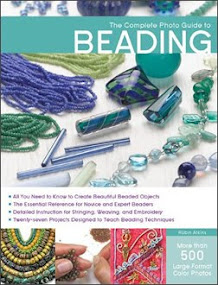
  • Rosie, The Uncaged Hen, a sculptural piece, cover-girl for the wonderful book, 500 Beaded Objects.

bead embroidery by Robin ATkins, Marriage BagMarriage Bag

bead embroidery handmade book by Robin Atkins, Earth JournalEarth Journal

beaded spirit doll by Robin Atkins, MadronaMadrona

beaded spirit doll by Robin Atkins, AquaAqua

Beadlust

Other bead artists represented in the show include Diana Grygo (The Lone Beader), Wendy Ellsworth, Laura McCabe, Marcia Decoster, Carol Perrenoud, Laura Willits, Carol Berry, Huib Petersen and more. This is not a group to be taken lightly... Rosie's privilidged to be out there with the best of the best! Here's a review from the local newspaper.

Wish I could have gone to the opening, or even just to see the show. (Waaaa) If you're able to get there before the exhibition closes, please leave a comment and let me know what you thought of it.

Sunday, November 21, 2010

Making a Book of My BJP Work from Last Year...

bead embroidery by Robin Atkins, detail from BJP piece, Stay in Touch with the River
Two years ago, I used My Publisher to make a hard-bound, photo-book showing and telling about the pieces I made each month during the first year of the Bead Journal Project. I was reasonably satisfied with the book, although a little frustrated with the lack of layout options offered by My Publisher. You can see a virtual copy of my first book here.

A couple of weeks ago, I decided to make a second book, using My Publisher again, this time to show my Bead Journal Project pieces from last year (2008-09). My book arrived in a mail Thursday! It's better than I thought it would be... top quality all the way!!! Here's a not-so-great photo of how the cover looks with the dust jacket on the book.

BJP book by Robin Atkins, cover
And here's the title page, or maybe it's better designated as the acknowledgement page. Note that there's a beautiful, semi-transparent, blank page between the cover and the first page of the book, and another like it at the end, a nice touch!

title page of BJP book by Robin ATkins
Here's what most of the spreads look like in my book, two columns of text on the left explaining about the piece and a picture of the piece on the right.

BJP book by Robin Atkins
Sometimes, I used a double page spread to show detail photos of the piece, like the one pictured below.

BJP book by Robin Atkins
My 34-page, coffee-table-sized, hard-cover book with photo dust-jacket cost me $48 for two copies (on a 2 for 1 promotional special). That's a chunk of money. Yes, it is. But, I'm so pleased to have both of my books. I keep them in the house; whereas my beadwork is in the studio. If ever there were a fire or if somehow my beadwork was destroyed, the books would be like gold to me. Also, I've given copies of them (always purchased when My Publisher has a 2 for 1 promotion) as gifts and they seem to be much cherished. So to me, they are worth the cost.

If you'd like to read/see a virtual copy of this book, where you can flip the pages one-by-one, it's here. In case you might wonder, once a book is published with My Publisher, the rights to it and the money from sales of it go to My Publisher. In other words, if anyone should decide to order a copy of my book (a very flattering thought!), the total amount goes to My Publisher. There are no author royalties! These are vanity books, pure and simple.

Are you curious about the process? It's fairly quick and easy...

In my case, I started by gathering my photos into a file. Then, using Photoshop, I reviewed each photo, sizing it for publication. The full-size pictures of each piece are sized to 9" high at a print-ready resolution of 300 ppi. If any picture was slightly out of focus or something about it was off, I deleted it from the file.

Next I made a photo collage (in Photoshop) for the printed dust jacket of my book. I cropped parts of the full-sized photos and layered them on a dark background. After fitting a part or all of each of my 12 pieces onto the 11.25 x 8.75 inch background, I added the text. Making a collage like this is not necessary, as you can simply use a single photo for the dust jacket along with a text box provided by My Publisher for the title. Or, you can choose not to have a dust jacket at all, a less expensive option.

After all my photos were labeled and ready to use in a digital file, I went to mypublisher.com and downloaded the program into my computer. Once downloaded, you can open it at anytime, work for a while on your book, save your progress, close it for the night, open it again the next day, etc.

For each page or each section of the dust jacket, you have a choice of layouts. You also have a choice of using the layouts, sized in standard ways, or to use them in a flexible way that allows you to re-size the photos and text boxes (as I did). For text pages, I used a two-column layout and wrote my text as I went along, applying standard formatting in a way very similar to MS Word or posting here. For photo pages, I uploaded my photos (in a way similar to uploading photos with Blogger), sizing them with the click-and-drag at the corners method.

When finished uploading all the photos and writing all the text, My Publisher provides a way to view the book in virtual form, just as if you had it in your hands, turning the pages. It's still possible to return to the editing window to make changes at any time. When the book seems as good as it can get, just hit the purchase button.

A week later, it's in my hands, crisp, professional-looking and beautiful! Be still, my vain little heart, this is such a treat!!!!!