Sunday, January 31, 2010

Bead Journal Project for January ~ Fini!

detail, bead embroidery on felt by Robin Atkins, bead journal project
I'm trying some new things this year...

1. Beading on felt
2. Using fibers, paper, multi-media approach
3. Learning collage
4. Using some of the papers I've painted
5. Including words
6. Making a hand-bound book with my 12 pages

It all started on Jan. 1, when I impulsively wrote 6 words that seemed important to me. They are:

Listen
Lighten
Walk
Cherish
Paint
Simplify

Then from those six words, I chose the one which seemed the most compelling to me at that moment. The word was walk. Why not use these words as the underlying theme for my BJP piece for January? In fact, why not write 6 words at the beginning of each month and use them as the basis for that month's piece? Well, OK, that's just what I'll do!

So with the six words for January in the back of my mind, I quickly flipped through my stash of painted papers (acrylic paint on 90 pound drawing paper) and found one that appealed to me. Same process with my felt stash. Purple felt! I basted it to a piece of interleaving paper to stabilize it, got out some beads and started stitching. Obviously, the word walk showed up in my beading. Here's how it looks:

bead embroidery on felt by Robin Atkins, bead journal project
That part was pretty easy.

Since I'm going to make a book, I wanted the page size to be larger than the bead embroidery (which is only 2.5 x 2.5 inches). I have some sheets of deep black paper (heavy-weight, with a deckle edge) which will be luscious for a book. I decided to make the book pages 8.5 x 11 and cut the painted papers to a 7" square. So now, I'm defining my BJP page as a 7 inch square, which will include some beading on felt of any size I wish for that page.

Now we get to the difficult (er, I mean challenging) part for me. What to do with the painted paper and the beading??? How to put them together??? How to add elements of collage??? How to add the words??? Yikes! Suddenly I'm all tense and don't know what I want to do or how to do it.

"Calm down," I remind myself... "It doesn't have to be perfect. Just do it. Think improvisationally." That works for about 5 minutes and I glue some wrapped fibers on the paper to extend the idea of walking from my bugle bead pathway onto the paper. Then I'm stuck again. I worry that the fibers aren't the right color. I worry about what to do next. I write some words on the page and worry that they look amateur... And so on...

Worrying about my art isn't the normal me. I worry about that too...

Finally, Marty's post "Editing and Improvisation," about ripping out beads in parts we don't like, rescued me from all the angst I was feeling about my piece. Somehow reading her words created a turning point in my mind. My self-talk changed to "This is a learning experience. I'm trying something new. I'll get better at it as the year goes by. It's a journey of discovery and everything I make is simply a marker along the path."

bead embroidery on felt collaged on painted paper by Robin Atkins, bead journal project
So here you have it... The first marker! Fini! Tomorrow I get to write 6 new words and continue the journey into February!

BTW, some of you readers are excellent at collage... all suggestions for the next piece are welcome!

Saturday, January 23, 2010

Taking and Editing Quality Photos of Beads and Beadwork

bead embroidery by Robin Atkins, detail
During 3+ years of blogging, several readers have complimented me on my blog pictures and asked what type of camera I use. So today, I’m going to write about how I take and edit pictures for my blog. I’m no professional and still have much to learn. Yet, for the most part, my pictures aren’t too bad…

bead embroidery, Robin Atkins, Bead Journal Project, detail
My camera is an old, Sony Cybershot 717. It’s seven years old and obsolete by today's camera standards. However, it still works great and I've taken many thousands of pictures with it. Although it's only 5 mega pixels, it has a quality lens and the ability to take macro shots as close as an inch away from the subject. When taking pictures for the web or for printing pictures 8x10 size or less, 5 mega pixels is perfectly adequate. My brother bought a re-conditioned, used camera like mine a few years ago on eBay and is pleased with the pictures it takes of his beadwork and quilts.

bead embroidery, Robin Atkins, Bead Journal Project, detail
In my experience, however, the real trick for quality images is more about photo editing than the camera. Learning how to use Photoshop was the best thing I ever did for myself to improve pictures of my beads and beadwork.

Tips for taking pictures of beadwork

1. Beads are shiny objects, which reflect light, especially faceted beads. Therefore, almost all direct lighting yields terrible results. I take most of my pictures outside on days when there are high clouds and the sun is overcast. If I can’t wait for a day like that, I take pictures outside in the full shade and place a large white cardboard behind the item (out of the picture frame) and wear a white bib apron to capture and reflect ambient light. If it’s raining or snowing and I can’t wait for a better day, I take pictures inside near a south-facing window (with all the lights in the room turned off) around noon or when there is the most light in the sky. I own three professional lights and a light tent. However, I rarely use these. Natural light on an overcast day gives better results with truer color.

2. Camera shake is responsible for many out-of-focus pictures of beading. The closer the camera is to your subject, the more you’ll see the effects of camera shake. I always try to brace my elbows on something and hold my camera with both hands. When I really care about the picture, I get out the tripod and take the picture with a remote control cord.

3. Another common reason for pictures being out-of-focus is using automatic focus with an incorrect camera setting. For my camera, if I am less than 3 feet from my subject, I must select the macro setting if I want my subject to be in focus.

4. One more reason for out of focus pictures has to do with depth of field. Flat beaded objects aren’t a problem. But if you are photographing a cuff or a sculptural item, you’ll want as much of the subject as possible to be in focus. The closer the camera lens is to the object, the less depth of field you will have. Therefore, don’t get too close. The more depth of field you need, the father away from the subject you need to be, even if there is a lot of extra space around the subject as seen through your viewfinder. When editing your image, you can crop the background away.

5. Distortion is another problem you will sometimes have when the lens is too close to the object. Again, it helps to move farther from the subject. Later, you can crop the picture to show just your subject.

bead embroidery, Robin Atkins, Bead Journal Project, detail
Tips for Learning Photo Editing

I use Photoshop CS and occasionally Photoshop CS2. I do not have experience with other photo editing programs. I’ve heard that the less-expensive Photoshop Elements offers many good features, but I haven’t seen or used it yet. Whatever photo editing program you use, there are certain things that can greatly improve the quality of your digital photos.

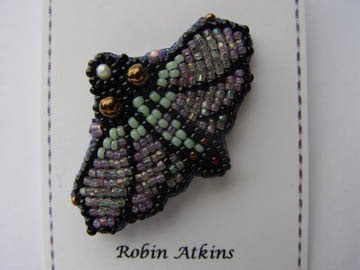
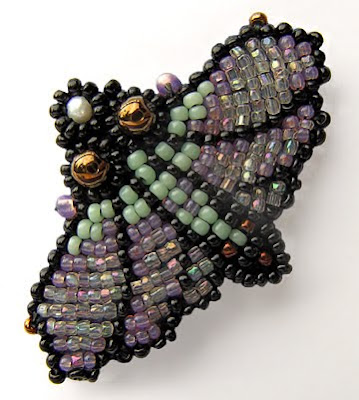
For example, below is the original photo I took of the moth pin (posted here). Not a very pretty picture, is it? Below that is the same photo after I edited it with Photohop CS.

bead embroidery, moth pin, by Robin Atkins, original photo
bead embroidery, moth pin, by Robin Atkins, edited photo
To learn Photoshop, I took a 20-hour class at our local community college. That was a good start, but I needed more. Scott Kelby has written several excellent books that provide everything else I need to know. The Photoshop Book For Digital Photographers is my favorite of his books.

The following are the Photoshop editing features that I find most important and use most often. Although I'm not explaining in detail how to use these features here, the list will give you an idea of what features are important to have and to learn in the photo editing process.

1. Levels. The first thing I do with each image is adjust RGB (red green blue) levels. Most photo editing programs offer an “auto level” adjustment feature, but generally it’s not as accurate as doing the adjustment for each range of the spectrum individually.

2. Shadow/Highlight. My second adjustment is one that brings out the details in the shadows and the highlights. This adjustment will make the picture look a little flat. But you will be able to see detail in all areas of the picture. For example, in the moth pin original picture (above), you can barely see detail in the lower body of the moth. In the adjusted picture, all of the detail is seen.

3. Brightness-contrast. Next I adjust the brightness level. If I have previously adjusted shadow-highlight, then it’s often necessary to increase the contrast a little.

4. If I’ve taken a picture of a square or rectangular object, I check for distortion. This can be corrected using the transform adjustment, which allows me to compress or extend the image at each of the corners.

5. Rotate and crop. I rotate the picture as needed so that the subject is in the desired position. I crop the edges of the picture to showcase my subject with only a small amount of background.

6. Many times, my pictures have a blue cast to them, especially if I’ve shot them in low light conditions. There are several different ways to correct color. The easiest way to correct a cool color cast is to apply a warming photo filter. Red is a color that may look too garish in digital photos, especially if the contrast is high. To correct an over-intense color, I use the Hue/Saturation adjustment, selecting the offending color range and lowering the saturation level.

7. It’s useful to know how to burn (darken) and dodge (lighten) specific areas or tones in your picture. For example, if you need better contrast in a certain area of your picture, you could burn the shadows and dodge the highlights in just that area.

8. On important pictures, like the ones for my books, I often remove the entire background. For this you need to know how to paint the background white or erase it altogether. I’ve never found a quick or easy way to do this. I enlarge the picture to 400% and work in very small areas so that I don’t accidentally erase or paint over details on the edge of my subject.

9. Rubber stamping is a good feature to learn. It allows you to copy any size area and paste it somewhere else. I use it to fix backgrounds and occasionally to place a copied bead over a bare thread, where my bead spacing wasn’t quite right. These areas are more noticeable in a digital picture than they are on the real piece.

10. Save as. After all the above adjustments, but before sizing and sharpening, I save the picture as a tiff (.tif) in a folder called Adjusted Pictures. Later if I want the image a different size or perhaps sized for printing, I work from this version. After saving, I continue to edit the image for my blog or other web application using the steps below.

11. Sizing. It’s very important to learn how to size your images, with appropriate dimensions and resolution for your intended use. If a picture is for my blog and I want it sized for maximum click-to-enlarge, I generally set the resolution to 72 pixels per inch. I set the width to no greater than 12 inches and the height no greater than 9 inches. If a picture is for my blog but not one where the enlarge feature is important, I set the width and height to under 5 inches. I posted specifically about sizing pictures so they will click to enlarge here.

12. The final step, after sizing, is to sharpen my picture. Sharpening will not fix an out-of-focus picture. Nothing will fix that. If your image is out of focus, delete it from your files and shoot a new picture. For an in-focus image, sharpening may bring out the details in an attractive way if not overdone. If you have reduced the size of your adjusted image significantly, it is necessary to sharpen it. I use the unsharp mask filter for this (amount: 90 to 200, radius: 0.2 to 0.5, threshold: 2)

13. When I’m finished with all the above adjustments, I save the image again, this time as a jpeg (.jpg) in a sub-folder within my main Blog Pictures folder.

bead embroidery, Robin Atkins, Bead Journal Project, detail
It's wonderful to feel good about the pictures I post here or on my website or Flickr, to feel that they adequately represent the quality, colors and attractiveness of my beading! Learning to do this has involved a lot of trial and error... it wasn't easy for me. But, it certainly is worthwhile! Hope this post will help some of you!

Thursday, January 21, 2010

Bead Embroidery and a Few Short Subjects

Beaded Moth ~ Pin (Brooch)

beaded moth, brooch by Robin Atkins
Thought you might like to see this beaded moth pin I made for one of my special quilting/beading friends this Christmas. It's mostly size 15 or smaller beads. The wingspan is slightly under 1.5 inches.

Beaded Button Earrings

beaded button earrings by Robin Atkins
My other best quilting/beading friend got these for Christmas. I made them using Dritz half-ball cover buttons, size 24. The button form is 5/8 inches in diameter, but after beading the fabric and covering the form, they are slightly larger. I removed the button shank from the form before covering and then stitched a circle of Ultrasuede on the back side using the picot edge stitch. You might want to check out my tutorial on making beaded buttons here and here.

World Beads ~ Book Giveaway ~ The Winner Is....

World Beads, book cover
Ta-daaa, drum roll..... Ane Severine!

In my previous post I reviewed Beading with World Beads edited by Ray Hemachandra. Sixty some readers commented! Thank you so much for telling me about your own world beads. I really enjoyed reading about them!!! I wish I had 60 copies of this book to give, as everyone had such good reasons for wanting it.

As Peggy commented, "In a sense, I have thousands - maybe even a million - "world beads" - Czech seed beads! And Tohos - Japanese seed beads." She's right! In that sense, all of us own world beads.

Using a random number generator, the winner is #26, a comment by Ann Severine, who said, "The world beads I love most are 10 small milleflori cylinder beads in blue and red. I never thought about making a necklace from them. But now I'm looking forward to seeing this book for inspiration, whether I win or purchase it. How nice for you to inspire us to look at our old stuff we haven't paid much attention to for a long time." Congratulations, Ann!!!

I'll be reviewing and giving away Marcia DeCoster's new book, Beaded Opulence, in a week or so. Watch for it!!

Bead Journal Project ~ January Progress Report

No pictures yet. And I have to admit, I'm a little behind, a little afraid, a little unsure.... For this, my third year participating in the BJP, I decided to practice collage. I admire my sister-in-law, Julie's, collages and the work of so many other artists. Yet, I've never felt I had a grasp of how to mix it all together.

This is my year to play with it, practice, try it on for size... beads, fabrics, papers, paint, fibers, ephemera, rubber stamping, lettering... bring it on... all of it. Yes, but how? Do I hear some of my former students saying, "Just do it!" Yes, that is the way. And I must remember my mantra, "It does not have to be perfect!"

Well, I've worked on it some, but am far from finished.... It's my first of 12... Hope they'll get better and easier. I'll take and post some pictures soon.

Friday, January 08, 2010

Beading with World Beads ~ Giveaway!

What “world beads” do you have in your stash? You may have more than you think! Here are a few of mine…

African trade beads, Robin Atkins collection
We buy beads in a local bead shop or in the comfort of our own home computer. But where were they made? Where have they traveled before we found them?

sterling silver charms, Robin Atkins collection
The origins of beads, particularly those in my stash, has fascinated me since day-one of my beady career 24 years ago. Joining my local Bead Society, where most members had a collector’s perspective about beads, and attending early Bead Conferences, which were more about the history of beads than making things with them, I began to appreciate that beads are truly ubiquitous!

hollow lampwork beads from China, Robin Atkins collection
Did you know that beads are one of man’s earliest artifacts? It’s possible that beads predate vessels and primitive tools in many cultures. Did you know that men and women of nearly every society, every culture and every land since the beginning of mankind have made and used beads in one or more ways?

African trade beads, Robin Atkins collection
Beads, being small, portable, long-lasting and made from various, naturally-occurring substances, have been a trade commodity for many centuries. Thus they have traveled the world in the hands of traders and merchants, sometimes for centuries. They arrive in our stash, some new and some used, from far-away places around the world.

African trade beads, Robin Atkins collection
Just as groups like the Bead Journal Project and other internet-based beading groups unite people of the world, so do the beads themselves. More than anything else about beads, their ubiquitous nature fascinates me!

Beading With World Beads, book cover
So too, the world-connection of beads intrigues Ray Hemachandra, editor of a book, recently published by Lark Books - Beading with World Beads, Beautiful Jewelry - Simple Techniques. This book features 30 jewelry projects with an international and multicultural flair created by 15 acclaimed jewelry designers.

Lark asked me to review several of their books and offered a signed copy of each one as a blog giveaway. And so, this is the first of my reviews. Someone who makes a comment on this post will win an autographed copy!

Beading With World Beads, project bracelet
Those of you who know me, are aware that I’m not really a recipe type of gal with my art (or my cooking for that matter). For me, it is simply more fun to “do my own thing” than to replicate a design by somebody else. Consequently, I don’t gravitate toward “project books,” preferring technique or inspirational guides.

Happily, Beading with World Beads, gives so much more than projects! First, there’s the whole idea of beading as “a multicultural bonanza – a melting pot of craft practices that yields innovative combinations of materials and influences,” to quote editor, Hemachandra. I love this concept and how it is realized in the unique creations of the designers chosen for the book. All of the jewelry is appealing and mysterious because of the cultural roots found in the materials and designs.

Beading With World Beads, project necklace
The second thing I really like about this book is that all the projects are based on sound design principles. They are well-balanced (although not necessarily symmetrical) and the different beads used in each piece have relationship of scale, color, style and origin. So even if I choose not to replicate any of the projects, each is an inspiration to me and offers challenging ideas I can apply to my personal world bead stash in my own way.

Beading With World Beads, project necklace
Looking at the photos in Beading with World Beads makes me crave making jewelry again, makes me get out my African trade beads and view them as potential designs rather than a collection, makes me remember things in my stash long neglected! And by the way, the photos are outstanding, something I always admire about books published by Lark.

Lastly, I have to bravo the book for its clear, concise step-by-step instructions for each of the projects. For each project, excellent editing results in consistency and clarity that are rare in project books.

In conclusion, I give Beading with World Beads an enthusiastic two-thumbs-up!

Would you like to win an autographed copy on this blog giveaway? Yes? Then make a comment in the next 10 days. Just for fun, tell me about something you love in your world bead stash! To be eligible to win, you must give me a clear way to get in touch with you - phone, email or snail mail address. (BTW, it's safest to give your email this way: name[at]provider[dot]com. Use the [ ] signs and substitute the word at for @ and dot for .)