Wednesday, March 25, 2015

Exhibition of My Beadwork... April 1 - May 3!!!

Beadlust 

an exhibition of bead and fiber works by Robin Atkins

This is the first solo exhibition of my work! I am very pleased and honored that the La Conner Quilt & Textile Museum offered me a show in their new Local Artist Exhibit Program's first-floor Landmarks Gallery.

There are 28 pieces in the exhibition, including beaded quilts, books, dolls, and framed art. Several of the pieces are new and have not been exhibited previously. Below is one of them, a beaded and embroidered collage using some of my hand-dyed, re-purposed fabrics.
hand-dyed, beaded, embroidered fabric collage
Every Child Should Have Her Own Tree, hand-dyed, beaded, embroidered fabric collage
I hope some of you will be able to come see my work, as well as the work of the other two featured quilt artists in the upper floor galleries.

Exhibition Information:
Exhibition Events: 
  • Opening reception at the museum: April 1, 4 to 7 pm; all three artists will be there; free admission
  • Demonstration at the museum: Robin demonstrates process and techniques of bead embroidery, April 1, 2-4 pmWorkshop: 
  • Robin teaches Improvisational Bead Embroidery, May 2-3 in La Conner http://www.laconnerquilts.org/improvisational-bead-embroidery.html
A couple of readers have contacted me asking if the above work, or any of the other pieces will be for sale...  Nope, afraid not... exhibition only, although the museum's excellent gift shop does carry my books.

Thursday, March 19, 2015

Wool Applique Chicks - Tips

All 16 chicks are finished now, and I've started quilting the piece!!! I'm quilting by hand, using a single strand of non-mercerized (not shiny) thread (Anchor brand), which is about the same weight as size 12 pearl cotton. This is how it looks so far...

Robin Atkins embroidered, wool applique chicks, in quilting process

While I contemplate how to proceed with the quilting, I thought it might be helpful to share some of the design process with you, especially since a few readers have said they might want to try something like this.

Learning the Stitches - Which Ones to Use and Where to Use Them

Sue Spargo's book, Creative Stitching, was very important in my design process. I didn't know most of the stitches when I started this piece. The instructions in the book are easy to follow, and I was able to learn all that I wanted from the book. More than learning the stitches, the photos in the book allowed me to see how she uses the stitches to embellish her wool applique shapes. Also, she writes about the threads and needles she uses. I followed her suggestions for needles, but did not use many of the threads she mentions.

Robin Atkins embroidered, wool applique chicks

Layout the Shapes

The wool is felted. I bought already felted (correct term is actually "fulled") wool. But you can make your own by washing wool fabric and drying it in the dryer. Here are some useful instructions for fulling wool fabric.

The first step is to cut out the chicks from felted wool fabrics. (Although I made chicks, the shape could be anything... butterflies, flowers, circles, donkeys...) I used 16 different colors, making each chick a different color. I used "chick colors" for some of the wings; others are from a bag of wool scraps I bought at the La Conner Quilt Festival.

I used 60 wt. cotton sewing thread to applique the chicks to the background fabric. Use a thread color that matches the chick color as closely as possible. Although it's a bit shiny, a single strand of embroidery floss would also work for this task.

Starting to Embellish the Chicks

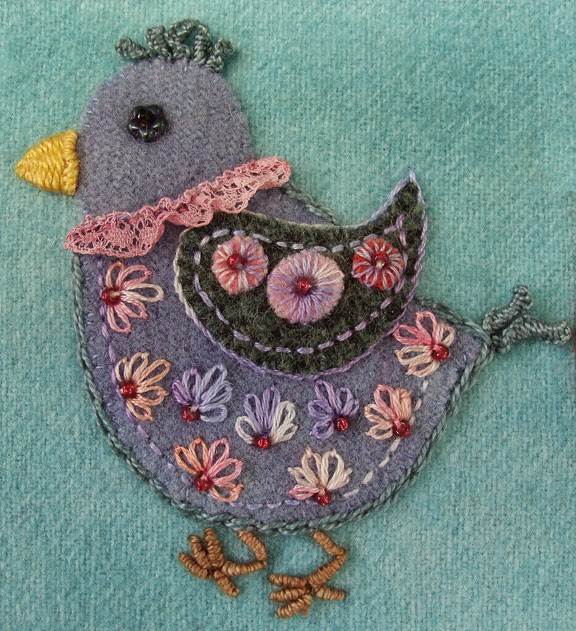
When I finished appliqueing the chicks to the background wool, they just looked like blobs, barely recognizable as chicks. This is not inspirational for starting to embellish! I found that in order to even want to start, I needed to make them more real, more chick-like. So I gave them all eyes, all 16 of them. That helped a lot, but still they didn't feel real. So I gave them all feet, and then beaks. So as not to get bored, I changed thread color for both beaks and feet. Some of the eyes are made with a button; some with a flower-shaped bead; some with a disc-shaped bead. When all of them had eyes, feet, and beaks, finally they began to be chicks, and I was ready to start!!!

Even so... starting is daunting. I used the same method I use (and teach) for bead embroidery... If you've taken a class from me you've heard me say, "Pick up a bead you love, and sew it on somewhere." That's what I did... picked up a thread I loved, picked a stitch that interested me from Sue's book, picked a chick color that appealed to me at that moment, and started practicing the stitch.

When I finished, I just did the same thing again. Sometimes it was the same chick, sometimes I chose a different chick. I kept picking a thread I liked, usually one I hadn't previously used, a stitch I wanted to learn or really liked, and a chick that seemed "to like" the chosen thread color.

After a while, some of the chicks were fully embellished. Once I learned the stitches and had experimented with various threads, I tended to work on one chick until it was finished. But if  when I got stuck, and couldn't think what to do next with a particular chick, I just moved along to some other chick that appealed to me at that moment.

Robin Atkins embroidered, wool applique chicks

Another way to get started

If you feel a bit timid about starting, you could make a pincushion, such as I did, shown below. It doesn't take a lot of time or materials, and can give you both practice (particularly in making beaks and feet) and confidence.

wool felt applique pincushion, Robin Atkins
Personality

I can't help but think of the chicks as youngsters, maybe early teens, with emerging personalities... each, as I work on it, starts to have a story which plays out in my head while I stitch. Once the story begins, it's easier to choose stitches, design motifs, and threads which further develop the story or personality of that chick. Thinking about the chick's personality and background story, keeps me from getting bored, and makes it really fun to work on the piece.

Robin Atkins embroidered, wool applique chicks

Thread Hints

I already wrote about threads, adding it to the bottom the previous post (or, scroll down one more post).

What's Next?

As usual, I don't know. I take it one step at a time, trying not to figure it all out before I start. I do what I know to do. If there isn't anything I know to do, then I wait... wait for an idea, for inspiration, for a solution... wait until I know what to do next, but only the next thing... I try to ignore the question of what comes after the next thing. That's what I'm doing now... waiting to know what the next step in the quilting process will be.

Thursday, March 12, 2015

Wool Applique Chicks - I Love Handwork!!!


Robin Atkins embroidered, wool applique chicks
I started this project in October, 2014, so I would have a nice handwork project while traveling for a month in Europe. I love it!!!

Robin Atkins embroidered, wool applique chicks
A bunch of pre-cut threads and trims, a small package of mixed seed beads/buttons/sequins, a folded piece of felt with various sizes of needles, embroidery scissors, Sue Spargo's book, and 16 wool chicks already stitched to the background wool fit very nicely into a 12 x 9 inch zippered, mesh bag.... perfect to tuck into my backpack! I stitched on the airplanes, in people's homes, and with my beady/quilty friends! At the end of the month, 8 chicks were finished. You can see them here.


Robin Atkins embroidered, wool applique chicks
Since then, I've been busy making a Travel Diary quilt, and starting another very challenging "Shimmer" quilt, which will be the subject of the next post. However, once in a while, the Chicks are just the right break from machine sewing. Working on them makes me happy and peaceful.

Robin Atkins embroidered, wool applique chicks

The new ones are in this post... As you can see in the photo below, I still have 2 chicks to embellish, plus one that might need something more.

Robin Atkins embroidered, wool applique chicks, unfinished

When all of them are finished, it will be time to decide what to do with them. My idea so far is to make them into a small wall quilt, hand quilting around the chicks, maybe adding a few flowers between some of the chicks.  I'll wait to decide, keeping all options open until the chicks are finished.

Robin Atkins embroidered, wool applique chicks

Most of the chicks are girls, but so far 3 of them seem to have a bit of testosterone...  can you tell which ones are the boys? You'll need to click on the above picture of all 16 to enlarge it enough to find the boys. If you feel like making a guess, let's give them numbers starting at the top left with 1 and going across row by row. As you can probably tell, the one below is definitely a girly girl!

Robin Atkins embroidered, wool applique chicks
By the way, the lace trim on the above chick is vintage lace from LaDonne Weinland, an Etsy vendor. It was white, which was too "strong" a color for this piece. So I painted dye on it!!! These are the pieces I painted. To give you an idea of scale, the lace is just under 1/4" wide. The chick, from the bottoms of her feet to the top of her crown, is exactly 3 inches tall.

Threads! 

People ask me where I got all the threads I use for these chicks. Here are some answers...

Variegated pearl cotton. I'd estimate that over half the stitches (all the beaks and feet, most of the edge stitches, tails, and top-knots) are pearl cotton, size 8 or 12. I like using threads that are subtly variegated. DMC and Valdani are two brands of pearl cotton that come in a ball for $5 to $7 per ball. I have purchased some Valdani balls from Sue Spargo and some from this site.

But most of my perle cotton comes from African Folklore Embroidery ... Leora Raikin, the owner, packages hand-dyed, variegated, pearl cotton on cards of three colors, each color about 10 yards in length, for $5.  She has a HUGE selection, from which you can have 24 colors for only $40!!! I love the colors, the subtle changes of colors in the variegation, and the quality of the thread. Here's a page that shows her colors in size 8 pearl cotton... mind boggling!
Variegated pearl cotton from African Folklore (I have already used some of it!)
My photo does not show the full amount you get... only how it is packaged, 3 colors to a card!

Embroidery floss.  For finer stitches and details, I often switch to regular embroidery floss. Again I gravitate toward the variegated colors. DMC has put out a lot of new variegated skeins in recent years. If you have an older supply of solid colors, you might want to check out DMC's 24 new colors. Here's an Etsy seller that offers them. Or, if you are in the Seattle area, Nancy's Sewing Basket (on Queen Anne hill) stocks all of them. They are much more subtle than previous DMC variegated floss choices, more like hand-dyed. Anchor has also added nice options to their line.

DMC variegated embroidery floss, 24 new colors


DMC variegated embroidery floss, 24 new colors

I also buy hand-dyed embroidery floss when I see a skein that appeals to me. Again, I like the subtlety of it.

Other threads. Sue Spargo offers a line of variegated silk threads in beautiful colors, which she calls Silken Pearl. I bought some of them from her during the class, and have enjoyed using them. The sheen of the silk is a lovely contrast to the more matte quality of the pearl cotton.

In her book, Sue recommends using a wool thread to applique the wool chicks to the background wool. Since it is quite expensive, I used 60 weight cotton applique/sewing thread by Metler, which I already had in a range of colors. It works fine. If I didn't already have the Metler thread, I probably would have bought a set of Genziana wool threads on bobbins on Etsy, here. This wool thread is a bit too fine for embellishment work, but it's great for wool applique.

Novelty yarns, metallic threads, chenille, dazzle threads, etc. all have their occasional use as well. As I tend to like more matte and less bling, I don't often use these threads. But it's fun to experiment with them. I did use chenille on one of the above chicks... can you find it?


Wednesday, March 04, 2015

Huge Challenge: Making a Whole from the Parts

In the previous posts, you've seen the individual blocks I've been making, 61 of them, for my Travel Diary 2014 quilt. Each block is quilted, bound, and embellished... each a mini-quilt. The difficult challenge was how to put them all together into a whole piece.

Robin Atkins, Travel Diary2014, one of 61 embellished blocks
This is one of the 61 blocks.
My original thought was to stitch them together into a wall hanging, something like the arrangement below:

Robin Atkins, Travel Diary Quilt, possible layout - blocks touching
No way! As I played with the arrangement, it was obvious that the results were "muddy," confusing, and "busy" from close up... and boring from a distance.

So then, I spaced them apart, like in a photo album, not touching, something like this:

Robin Atkins, Travel Diary Quilt, possible layout - blocks not touching
Nope. That didn't work either... still too busy, muddy, and boring from a distance. Akkk, what to do???? Sleep on it!

Next morning, the solution came to me upon waking! Sew them together in clusters, and mount the clusters on a back-quilt!

To see how the idea would work, I grouped the blocks on a piece of fabric from my stash, each cluster representing a whole (or segment of a) trip. This is how it looked:

Robin Atkins, Travel Diary Quilt, possible layout - blocks grouped in clusters
The idea of clustering worked! Yay! Instead of 61 different things to view, there were now only a dozen or so. And from a distance, the shapes of the clusters against the pathway of background color made an interesting pattern.

What color would the back-quilt be, and how would the clusters be attached, I wondered? After stitching the clusters together, I took them to the quilt shops in Anacortes to find the a fabric for the back-quilt.  It had to be a read-as-solid print, one that wouldn't distract from the clusters, in a color  that contrasted in value with the over-all value of the clusters. I soon found that either too much or too little value contrast was not good. Two green prints and a light coral print came home with me as possibilities.

That evening, after trying all three of them, I decided to go with one of the green prints. The clusters seemed to "pop" nicely on it!

Robin Atkins, Travel Diary Quilt, possible layout - green black quilt
However, the next morning, when I viewed it in daylight, the green seemed just too cool. My travels were warm (at heart) and wonderful...  I wanted the quilt to have visual warmth. Back to the drawing board. I made a "help!" call to Lunnette, my quilting friend and travel companion on one of the trips, who came over and agreed that the green was good... except for the important consideration of "warmth." While trying various possible fabrics, she happened to mention that red is sometimes considered a neutral color, which made me look at the red/rose fabrics in my stash with a different eye. When we put the clusters on a piece of medium-rose batik, we both knew instantly we had found the back-quilt fabric!!! Whooo-hooo!

Robin Atkins, Travel Diary Quilt, possible layout - rose black quilt

Next was the matter of how to construct the back-quilt and how to attach the clusters. I made all the mini-decisions on an "as needed" basis. Here they are in order:
  1. quilt the names of the people I spent time with on these travels on the back-quilt (picture shows one quilted line, and two lines written in chalk to be quilted)
    Robin Atkins, Travel Diary Quilt, names quilted in back quilt
  2. use the same color thread as the fabric to quilt the names, so they are there, but do not distract the viewer from the clusters of blocks
  3. make the edges of the back-quilt irregular
  4. bind the back-quilt edges, and then whip stitch the binding with pearl cotton, the same as the individual blocks
    Robin Atkins, Travel Diary Quilt, binding whipped with pearl cotton
  5. sew the clusters onto the back-quilt on the top edge only, allowing the cluster to be lifted to see the backs of the blocks (all different fabrics, carefully chosen for the subject of each block), and giving a place to sew a label identifying the location, people, etc. in the photos of that cluster
  6. use a double row of hand-stitching along the top of each cluster to support the weight
  7. make a small identifying label for each cluster
    Robin Atkins, Travel Diary Quilt, clusters labeled
  8. sew a small, and very personal, embellishment on the back of each cluster, something I know is there but that most people won't see (or know the meaning of if they did see it)

Robin Atkins, Travel Diary2014, finished quilt
And here is the finished quilt. It's 37" wide by 43" tall. Even if you click-to-enlarge, this picture does not do the quilt justice... So, if you'd like to really SEE it, come to the La Conner Quilt & Textile Museum during April (April 1 - May 3), when it and 29 other of my beaded objects and quilts will be exhibited!

What did I learned making this quilt? Whew... probably more than you'd want to read... The most important thing was a reinforcement of the "just do it" approach to original art, an approach that works so well for me with my bead embroidery. Not stressing over all the decisions, not needing to have all the answers in hand before starting, is a hugely enabling gift to the creative process!