When my brother, Thom Atkins, visited last fall, he showed me (and a few quilting buddies) his new method for designing and constructing "scrappy improv wall quilts," a technique that turned out to be a lot of fun for me, especially given my long history with an improvisational, intuitive approach to bead embroidery.
Basically, what we did was to empty our bags or boxes of scraps onto a large table and start pawing through them, pulling out ones that appealed to us at that moment. For me it was all about color - red, magenta, fuchsia, with hints of pink, golden-yellow, orange, lavender, and dark green. All of the fabrics were in my scrap box. We had two days of Thom's demonstrations and guidance. During that time, each of us in our small group produced a unique and very pleasing "piece" or "block," measuring roughly 18 x 21 inches, the size of a fat quarter.
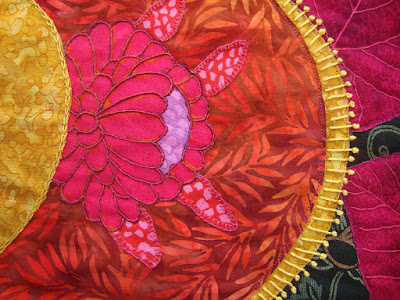
One of my red scraps, cut in a nice arc at one end, was the start of it all because I liked the shape and the color. Next I picked up a small strip of yellow, and held it behind the arc of red. Ooooh! Nice enough to repeat. The scrap of orange/red batik was large enough to cut a similar arc, and the strip of yellow was long enough to go behind that one too. These two arcs formed the basis of my piece.
You can see the two arcs above; the lower right was the first. The yellow strip was only about 3" wide, not enough to go all the way around the arcs, but I cut two shapes that would echo the top of each of the arcs. I layered the remaining scraps from that on top of the arcs along the vertical edges of the design. Then I put a dark green scrap behind the arcs and the yellow, which set them off nicely. The rest was just filling to the edges of the quilt with more scraps, including fussy-cut leaves and flowers.
The next step was to glue it all together along the 1/4" seam overlap, working in layers from bottom to top, and cutting away the excess fabric from the underside after each piece is glued. Cutting away the excess fabric leaves a double layer of fabric only at the seams; the rest is a single layer. The glue is Elmer's School Glue, Disappearing Purple, as shown below. It is an organic stick glue, relatively easy to sew through, repositionable, (in case you change your mind), and purple when first applied, drying to transparent (so you can see where exactly you are putting it).
Thom's method is a type of raw edge applique, typically accomplished with heat-fusible web, such as "wonder under." The typical method, given a complex, layered design such as mine, would have resulted in a thick, stiff, multi-layer surface, which would be difficult to quilt, even with a machine. In Thom's method, there is no web, and in most places only one or two layers of fabric. Like all raw edge techniques, the raw edges must be sewn down, and the resulting quilts are not very suitable for bed quilts unless there is heavy stitching over the raw edges (for example, dense, zig-zag, machine stitching).
After gluing my original (shown above) quilt top, I assembled the quilt, using a spray glue to layer the backing, batting and top. The next step was to stitch along the "seams," the overlapping, glued edge of each piece. From there, it was up to each of us as to how to finish the quilt, perhaps with machine quilting, such as stippling or contour stitches, or perhaps with beading, all of which Thom does on his quilts.
A couple of months went by after getting to the unfinished stage shown above. I liked it, but didn't know what to do with it, until one day when I was at our Senior Center, getting foot care from a trained nurse who comes a couple times a week to help those who need it. Her treatment room, about the size of a walk-in closet, has no windows. Her client faces the door to the room, a plain, wooden door. "That door needs a quilt," I told her. The rest is history; my scrappy improv quilt, Eclipse, hangs there now.
Only first I had to finish it. Above is the finished quilt, Eclipse. Below I'll tell you some of the finishing steps and about how I transformed it from looking flat and ordinary to sharp and textured using embroidery embellishments. Please click on the photo so you can see the details!
You might have noticed that the finished quilt is longer (better suited for hanging on a door) than the original piece. That was a challenge, although less than you might expect, because Thom had demonstrated for us how he sometimes extends the size of his quilts. In short, I roughly planned out the addition, the mock-up shown below, then created it using the same process and scraps as the original piece.
I used fusible "tape" made for butt-joining pieces of batting, to add a new piece of batting to the bottom edge of batting on the original (upper) part of the quilt. The horizontal strip of striped fabric overlaps the two parts of the quilt and the joined batting underneath. As you can see below, I added a fussy-cut flower over the striped fabric to break up the horizontal strip and visually join the two parts.
Confession time... I'm not good at machine quilting, and don't even have a proper quilting foot for my old machine (1972 Pfaff). I tried stitching around the fussy cut flowers to secure the glued edges, but failed miserably. What to do? Ah, hand-sew with embroidery stitches and floss? Yes! It took a few tries, but eventually I found stitch and thread combinations that worked.
It looked so good that I decided to add stitching and knots to the yellow arcs next. Wow! That popped the eclipse look! In the photo below, you can see bits of all the embroidery stitches I added. Not only does the embroidery provide embellishment and emphasis, it also further quilts the piece. Click the photo to see the detail and better read the stitch identification.
Here are two more detail photos of the finished quilt (without the text boxes).
Lots of fun, and I like the results! Will I do another one? Well, right now I've finally returned to my hexie project, where I'm likely to remain for many months, but after that, scrappy improv may be just what I need!
Showing posts with label applique. Show all posts
Showing posts with label applique. Show all posts
Monday, January 15, 2018
Friday, March 11, 2016
Does Machine Quilting Enhance Quilts that are otherwise Hand-Sewn?
Oh dear, I'm sorry to have neglected posting here for so long. Although many suitable topics and photos have passed through my mind and camera, there just hasn't seemed to be a nice chunk of time available for putting it all together. Today is the day to begin again!
For the past two months, it's been all about quilts and quilting for me, with beading taking a bit of a back seat for a while. My quilt and travel buddy, Lunnette, and I flew to Ontario, California for The Road to California, which is a ginormous quilt show with more than 1,000 quilts on exhibition and over 200 vendors. We gawked (and spent all of our allotted budget) for 3 whole days, barely noticing our fatigue and sore footies.
There are several intriguing subjects to cover, inspired by our experiences there. Today's post is about traditional applique and machine quilting.
Inspired by Alice, shown in the photos above, won the first prize of $1,000 in the Traditional, Wall, Applique category of the main (judged) exhibit! Take a moment to study the pictures, click on them to enlarge them, notice the way the applique and machine quilting compliment each other. Also think about what this might have looked like if the maker, Marilyn Lidstrom Larson, had hand-quilted her work the way Alice, her grandmother (and inspiration for the central portion of the quilt), would have done. I love this quilt, totally love it, and believe it deserved the award it received.
At the same time, it saddens me that in all the juried/judged shows I've seen (and entered) recently, there is no category specifically for hand sewn quilts... quilts which are hand-pieced, hand-appliqued, hand-embroidered, and/or hand-embellished, and finished with hand-quilting. Nope, hand-sewn quilts are judged right along with machine-sewn quilts. In my observation, machine-quilted pieces are the ones that win almost all the prizes, even in the traditional categories. Why is that? Is hand-quilting considered passe, a thing of our grandmothers' time? Is it because machine-quilting has more pizzazz in the viewers' and makers' eyes? Is it because the machine manufacturers are huge financial supporters of these shows and providers of much of the prize money? Is it because the machine manufacturers run the training programs for judges?
OK, let's look into this subject a bit more. Later, I'll tackle the subject of the influence of the machine manufacturers. For now let's consider this question:
 | ||
| Inspired by Alice, by Marilyn Lidstrom Larson of Willow City, ND (detail of border) |
There are several intriguing subjects to cover, inspired by our experiences there. Today's post is about traditional applique and machine quilting.
 |
| Inspired by Alice, by Marilyn Lidstrom Larson of Willow City, ND photo credit (for this photo only): Road 2 CA |
 |
| Inspired by Alice, by Marilyn Lidstrom Larson, detail showing back |
 |
| Inspired by Alice, by Marilyn Lidstrom Larson, detail of center |
 |
| Inspired by Alice, by Marilyn Lidstrom Larson, detail of center quilting |
At the same time, it saddens me that in all the juried/judged shows I've seen (and entered) recently, there is no category specifically for hand sewn quilts... quilts which are hand-pieced, hand-appliqued, hand-embroidered, and/or hand-embellished, and finished with hand-quilting. Nope, hand-sewn quilts are judged right along with machine-sewn quilts. In my observation, machine-quilted pieces are the ones that win almost all the prizes, even in the traditional categories. Why is that? Is hand-quilting considered passe, a thing of our grandmothers' time? Is it because machine-quilting has more pizzazz in the viewers' and makers' eyes? Is it because the machine manufacturers are huge financial supporters of these shows and providers of much of the prize money? Is it because the machine manufacturers run the training programs for judges?
OK, let's look into this subject a bit more. Later, I'll tackle the subject of the influence of the machine manufacturers. For now let's consider this question:
Does machine-quilting enhance quilts that are otherwise hand-sewn?
Interestingly, at Road to California this year, there was a small exhibit of hand-sewn quilt tops, made long ago (most of them in the early 1900s) that were not quilted or layered with back and batting by the maker.
These tops were given to modern machine quilters to finish, and the
results were displayed. Studying them gave me a greater perspective on
the above question.
What do you think of these? Which tops are enhanced by the machine quilting? Are there any that don't look right to you? If so, why not?
I
found myself looking at them through the imagined eyes of the original
maker. Would she have been pleased with the finished quilt? As you look
at some of the quilts below (and in a few cases, detail shots), ask
yourself, if you had hand-sewn the top, would you have liked the way it
looks today? Does the machine quilting enhance the work of the original
maker? I've numbered the quilts (in no particular order), so you can
respond (regarding specific quilts) in the comments if you wish. As always, you can click on the photos to enlarge them.
 |
| #1 - Vintage Top with Modern Machine Quilting |
 |
| #1 - Vintage Top with Modern Machine Quilting, detail |
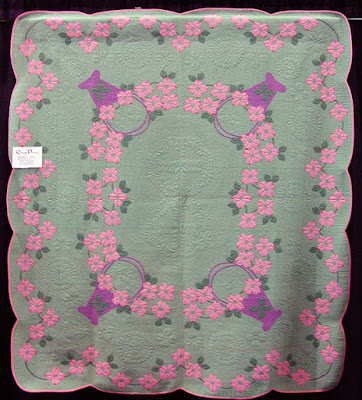 |
| #2 - Vintage Top with Modern Machine Quilting |
 |
| #3 - Vintage Top with Modern Machine Quilting |
 |
| #3 - Vintage Top with Modern Machine Quilting, detail |
 |
| #3 - Vintage Top with Modern Machine Quilting, detail |
 |
| #4 - Vintage Top with Modern Machine Quilting |
 |
| #5 - Vintage Top with Modern Machine Quilting |
 |
| #5 - Vintage Top with Modern Machine Quilting, detail |
Since there is quite a difference looking at the photos as opposed to seeing the actual quits, my responses to these questions might be different than yours. To my eyes, #1 offers a believable connection and balance between the quilting and the original applique or piecing. It felt like the original maker would have done something very similar, only by hand.
I didn't want the quilting to overpower the original as it does in #3 and #5. Both of these were so stiff from the dense quilting, that it would be like sleeping under a piece of cardboard. Both of them made me feel disjointed. The lovely charm and grace of the original work seemed lost. I'm not sure why, but the background color created by machine quilting with colored thread in #5 seems almost weird... maybe because it's such an unlikely choice for the period.
Number 4 has the look of a chenille bedspread, both pretty and more-or-less "of the period." It works for me, even though the quilting is dense. The same is true for #2.
More from Road to California coming soon...
Wednesday, September 23, 2015
Wool Applique + Thread Embroidery + Beads = Happy Quilts!!!
Oh dear, busy me, four months since I've posted here. Lots of quilting, a little beading, some travels, and recently several sets of house guests have made "retirement" a bit of a joke. For now, since the La Conner Quilt Festival is just around the corner (October 2-4), my subject is one small exhibition on the first floor at the Museum, which is currently up, and will remain through the Festival.
Last year at the Festival (and again this year!) Sue Spargo taught workshops on her wool applique embroidery methods. Those of us who were lucky enough to get in were invited by the Museum to exhibit our finished pieces. These marvelous creations are the subject of this post. Uneven lighting makes it difficult to get good photos, so please forgive poor color or tone on some of these photos.
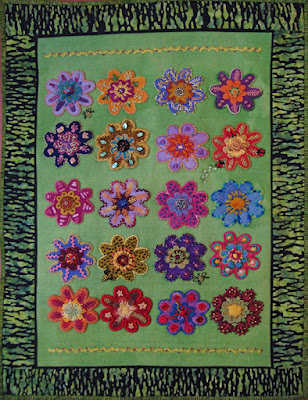
In case you are unfamiliar with Sue's work, below is an example of her work. Students in her class could choose to make chicks, circles, or flowers. Most chose the chicks. Eight of her students are showing their work in the current exhibit.
My vote for the most awesome-creative piece goes to Bunny Starbuck for She Has Flown the Coop! Here it is:
Having put my chicks all in neat rows similar to Sue's example, I find it amazing that Bunny's mind took the idea and made a whole different story of it... a coop full of chicks, with two in line on the roof ready to follow the one already in the air. Don't you just love the way the lines divide the space?!
Note Bunny's use of whispy yarn to suggest little chick feathers, her use of snaps for eyes, the one chick turned full front, the one with a bead-tassled braid and glasses, and the one with beaded loop fringe and a gathered yellow ribbon (?) yo-yo. I love them! I'm in awe, Bunny!
Below is Chicks on Parade by Dorie Benson. It's so fun the way they are so close together, with two of them going in a different direction, just as you might see in a little cluster of chicks. If you click the photo to enlarge it, you can see some of Dorie's excellent stitching and hand quilting!
The next one is Chicks by Glenys Baker, who not only did all 36 chicks but also made a second quilt featuring circles (shown further down). Awesome work, Glenys!
And next is Birds of a Feather Can Dance Together by Lorraine Jones. The fun of the title is matched by the fun of Lorraine's embellishments, including her border treatment. (You'll have to see this one in person, because the light from a table lamp, made the lower corner of the photo look terrible.)
I guess most of us like to "swim the other way," as you can see in the next piece, Chickadees, by Carrie Unick. I thought many of Corrie's embellishments were especially fun and creative, so I've also included a couple of detail photos.
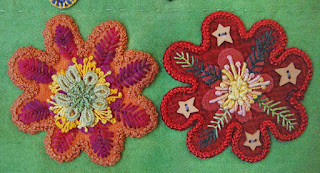
Last of the chicks is my piece, simply named Chicks. It was so much fun, that I made another small piece (also in the exhibition), shown at the top of this post. Both are displayed in shadow-box type frames to protect them from dust and moth damage.
Glenys Baker, in one year, made not only a 36-chicks quilt (shown above), but also a 48-circles quilt, Circles. How she keeps thinking of new embellishment variations I can't imagine. Yet each of her circles is completely unique! Her choice of border fabrics is perfect for the quilt, complimenting the flow of color among the circles.
I love the fun color combinations and the way the beads enhance her embroidery on Nancy Anders' Bodacious Blooms, a joyful wall quilt if ever there was one! (Again, I couldn't quite get the color right in the photo, so you'll just have to go to the Museum to see it in person.)
The name of Roberta Roberts' flower quilt, Memories, invites us to look closely at the flower with three ladybugs. I don't know the story, but I can tell there is one here... and I love that. Her embellishments are varied and fun as well.
There you have it... 10 quilts by 8 students who learned some methods of wool applique and embroidery from Sue Spargo, last year at the La Conner Quilt Festival. I'm so grateful to be one of them!
Last year at the Festival (and again this year!) Sue Spargo taught workshops on her wool applique embroidery methods. Those of us who were lucky enough to get in were invited by the Museum to exhibit our finished pieces. These marvelous creations are the subject of this post. Uneven lighting makes it difficult to get good photos, so please forgive poor color or tone on some of these photos.
In case you are unfamiliar with Sue's work, below is an example of her work. Students in her class could choose to make chicks, circles, or flowers. Most chose the chicks. Eight of her students are showing their work in the current exhibit.
My vote for the most awesome-creative piece goes to Bunny Starbuck for She Has Flown the Coop! Here it is:
Having put my chicks all in neat rows similar to Sue's example, I find it amazing that Bunny's mind took the idea and made a whole different story of it... a coop full of chicks, with two in line on the roof ready to follow the one already in the air. Don't you just love the way the lines divide the space?!
Note Bunny's use of whispy yarn to suggest little chick feathers, her use of snaps for eyes, the one chick turned full front, the one with a bead-tassled braid and glasses, and the one with beaded loop fringe and a gathered yellow ribbon (?) yo-yo. I love them! I'm in awe, Bunny!
Below is Chicks on Parade by Dorie Benson. It's so fun the way they are so close together, with two of them going in a different direction, just as you might see in a little cluster of chicks. If you click the photo to enlarge it, you can see some of Dorie's excellent stitching and hand quilting!
The next one is Chicks by Glenys Baker, who not only did all 36 chicks but also made a second quilt featuring circles (shown further down). Awesome work, Glenys!
And next is Birds of a Feather Can Dance Together by Lorraine Jones. The fun of the title is matched by the fun of Lorraine's embellishments, including her border treatment. (You'll have to see this one in person, because the light from a table lamp, made the lower corner of the photo look terrible.)
I guess most of us like to "swim the other way," as you can see in the next piece, Chickadees, by Carrie Unick. I thought many of Corrie's embellishments were especially fun and creative, so I've also included a couple of detail photos.
Last of the chicks is my piece, simply named Chicks. It was so much fun, that I made another small piece (also in the exhibition), shown at the top of this post. Both are displayed in shadow-box type frames to protect them from dust and moth damage.
I love the fun color combinations and the way the beads enhance her embroidery on Nancy Anders' Bodacious Blooms, a joyful wall quilt if ever there was one! (Again, I couldn't quite get the color right in the photo, so you'll just have to go to the Museum to see it in person.)
The name of Roberta Roberts' flower quilt, Memories, invites us to look closely at the flower with three ladybugs. I don't know the story, but I can tell there is one here... and I love that. Her embellishments are varied and fun as well.
There you have it... 10 quilts by 8 students who learned some methods of wool applique and embroidery from Sue Spargo, last year at the La Conner Quilt Festival. I'm so grateful to be one of them!
Tuesday, May 12, 2015
Finished "Chicks" Quilt (Sue Spargo Wool Applique)
A week of finishing!!! Oh my, it feels good to finish things, doesn't it?!
Last October, I started the applique process, stitching chick bodies and wings cut from felled wool onto the wool background fabric. Seven months later, 16 chicks, embroidered with threads and beads, run free! Please click the picture to enlarge it, so you can enjoy the fanciful details.
If you are new to this process, you can see the various steps and pictures of the chicks on these posts. Of course, they are inspired by Sue Spargo's exhibit at the La Conner Quilt Museum, by her book, Creative Stitching, and by taking a one-day class from her to get me going. Along the way, other books, embroideries, and drawings also inspired me.
As you might guess, most of the chicks have at least a few beads. Here is one with the main motif embroidered with beads.
And, here is one with just a few beads, the center of the "flowers," and one with no beads at all.
Also note that I've quilted the piece with Danish Flower Thread in a shade which closely matches the background color.
At first, I thought it would be pleasing to embellish the areas between the chicks with flowers, vines, and leaves using three close shades of the background color. Here is an example.
It looks OK when you look at just four chicks with the flower/vine motif in the center. But when I had finished 6 of the areas (sorry no photo), some of them with larger spaces and larger vines/leaves, it looked too busy. It took away from the chicks. I couldn't tell if I was supposed to look at the chicks or the flowers. So I picked out the vines and leaves, leaving just the flowers, which weren't such a distraction.
After sewing on the binding, the chicks seemed to need a little warming around them. So I added a line of stem stitch in variegated pearl-cotton in a magenta color. It pleases me!
Oh, and one more thing... This is a quilt, designed to hang on the wall, with lots of details to enjoy as you view it up close. But what happens to wool felt when it is out in the open? MOTH DAMAGE and DUST are the enemies. My solution? Find, buy, or have somebody make a wall-mounted display case, with a hinged door. Hang the quilt inside the case, which remains closed except when somebody wants to take a closer look. The above, found on the internet, is close to what I have in mind, with a white background of course.
What's next in chick-land? Well, my dear niece just got married... Here is the start of her wedding gift... I'll post a finished photo soon.
Labels:
applique,
art quilts,
Bead Embroidery,
display,
hand quilting,
Quilting,
Sue Spargo,
thread embroidery,
wool
Thursday, March 19, 2015
Wool Applique Chicks - Tips
All 16 chicks are finished now, and I've started quilting the piece!!! I'm quilting by hand, using a single strand of non-mercerized (not shiny) thread (Anchor brand), which is about the same weight as size 12 pearl cotton. This is how it looks so far...
While I contemplate how to proceed with the quilting, I thought it might be helpful to share some of the design process with you, especially since a few readers have said they might want to try something like this.
Learning the Stitches - Which Ones to Use and Where to Use Them
Sue Spargo's book, Creative Stitching, was very important in my design process. I didn't know most of the stitches when I started this piece. The instructions in the book are easy to follow, and I was able to learn all that I wanted from the book. More than learning the stitches, the photos in the book allowed me to see how she uses the stitches to embellish her wool applique shapes. Also, she writes about the threads and needles she uses. I followed her suggestions for needles, but did not use many of the threads she mentions.
Layout the Shapes
The wool is felted. I bought already felted (correct term is actually "fulled") wool. But you can make your own by washing wool fabric and drying it in the dryer. Here are some useful instructions for fulling wool fabric.
The first step is to cut out the chicks from felted wool fabrics. (Although I made chicks, the shape could be anything... butterflies, flowers, circles, donkeys...) I used 16 different colors, making each chick a different color. I used "chick colors" for some of the wings; others are from a bag of wool scraps I bought at the La Conner Quilt Festival.
I used 60 wt. cotton sewing thread to applique the chicks to the background fabric. Use a thread color that matches the chick color as closely as possible. Although it's a bit shiny, a single strand of embroidery floss would also work for this task.
Starting to Embellish the Chicks
When I finished appliqueing the chicks to the background wool, they just looked like blobs, barely recognizable as chicks. This is not inspirational for starting to embellish! I found that in order to even want to start, I needed to make them more real, more chick-like. So I gave them all eyes, all 16 of them. That helped a lot, but still they didn't feel real. So I gave them all feet, and then beaks. So as not to get bored, I changed thread color for both beaks and feet. Some of the eyes are made with a button; some with a flower-shaped bead; some with a disc-shaped bead. When all of them had eyes, feet, and beaks, finally they began to be chicks, and I was ready to start!!!
Even so... starting is daunting. I used the same method I use (and teach) for bead embroidery... If you've taken a class from me you've heard me say, "Pick up a bead you love, and sew it on somewhere." That's what I did... picked up a thread I loved, picked a stitch that interested me from Sue's book, picked a chick color that appealed to me at that moment, and started practicing the stitch.
When I finished, I just did the same thing again. Sometimes it was the same chick, sometimes I chose a different chick. I kept picking a thread I liked, usually one I hadn't previously used, a stitch I wanted to learn or really liked, and a chick that seemed "to like" the chosen thread color.
After a while, some of the chicks were fully embellished. Once I learned the stitches and had experimented with various threads, I tended to work on one chick until it was finished. Butif when
Another way to get started
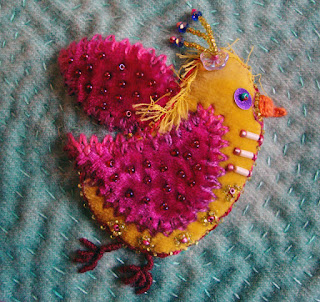
If you feel a bit timid about starting, you could make a pincushion, such as I did, shown below. It doesn't take a lot of time or materials, and can give you both practice (particularly in making beaks and feet) and confidence.
Personality
I can't help but think of the chicks as youngsters, maybe early teens, with emerging personalities... each, as I work on it, starts to have a story which plays out in my head while I stitch. Once the story begins, it's easier to choose stitches, design motifs, and threads which further develop the story or personality of that chick. Thinking about the chick's personality and background story, keeps me from getting bored, and makes it really fun to work on the piece.
Thread Hints
I already wrote about threads, adding it to the bottom the previous post (or, scroll down one more post).
What's Next?
As usual, I don't know. I take it one step at a time, trying not to figure it all out before I start. I do what I know to do. If there isn't anything I know to do, then I wait... wait for an idea, for inspiration, for a solution... wait until I know what to do next, but only the next thing... I try to ignore the question of what comes after the next thing. That's what I'm doing now... waiting to know what the next step in the quilting process will be.
While I contemplate how to proceed with the quilting, I thought it might be helpful to share some of the design process with you, especially since a few readers have said they might want to try something like this.
Learning the Stitches - Which Ones to Use and Where to Use Them
Sue Spargo's book, Creative Stitching, was very important in my design process. I didn't know most of the stitches when I started this piece. The instructions in the book are easy to follow, and I was able to learn all that I wanted from the book. More than learning the stitches, the photos in the book allowed me to see how she uses the stitches to embellish her wool applique shapes. Also, she writes about the threads and needles she uses. I followed her suggestions for needles, but did not use many of the threads she mentions.
Layout the Shapes
The wool is felted. I bought already felted (correct term is actually "fulled") wool. But you can make your own by washing wool fabric and drying it in the dryer. Here are some useful instructions for fulling wool fabric.
The first step is to cut out the chicks from felted wool fabrics. (Although I made chicks, the shape could be anything... butterflies, flowers, circles, donkeys...) I used 16 different colors, making each chick a different color. I used "chick colors" for some of the wings; others are from a bag of wool scraps I bought at the La Conner Quilt Festival.
I used 60 wt. cotton sewing thread to applique the chicks to the background fabric. Use a thread color that matches the chick color as closely as possible. Although it's a bit shiny, a single strand of embroidery floss would also work for this task.
Starting to Embellish the Chicks
When I finished appliqueing the chicks to the background wool, they just looked like blobs, barely recognizable as chicks. This is not inspirational for starting to embellish! I found that in order to even want to start, I needed to make them more real, more chick-like. So I gave them all eyes, all 16 of them. That helped a lot, but still they didn't feel real. So I gave them all feet, and then beaks. So as not to get bored, I changed thread color for both beaks and feet. Some of the eyes are made with a button; some with a flower-shaped bead; some with a disc-shaped bead. When all of them had eyes, feet, and beaks, finally they began to be chicks, and I was ready to start!!!
Even so... starting is daunting. I used the same method I use (and teach) for bead embroidery... If you've taken a class from me you've heard me say, "Pick up a bead you love, and sew it on somewhere." That's what I did... picked up a thread I loved, picked a stitch that interested me from Sue's book, picked a chick color that appealed to me at that moment, and started practicing the stitch.
When I finished, I just did the same thing again. Sometimes it was the same chick, sometimes I chose a different chick. I kept picking a thread I liked, usually one I hadn't previously used, a stitch I wanted to learn or really liked, and a chick that seemed "to like" the chosen thread color.
After a while, some of the chicks were fully embellished. Once I learned the stitches and had experimented with various threads, I tended to work on one chick until it was finished. But
Another way to get started
If you feel a bit timid about starting, you could make a pincushion, such as I did, shown below. It doesn't take a lot of time or materials, and can give you both practice (particularly in making beaks and feet) and confidence.
I can't help but think of the chicks as youngsters, maybe early teens, with emerging personalities... each, as I work on it, starts to have a story which plays out in my head while I stitch. Once the story begins, it's easier to choose stitches, design motifs, and threads which further develop the story or personality of that chick. Thinking about the chick's personality and background story, keeps me from getting bored, and makes it really fun to work on the piece.
Thread Hints
I already wrote about threads, adding it to the bottom the previous post (or, scroll down one more post).
What's Next?
As usual, I don't know. I take it one step at a time, trying not to figure it all out before I start. I do what I know to do. If there isn't anything I know to do, then I wait... wait for an idea, for inspiration, for a solution... wait until I know what to do next, but only the next thing... I try to ignore the question of what comes after the next thing. That's what I'm doing now... waiting to know what the next step in the quilting process will be.
Labels:
applique,
embellishments,
floss,
pearl cotton,
Quilting,
Sue Spargo,
thread,
thread embroidery,
tips,
wool
Subscribe to:
Posts (Atom)


