Showing posts with label Quilting. Show all posts

Tuesday, December 06, 2016

My Quilt for 2017 La Conner Quilt Museum Challenge

Robin Atkins, quilt for 2017 La Conner Quilt Museum challenge, detail
To be honest with you, the past two months (Oct. and Nov.) have been miserable for me because of the election campaign and results. Now, finally, the cloak of despair, the fog of depression, is lifting a little.

One evening, as I noticed the challenge kit from the La Conner Quilt Museum on top of my quilting to-do pile, a flicker of an idea passed through my brain. Then, as I awoke the next morning, the flicker became a small flame, which in turn lead me to accept an invitation to spend an afternoon quilting with some friends, which (in order to have something to work on) got me rooting through my fabric stash.

Now, quilters, beaders, and artists of all types, will recognize the phenomenon caused by physically touching your materials, supplies, and tools. Suddenly your wearisome thoughts of the election (or whatever else got you down) are gone! You fondle your stuff lovingly, and with great anticipation, you make the first cuts, fanning the flame, turning it into a nice warm fire. Ah, saved from the chilly fog, at last!

vintage quilt block, 11 inches square, hand pieced
My journey out of the fog began with this vintage block from a quilt that someone, somewhere, started long ago, but never finished. It, along with many others, was donated to the La Conner Quilt Museum. The Curator, Kathleen Kok, not knowing what she would do with all the vintage blocks donated over the years, just kept them in a corner waiting for an idea to form. And form it did!

Every year the Museum has a challenge as a fundraiser, showcasing the entries at the annual Quilt Festival. For 2017, the challenge theme is "Time" and the material provided in the kit is one of the vintage blocks from their collection. The block above is the one I picked. It is just so cheerful... how could I resist? Hand pieced, it wasn't perfectly sewn, but still I fell instantly in love with it. Mine for a $10 contribution!

Of course, it was just the block. In the photo above, I have already layered it with backing and batting, and then hand quilted it.

My idea is two-fold. (1) Since the "time" theme can be portrayed by a transition from these early fabrics to modern fabrics, I decided to repeat the block using Kaffe Fassett fabric scraps left over from my shimmer quilt. (2) Feeling powerless in the face of impending doom after the election, I had to find some ways to assert my beliefs, and this quilt was to be one of them. I've long been concerned about the ever-increasing world population, about all the small, yet constant ways overpopulation is damaging and destroying the natural systems of the planet. So the title will be: Under the Quilts, Time Flies, and Population GROWS. My idea is to illustrate this concept using both color and beads. You'll see.

First though, a few words about making the modern block. At first I tried to make a pattern for the "flower/star" by tracing one of the triangles from the back side. I hand-stitched the required 16 pieces together FOUR different times, varying the seam allowances each time, trying to get it to lie down flat. Obviously, I did not correctly copy the original, because when I finally sewed it so it was nice and flat, it was also too small. Grrr.

A smart quilt friend (thanks Tori) suggested I trace a section from the right side of the block and add 1/4 inch seam allowances all around. Good idea, but there were small differences between the sections... which one to trace? Trying to answer that question, looking at the block, I finally saw how the pattern was derived! (Light bulb!!!)

pattern for vintage quilt block, 11 inches square
It's two overlapping squares of the same size, one on point and one not. All it took was to measure the sides of the squares on the original block (which averaged 8.5 inches), cut them out of paper, fold the diagonals and sides, put a pin through the centers to join them, rotate the top one until the folds lined up, tape the two together, and draw along the fold lines. Voila! Now, all I had to do was cut out one of the half-points, add my quarter-inch seam allowances, and there was the perfect pattern for my new block. The rest went quite quickly, and below you can see the quilted result. (Note: I added quarter-inch seam allowances to each of the pattern pieces shown above to get the final cutting pattern.)


Robin Atkins, hand pieced, hand quilted block, Kaffe Fassett fabrics
You might be wondering why I've layered and quilted these blocks. How will they be joined to form the quilt? The answer is they won't be joined! Instead, they will be bound as separate little quilts (each 11 inches square), and then appliqued to a separate "background quilt."

Here is how they look with the binding.

vintage quilt block, hand quilted and bound by Robin Atkins

Robin Atkins, hand pieced, hand quilted block, Kaffe Fassett fabrics
Notice that the over-all color of the modern block is darker. This matches my concern about over-population of the planet. Time flies, and the population GROWS, making the world a darker place for me, as many species become stressed and obsolete, as the desert lands grow and the forests shrink, as potable water becomes polluted and scarce, as crowded people war with each other. You know. If you watch the documentaries and contribute to various environmental causes, you know. Darker.

Thus, the quilt also becomes darker as the eye travels from top to bottom. Here is how it looks with the two blocks on the background quilt, the transitioning colors from light to dark, representing about 70 years in time passing (estimating the date of the fabrics in the vintage block at approximately 1946). This is an extremely tiny period of world history, but one in which world population sky-rocketed from 2.3 billion to 7.4 billion.

Robin Atkins, quilt for 2017 La Conner Quilt Museum challenge
You can probably see the little heart beads, but if you click to enlarge the photo, you'll see them more clearly. The pair at the top represents a couple. They dive under the quilt, have some fun, and produce four lovely children (between the two blocks). These four pair up, dive under the quilt, resulting in 16 children. Under the quilts, time flies, and the population GROWS. That's m' story, and I'm sticking to it.

Now, here's a question for you loyal readers who have come so far with me on this thing.  The quilt looks really pretty the way it is. But originally, I had planned to do more beading on it.  I planned to bead several vines circling the outer border of the quilt (not the binding). Across the top of the quilt, the vines would be light green, with many green leaves, bright-colored flowers, and some critter beads/charms (bees, birds, bears, fish). As the vines trailed down the sides, they would become darker, until at the bottom they would be beaded with dark brown, black, and darkest greens, with no critters, and only a few dark flowers. The visual message (I hope) would be, "this is what happens when we overpopulate the world." What do you think... leave it like it is now or bead the borders?

Global Population Information

Think of it this way. Every single month increasing world population adds another Los Angeles AND another Chicago to the planet. That's 24 gigantic cities worth of people added EVERY year; more than 240 giant cities every 10 years. Imagine how many cities full of people will be added in your life time. Crunch the numbers and see what you think.

Evidence of heavy population demand on resources is all around us. Global aquifers are being pumped 3.5 times faster than rainfall can naturally recharge them. Eventually they will run dry, perhaps as soon as 75 years. Topsoil is being lost 10-40 times faster than it is formed.  Feeding all 7+ billion of us is increasingly difficult, impossible actually.

There is no technology solution to accommodate the increasing demand of uncontrolled global population growth. The only solution is voluntary one child per couple for a couple of generations, on a Global participation level. If all countries followed the lead of countries with the lowest birth rates (Taiwan, Spain, Portugal, South Korea, and Poland), we could reach a more sustainable Global population of 3 billion by 2100!

Please, talk about this with your child-bearing-aged kids, grand kids, students, etc. We teach environmentally sound practices in most schools, write books and make documentary films about issues like clean water, over-fishing, fracking, etc. But rarely does the topic center on overpopulation. Be proactive. Make it happen.

If you are willing to read (or listen to an audio book) to learn more about Global population, Count Down is an excellent read.

Here is a link to the previous bead embroidery pieces (and poems) I've made concerning population growth.Thank you for reading all the way to the end, and for anything you can do to help people understand what we need to do.


Friday, March 11, 2016

Does Machine Quilting Enhance Quilts that are otherwise Hand-Sewn?

Oh dear, I'm sorry to have neglected posting here for so long. Although many suitable topics and photos have passed through my mind and camera, there just hasn't seemed to be a nice chunk of time available for putting it all together. Today is the day to begin again!

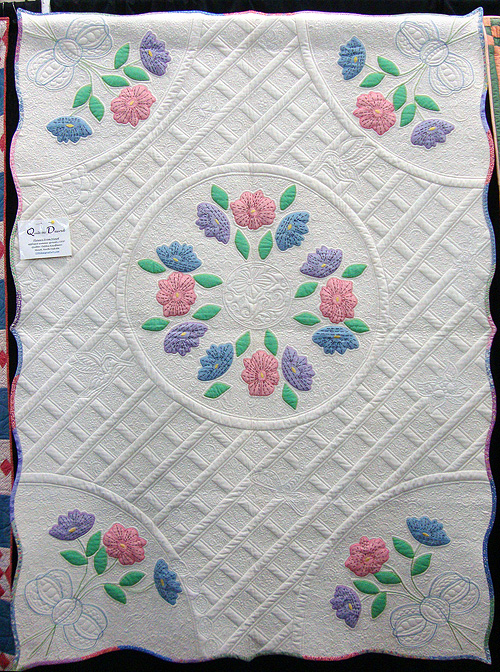
quilt, Inspired by Alice, Marilyn Lidstom Larson, border detail
Inspired by Alice, by Marilyn Lidstrom Larson of Willow City, ND (detail of border)

For the past two months, it's been all about quilts and quilting for me, with beading taking a bit of a back seat for a while. My quilt and travel buddy, Lunnette, and I flew to Ontario, California for The Road to California, which is a ginormous quilt show with more than 1,000 quilts on exhibition and over 200 vendors. We gawked (and spent all of our allotted budget) for 3 whole days, barely noticing our fatigue and sore footies.

There are several intriguing subjects to cover, inspired by our experiences there. Today's post is about traditional applique and machine quilting.

quilt, Inspired by Alice, Marilyn Lidstom Larson
Inspired by Alice, by Marilyn Lidstrom Larson of Willow City, ND
photo credit (for this photo only): Road 2 CA

quilt, Inspired by Alice, Marilyn Lidstom Larson, detail of maching quilting
Inspired by Alice, by Marilyn Lidstrom Larson, detail showing back

quilt, Inspired by Alice, Marilyn Lidstom Larson, detail of applique
Inspired by Alice, by Marilyn Lidstrom Larson, detail of center

quilt, Inspired by Alice, Marilyn Lidstom Larson, detail of maching quilting
Inspired by Alice, by Marilyn Lidstrom Larson, detail of center quilting
Inspired by Alice, shown in the photos above, won the first prize of $1,000 in the Traditional, Wall, Applique category of the main (judged) exhibit! Take a moment to study the pictures, click on them to enlarge them, notice the way the applique and machine quilting compliment each other. Also think about what this might have looked like if the maker, Marilyn Lidstrom Larson, had hand-quilted her work the way Alice, her grandmother (and inspiration for the central portion of the quilt), would have done. I love this quilt, totally love it, and believe it deserved the award it received.

At the same time, it saddens me that in all the juried/judged shows I've seen (and entered) recently, there is no category specifically for hand sewn quilts... quilts which are hand-pieced, hand-appliqued, hand-embroidered, and/or hand-embellished, and finished with hand-quilting. Nope, hand-sewn quilts are judged right along with machine-sewn quilts. In my observation, machine-quilted pieces are the ones that win almost all the prizes, even in the traditional categories. Why is that? Is hand-quilting considered passe, a thing of our grandmothers' time? Is it because machine-quilting has more pizzazz in the viewers' and makers' eyes? Is it because the machine manufacturers are huge financial supporters of these shows and providers of much of the prize money? Is it because the machine manufacturers run the training programs for judges?

OK, let's look into this subject a bit more. Later, I'll tackle the subject of the influence of the machine manufacturers. For now let's consider this question:

Does machine-quilting enhance quilts that are otherwise hand-sewn?

Interestingly, at Road to California this year, there was a small exhibit of hand-sewn quilt tops, made long ago (most of them in the early 1900s) that were not quilted or layered with back and batting by the maker. These tops were given to modern machine quilters to finish, and the results were displayed. Studying them gave me a greater perspective on the above question.

I found myself looking at them through the imagined eyes of the original maker. Would she have been pleased with the finished quilt?  As you look at some of the quilts below (and in a few cases, detail shots), ask yourself, if you had hand-sewn the top, would you have liked the way it looks today? Does the machine quilting enhance the work of the original maker? I've numbered the quilts (in no particular order), so you can respond (regarding specific quilts) in the comments if you wish. As always, you can click on the photos to enlarge them.
vintage quilt top, modern machine quilted, exhibited at Road to California 2016
#1 - Vintage Top with Modern Machine Quilting

vintage quilt top, modern machine quilted, exhibited at Road to California 2016
#1 - Vintage Top with Modern Machine Quilting, detail

vintage quilt top, modern machine quilted, exhibited at Road to California 2016
#2 - Vintage Top with Modern Machine Quilting

vintage quilt top, modern machine quilted, exhibited at Road to California 2016
#3 - Vintage Top with Modern Machine Quilting

vintage quilt top, modern machine quilted, exhibited at Road to California 2016
#3 - Vintage Top with Modern Machine Quilting, detail

vintage quilt top, modern machine quilted, exhibited at Road to California 2016
#3 - Vintage Top with Modern Machine Quilting, detail

vintage quilt top, modern machine quilted, exhibited at Road to California 2016
#4 - Vintage Top with Modern Machine Quilting

vintage quilt top, modern machine quilted, exhibited at Road to California 2016
#5 - Vintage Top with Modern Machine Quilting

vintage quilt top, modern machine quilted, exhibited at Road to California 2016
#5 - Vintage Top with Modern Machine Quilting, detail
What do you think of these? Which tops are enhanced by the machine quilting? Are there any that don't look right to you? If so, why not?

Since there is quite a difference looking at the photos as opposed to seeing the actual quits, my responses to these questions might be different than yours. To my eyes, #1 offers a believable connection and balance between the quilting and the original applique or piecing. It felt like the original maker would have done something very similar, only by hand.

I didn't want the quilting to overpower the original as it does in #3 and #5. Both of these were so stiff from the dense quilting, that it would be like sleeping under a piece of cardboard. Both of them made me feel disjointed. The lovely charm and grace of the original work seemed lost. I'm not sure why, but the background color created by machine quilting with colored thread in #5 seems almost weird... maybe because it's such an unlikely choice for the period.

Number 4 has the look of a chenille bedspread, both pretty and more-or-less "of the period." It works for me, even though the quilting is dense. The same is true for #2.

More from Road to California coming soon...

Thursday, October 08, 2015

Tips for Cutting Fabrics for a Hexie Quilt

I'm making 3/4" hexies, which means each of the six sides measures 3/4 of an inch. For these I need to cut 2" squares. (At the end of this post there is a table showing the size of fabric squares that corresponds to each of the standard sizes of hexie paper pieces.) To make each hexie flower, I need 6 squares for the petals and 1 square for the center. This is how I cut them.

hexie tutorial: for 3/4" hexies, cut rows of 2" strips into 2" squares
The first thing I do, is sort my scraps into piles by size. The easiest to work with are strips. These I iron, sort by approximate width, and stack 6 strips high, aligning the top and right side edges. Then I cut each stack of 6 strips to exactly 2" wide by slightly more than 14" long. From each one of the strips, I will get one set of petals and one center. After cutting 5 stacks of strips (a total of 30 different fabrics), line them up next to each other as shown above, and cross-cut 2" squares through all of the strip piles at once.

hexie cutting tutorial: pile stacks of 2" squares, alternating orientation of each stack

Now, pick up the piles of 2" squares, and place them in stacks, alternating the orientation as shown above.

hexie tutorial: trim corners off squares, cutting 6 at a time

Next, use dressmaker's shears to trim the corners off of each of the piles. Each pile has 6 fabrics, so you are trimming 6 at a time. Re-stack them as shown above. Note that there are only 6 piles in each row. The 7th pile in each stack, I have set aside to use for centers. These I keep separate from the petal sets, selecting a center for each petal set later in the flower-making process.

hexie tutorial: the yield from cutting the strip is 36  petal sets

The final step is to separate each of the piles into 6 separate piles, one for each of the fabrics. You will end up with 30 singles piles, or petal sets, each with 6 of the same cut and corner-trimmed fabric, enough to make 30 hexie flowers.

Certainly there are other, and even possibly more efficient ways to cut fabrics for hexies, but this way works well for me. Some quilters recommend using the squares without trimming the corners. I tried it that way, but went back to corner-trimming because I like not having the extra bulk toward the centers of each hexie. I'm especially glad I trimmed the corners on my Grandmother's Flower Garden hexie quilt, because it was that much less to stitch through in the hand-quilting process.

Sometimes, the fabric scraps are not strips, or would more effectively be cut as a chunk rather than strip. Basically it's the same process. I stack 6 different fabrics, aligning the top and right hand edges. From this stack, I cut a 4 x 6 inch block, and then cut that in half to make two 2 x 6 inch strips. I align the strips the same way as the 14" strips above, cross-cutting several at one time, and finish the same way as described above.

Fabric Cutting Guide for Different Sizes of Hexies

1/4" hexie  --- cut 1" squares
1/2" hexie  --- cut 1-1/2" squares
3/4" hexie  --- cut 2" squares
1" hexie ------ cut 2-1/2" squares
1-1/4" hexie - cut 3" squares
1-1/2" hexie - cut 3-1/2" squares
2" hexie ------ cut 4-1/2" squares
3" hexie ------ cut 6-1/2" squares
4" hexie ------ cut 8-1/2" squares
6" hexie ------ cut 12-1/2" squares

A very handy, and more complete cutting guide is available from Paper Pieces, which is where I get my pieces. Nope, I don't cut my own; too boring, and I really like the precision of die-cut paper pieces!

For a lot more helpful tips on making a hexie quilt, please see these posts:

Grandma's Flower Garden - 3/4 Inch Hexie Quilt - Time Study

Hand Quilting a Hexie Quilt

Hexie Quilt - Embroidery Quilting in Flower Centers

Hexie Quilt - Paper Pieces are GONE + Tips

Hexie Quilt - To Fix or Not to Fix

Hexie Quilt Top - Almost Finished

Hexies Galore - Grandma's Flower Garden

Grandma's Flower Garden Quilt - I'm Doin' It!


Wednesday, September 23, 2015

Wool Applique + Thread Embroidery + Beads = Happy Quilts!!!

Margaret & Scott, a wall quilt by Robin Atkins
Oh dear, busy me, four months since I've posted here. Lots of quilting, a little beading, some travels, and recently several sets of house guests have made "retirement" a bit of a joke. For now, since the La Conner Quilt Festival is just around the corner (October 2-4), my subject is one small exhibition on the first floor at the Museum, which is currently up, and will remain through the Festival.

Last year at the Festival (and again this year!) Sue Spargo taught workshops on her wool applique embroidery methods. Those of us who were lucky enough to get in were invited by the Museum to exhibit our finished pieces. These marvelous creations are the subject of this post. Uneven lighting makes it difficult to get good photos, so please forgive poor color or tone on some of these photos.

In case you are unfamiliar with Sue's work, below is an example of her work. Students in her class could choose to make chicks, circles, or flowers. Most chose the chicks. Eight of her students are showing their work in the current exhibit.

Chicks, a wall quilt by Sue Spargo, embroidery on wool applique
My vote for the most awesome-creative piece goes to Bunny Starbuck for She Has Flown the Coop! Here it is:

She Has Flown the Coop, a wall quilt by Bunny Starbuck, embroidery on wool applique
Having put my chicks all in neat rows similar to Sue's example, I find it amazing that Bunny's mind took the idea and made a whole different story of it... a coop full of chicks, with two in line on the roof ready to follow the one already in the air. Don't you just love the way the lines divide the space?!

She Has Flown the Coop, a wall quilt by Bunny Starbuck, detail

She Has Flown the Coop, a wall quilt by Bunny Starbuck, detail

She Has Flown the Coop, a wall quilt by Bunny Starbuck, detail

She Has Flown the Coop, a wall quilt by Bunny Starbuck, detail
Note Bunny's use of whispy yarn to suggest little chick feathers, her use of snaps for eyes, the one chick turned full front, the one with a bead-tassled braid and glasses, and the one with beaded loop fringe and a gathered yellow ribbon (?) yo-yo. I love them! I'm in awe, Bunny!

Below is Chicks on Parade by Dorie Benson. It's so fun the way they are so close together, with two of them going in a different direction, just as you might see in a little cluster of chicks. If you click the photo to enlarge it, you can see some of Dorie's excellent stitching and hand quilting!

The next one is Chicks by Glenys Baker, who not only did all 36 chicks but also made a second quilt featuring circles (shown further down). Awesome work, Glenys!

Chicks, a wall quilt by Glenys Baker, embroidery on wool applique
And next is Birds of a Feather Can Dance Together by Lorraine Jones. The fun of the title is matched by the fun of Lorraine's embellishments, including her border treatment. (You'll have to see this one in person, because the light from a table lamp, made the lower corner of the photo look terrible.)

Birds of a Feather Can Dance Together, a wall quilt by Lorraine Jones, embroidery on wool applique
I guess most of us like to "swim the other way," as you can see in the next piece, Chickadees, by Carrie Unick. I thought many of Corrie's embellishments were especially fun and creative, so I've also included a couple of detail photos.

Chickadees, a wall quilt by Carrie Unick, embroidery on wool applique

Chickadees, a wall quilt by Carrie Unick, detail

Chickadees, a wall quilt by Carrie Unick, detail

Last of the chicks is my piece, simply named Chicks. It was so much fun, that I made another small piece (also in the exhibition), shown at the top of this post. Both are displayed in shadow-box type frames to protect them from dust and moth damage.

Chicks, a wall quilt by Robin Atkins, embroidery on wool applique
Glenys Baker, in one year, made not only a 36-chicks quilt (shown above), but also a 48-circles quilt, Circles. How she keeps thinking of new embellishment variations I can't imagine. Yet each of her circles is completely unique! Her choice of border fabrics is perfect for the quilt, complimenting the flow of color among the circles.

Circles, a wall quilt by Glenys Baker, embroidery on wool applique

I love the fun color combinations and the way the beads enhance her embroidery on Nancy Anders' Bodacious Blooms, a joyful wall quilt if ever there was one! (Again, I couldn't quite get the color right in the photo, so you'll just have to go to the Museum to see it in person.)

Bodacious Blooms, a wall quilt by Nancy Anders, embroidery on wool applique

The name of Roberta Roberts' flower quilt, Memories, invites us to look closely at the flower with three ladybugs. I don't know the story, but I can tell there is one here... and I love that. Her embellishments are varied and fun as well.

Memories, a wall quilt by Roberta Roberts, embroidery on wool applique

Memories, a wall quilt by Roberta Roberts, detail

Memories, a wall quilt by Roberta Roberts, detail
There you have it... 10 quilts by 8 students who learned some methods of wool applique and embroidery from Sue Spargo, last year at the La Conner Quilt Festival. I'm so grateful to be one of them!

Wednesday, May 20, 2015

Beading + Quilting - a Happy Marriage!

It sure was a lovely surprise one day last fall when a representative from the Bead&Button Show called to ask if I would be interested in sending my beaded quilts for exhibition at the 2015 show in Milwaukee, WI.

Would I be interested? Of course I would!!! But since I'm more of a beader and don't have that many beaded quilts, I suggested they also contact my brother, Thom Atkins, who has made a mind-boggling number of beaded quilts in the last 10 years or so.

Brother-sister exhibition... how fun is that! You can see all 22 quilts in the Artisan Area of the Exhibition Hall if you're attending the show, May 27 - June 8. For those who can't make it, here are my quilts, the ones in the show. When you click on the first picture, you can see a slide show with full-size pictures.

Robin Atkins, beaded quilt, Five Cats in the Yard

Robin Atkins, beaded quilt, Five Cats in the Yard, detail

Robin Atkins, beaded quilt, April

Robin Atkins, beaded quilt, April, detail

Robin Atkins, beaded quilt, Beadlust

Robin Atkins, beaded quilt, Beadlust, detail

Robin Atkins, beaded quilt, Grandpa

Robin Atkins, beaded quilt, Intersections

Robin Atkins, beaded quilt, Intersections, detail

Robin Atkins, beaded quilt, Order & Chaos

Robin Atkins, beaded quilt, Order & Chaos, detail

It's really special how,in recent years, quilters are interested in beads, and beaders are playing with quilting, both finding ways to expand their creativity! And it's super fun to show with my bro!