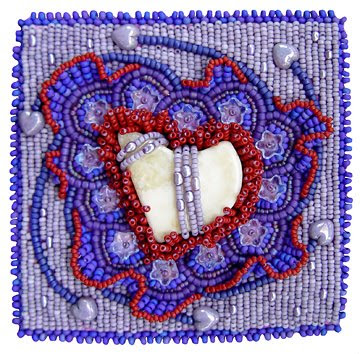
 February ~ Expanding My Constricted Heart
 March ~ For Little Christy (orange & yellow, colors of childhood)
 April ~ Serenity
 May ~ Blooming
Christy H is a dear friend here on the island where I live. We share passions for beading and quilting. She's been beading ever since she took my class a couple of years ago and is a current member of the Bead Journal Project (BJP). She also participated in the first BJP.
You may recall seeing her first eight BJP pieces. They're posted on the BJP website here... Finally I've gotten around to photgraphing Christy's remaining four pieces (above).
We thought you might also like to see what she did with her 12 finished pieces, which so vibrantly chronicle her life from June, 2007 to May, 2008. She wanted to display them, framed together. Since I have some experience with framing bead embroidery pieces, she asked me to help her.
We decided to mount them on a piece of fabric that would look good as a background for all of the pieces. Being a quilter, she has quite a fabric stash. After auditioning several fabrics, we chose a dark, muted red, striped fabric. We then bought a large piece of archival, 3/16" foam core board (get it here or at your local frame shop). Laying the fabric over the board, we arranged the pieces on top until the spacing looked pleasing. Then we measured the size we'd need and cut the board.

This is how her pieces look framed! Below is a tutorial to follow for sucessful, no-glue mounting...
A. In a similar manner to stretching a canvas for painting, stretch the fabric around the board and pin it in place:


You may recall seeing her first eight BJP pieces. They're posted on the BJP website here... Finally I've gotten around to photgraphing Christy's remaining four pieces (above).
We thought you might also like to see what she did with her 12 finished pieces, which so vibrantly chronicle her life from June, 2007 to May, 2008. She wanted to display them, framed together. Since I have some experience with framing bead embroidery pieces, she asked me to help her.
We decided to mount them on a piece of fabric that would look good as a background for all of the pieces. Being a quilter, she has quite a fabric stash. After auditioning several fabrics, we chose a dark, muted red, striped fabric. We then bought a large piece of archival, 3/16" foam core board (get it here or at your local frame shop). Laying the fabric over the board, we arranged the pieces on top until the spacing looked pleasing. Then we measured the size we'd need and cut the board.

This is how her pieces look framed! Below is a tutorial to follow for sucessful, no-glue mounting...
A. In a similar manner to stretching a canvas for painting, stretch the fabric around the board and pin it in place:
- Cut 3/16" acid-free foam core board to size, being sure to include an adequate margin for overlap of the frame.
- Cut the fabric 3 inches larger than the board on all four sides.
- Turn under a 1/4 inch hem on the fabric and machine stitch using zig-zag stitch.
- Center the foam core board on the wrong side of the fabric.
- Starting in the center of the longer side, stretch the fabric around the board and pin in place.
- Work your way to the corners on one end, stretching and pinning.
- Start again at the center point and work your way to the other end of the board.
- Follow steps 5-6 to stretch the fabric around the shorter side of the board.
- Now the fabric should be stretched and pinned all around the board.
B. Lace the fabric onto the board:
- Use a strong, nylon thread, such as Nymo D. Pre-stretch your thread.
- Starting at the center of the longer side, sew from side to side, zig-zagging your way to the corner. (See drawing below.)
- Start again at the center of the longer side, and lace in the opposite direction to the other end of the board.
- Lace the shorter side in the same way.
- Be sure to pull the thread really tight with each stitch. Adjust the pins if necessary. The laced thread should be quite taught, so that you can hear it "snap" when you lift it slightly and let it go.

C. Sew your pieces to the board:
- For this mounting method, each piece must have a finished edge. Christy turned under the fabric and finished the edges with a picot edge stitch. (See picture in this post showing back side of finished piece.)
- Arrange the pieces on the fabric-covered board.
- Pin the pieces in place using a pin in each corner.
- Attach the centermost pieces first and work your way to the edges, adjusting placement if necessary.
- Select the centermost piece and push the corner pins all the way through the foam core board so that you can see them on the back side.
- Mark these four points on the back side of the board. Also mark the approximate center of these four points.
- Use a strong, nylon or synthetic thread, such as Nymo D, in a color that blends with the piece you are attaching. Make a large knot at the end of the doubled thread.
- Sew through the board from the back side at the marked center point to the surface of the piece, adjusting as necessary so that your needle pierces a place between two beads.
- Stitch betwen beads for a short distance and back down through the board to the back side. This is called tacking your piece to the board.
- Remove one of the corner pins and tack it in place in the same way as steps 8 & 9 above.
- Tack the other three corners of the piece.
- Is this enough tacking to hold your piece? How large is it? How heavy? Maybe you need to tack it in more places. Christy's pieces are about 4 inches square. She tacked each of them in about 10 places.
- Continue to tack each of the pieces in place the same way.


D. Framing:
- Take your piece to a professional framer and select an appropriate frame.
- Use risers in the frame to insure that the glass does not touch textural elements on your beadwork.
- Hint: Be sure to cut your foam core board large enough to allow for the frame to overlap the board. The amount will depend on the frame you choose. Most frames will overlap the board by at least 1/2 inch.
This is an excellent way to frame a single piece as well. Because you don't use any glue, you will always have the option to take it apart and do something else with your bead embroidery!


Excellent tutorial, Robin!
ReplyDeleteKathy V in NM
I am so glad to have detailed steps for framing. It turned out beautifully. Hopefully I'll have 12 to frame someday.
ReplyDeleteAnn in NM
These are so beautiful and the framing is great. It highlights each piece yet still ties them together. Really nice!
ReplyDeleteI wonder if this method would work for something 3 or 4 feet wide... ;)
ReplyDeleteRobin,
ReplyDeleteThank you so much for this guide to framing. I took your class in Denver in April and am ready to frame my small piece by itself. I was going to use matboard. Would that work - have you used that?
Thanks so much.
Alice Howe
To Lone Beader ~ Yes, actually, I think it would. You might have to back the foam board with a second piece (or some other stiff board). Also you might have to spice the foam core board, as I don't think it comes quite that large.
ReplyDeleteTo Alice ~ I use foam core board because it is so easy to sew through it and yet, at the same time, it's very sturdy. Once I used mat board... I drilled the holes in it, but they weren't always in a very good place. With the foam core board, you just keep poking the needle in until you come up in a good place on the surface of your beading.
Great tutorial Robin and thanks so much for sharing Christy's beautiful work --
ReplyDeleteI have a question...Did Christy bead the edges of her pieces before or after stretching?? I intend to stretch all of mine on foam core and need to do a beaded edge...I haven't done that before (and I don't want to ruin them!) but I think each one of mine will look better with a beaded edge? (Maybe it's in one of your books? but I'm too lazy to run upstairs and check...*wink)...xo Susan
The pieces are individually beautiful and look stunnung together !
ReplyDeleteThe mounted pieces look good that way. Good tutorial.
ReplyDeleteThanks for the helpful mounting on foam core idea!
ReplyDeleteNice graphic too, of lacing the fabric across the back. ;-)
Christy's pieces look fantastic grouped together like this.
What a wonderful way to mount and show all of christie's beautiful work! (and what a nice friend you are for helping her)
ReplyDeleteTo Allie ~ Thanks for the kudos on the graphic... I was proud of myself to figure out how to do that in Photoshop!
ReplyDeleteTo Beadbabe ~ Thanks for the "friend" kudos... Christy gives back in many ways... She's my "quilting" mentor!
To Susan ~ Thanks for the good question (You did that in class too)!
ReplyDeleteChristy beaded all of her pieces on fabric backed with acid-free paper. She allowed a 3/4-inch margin of fabric around each piece, which was not beaded. After completing the beading, she tore away the paper from the back in the margin areas and folded the margin fabric to the back along the edges of her beading. She based the folded fabric in place and then stitched a beaded picot edge stitch (look at your class notes) all the way around the edge. A picture in this post shows how it looks on the back side. There is no stretching of the beading at all, only finishing of the edges.
The stretching is only for the background fabric, which is snuggly wrapped around foam core board and laced on the back.
Then the indidual pieces are sewn onto the covered foam core board by stitching through the board.
Hope this helps, Susan... if not, please ask!
Robin A.
This is a huge bunch of work, but it looks great. Hmmmmmmm, she says. and goes happily on her way. Great work and good tutorial.
ReplyDeleteChristy, I love your pieces--especially April's Serenity.
ReplyDeleteRobin, thanks for the how-to-mount tutorial.
Marty S
Crackpot Beader
Robin comes through again with a tutorial! I've been musing and muttering my way through what to do with my pieces and have actually decided to do nothing with them for now (maybe a mood thing), I still have my stuff from last year sitting in a box! Christy's pages are beautiful, and I too love the Serenity one!
ReplyDeleteWhat a beautiful piece. I love all the textures and especially the colors. Very beautiful. Julie C
ReplyDeleteYour timing is, as usual, excellent! I've been trying to figure out the best way to mount some things (pouring over your Finishing book) and you've just given me the answer! Thanks!
ReplyDeleteSerenity looks great, so tasty! Well done. Hugs / byZarah.com
ReplyDelete