Showing posts with label Totem Animals. Show all posts

Wednesday, February 29, 2012

October BJP Finished - Friend with Big Heart!


Stitching beadwork about my long-long-time friend, Liz, for October's BJP piece (see here) felt really great. It developed easily and was warm and fuzzy throughout the process. I've been best friends with Liz for more than half my life; she knows me better than anybody. She lives in Seattle.

When I married and moved away from Seattle to live on an island, Liz and I suffered deep pangs of proximity removal. We still had the phone and later email, but it's not the same as face to face, spur of the moment, let's TALK, which we had always shared. I was so lonely on the island at first. My husband had two jobs at the time; I worked at home, where I sorely missed female companionship. I joined some groups, found a walking partner, tried to be social and get to know folks. But for several years nothing really clicked.


Then I met Christy! Our husbands both served with the volunteer fire department. At social functions I always gravitated toward Christy, because she was so warm and friendly, so comfortable to talk with. She belonged to a quilting group and one day asked if I'd be interested to teach them some beading. The rest is history. Our friendship blossomed over beads at first, because her passion and talent for beading quickly burst forth into full bloom. She joined the BJP and made some touchingly beautiful pieces (see here).


Our friendship grew, and spread into other areas of interest, including quilting. About three years ago, we started meeting every Tuesday afternoon, three of us as the core group, to do our stitching, beading, and quilting together. Christy and our other Tuesday friend, Lunnette, are now my island safe haven, the two hearts to whom I turn for feminine companionship, understanding and support. I am very blessed!


And so, it's no surprise that my October piece is all about my relationship with Christy.  Because bear and dragonfly are two significant totems in her life, I've put them on her arm of the cross. In the center where our paths meet, you can see a crocheted flower that I've adorned with beads. This represents the full bloom of our friendship. The ring of beads surrounding the flower represents, I think, the way our friendship seems to be a safe place for both of us. Christy has a big heart, as you can see.

On my arm of the cross, I added a kitty charm because I am a kitty-lover and especially loved Christy's beautiful old cat. The heart/bird charm is one I've had since 1965. It's a design by Georg Jensen, one that I've hoarded and not even worn (for fear of losing it) all these years. To me, it represents me, my Chinese name, Peacefulbird. I'm so pleased to have found the freedom to place it here in my relationship with Christy!

+ + + + + +
In case you're a new visitor, the Bead Journal Project has been going for 4 years, and we started the 5th year last month. We each make 12 pieces per year. The pieces must have some beads and must all be the same size/shape. The idea is to use beading (and whatever other methods we like) to make a visual journal about the current month.

The piece above is for October of last year. I'm behind because of spending all my time since July writing a book. However, I've also completed November's piece (to be posted soon) and started December's. When I finish them, I'll get started on my 2012 pieces, hopefully catching up by next month.

My pieces for 2011 are intended as quilt blocks; they will be sewn together and quilted to make a wall hanging. The blocks are about 7 inches square. Each represents an important relationship in my life, how my life path intersects with some other path in the universe, how the relationship affects me.

Thursday, July 22, 2010

June BJP Finished!

This was a fun one! My words for the month of June made me think of my totem animal, rabbit.

stuffed rabbit, component for June BJP by Robin Atkins,detail
So this is how it all started. I had a package of bunnies pre-cut out of different batik fabrics and selected one that appealed to me. A black bunny with square spirals... What could be more cute than that?

I decided to make a slightly stuffed (dimensional) bunny, by cutting out a back piece, inserting some quilt batting and beading around the edge with picot edge stitch.

stuffed rabbit, component for June BJP by Robin Atkins
Here's how the back looks.

stuffed rabbit, component for June BJP by Robin Atkins
And here's the front.

Now what? Well, doesn't a bunny just love to leap and frolic across little hills and fields of flowers? And wouldn't pink be just the right color... my favorite color as a child to go with my childhood favorite animal?

decorative paper painted with acrylics by Robin Atkins
I painted the above paper some years ago (acrylic paints on heavy drawing paper... stenciling, stamping, glazes, textures, layers). The white spiral design is purchased rayon lace paper left over from a bookmaking project.

Next I needed some pink felt for the hills and my words. This time I decided to try stitching my words with embroidery floss. I used a double strand of variegated silk floss and the stem stitch. For the first two words breathe and believe), I "just did it." But I could see that my size and spacing weren't very good that way. So for the other four words, I stitched guidelines on the the felt, which you can see in two of the words below.

embroidered words, components for June BJP by Robin Atkins
Next I stitched the hills together using various embroidery stitches. Then came the beads and embellishments! The most fun part! I stitched the flower and leaf beads in place and then embroidered around them. It is so sweeeeeet to embroider on felt.... I love the feel of it!

bead and thread embroidery by Robin Atkins, bead journal project, Believe
Here's how it looks finished. Since my primary word for June is "believe," that's the title of this piece... Believe! (Click picture to enlarge.)

I believe in
  • asking for what I need and want
  • writing, writing, and more writing
  • surrendering rather than fighting
  • breathing deeply and mindfully
  • laughing as much as possible
So there you have it! I believe my dear totem animal guide, rabbit, is enjoying a leap into the stars... definitely in the pink!

Tuesday, August 25, 2009

Memory Box and How to Make It

Memory Box


memory box, bead journal project, robin atkins, bead embroidery
Stitching my Bead Journal Project piece for July on neckties I had made for my Dad (here), gave me the idea to create a Memory Box I can use to safe-keep letters, photos and other remembrances I have of my parents.

The box, made from scratch using book board, fabric, thread and beads (no glue!), is 10" x 13" x 5" high, which should be large enough to hold most of the dearest things I have.

I'm going to show pictures and write about how I made it.
But first I just want to say that it's not so much a tribute to my parents (although that's part of it). More significantly, this box, with thousands of hand stitches and hundreds of hours in its making, represents a connection with them. In my mind and heart, each stitch binds us together - birth, memories, history, love, good-bad-ugly-quirky-beautiful, death - all that we were and are to each other symbolized by all the stitches in this box. I put me in the box too, in the form of quilted rabbits and hearts all around the inside. You'll see.

Many Ways to Make a Box ~ Here's One of Them
To make the box... I used a rather improvisational or just do it approach, since I've never made one before and didn't have a clear idea about how to do it. One step at a time... do what I know and figure out the rest later. That's one of my guiding lights. The other is: it doesn't have to be perfect.
First I decided on the finished size. Using a box-cutter, I cut the pieces for the box and lid from heavy, dense, book board (Davey board). The lid pieces are about 1/8" larger all around than the bottom pieces.

Then I chose some fabrics that I loved and picked one of them to cover the inside bottom of the box. I happened to be going to an all-day quilting sewcial at our local Sr. Center and needed something to do. So I decided to quilt the bottom of the box. I sandwiched thin cotton quilt batting between the bottom fabric and some muslin and then stitched using embroidery floss.

quilted fabric, bottom of memory box, back side, by robin atkins
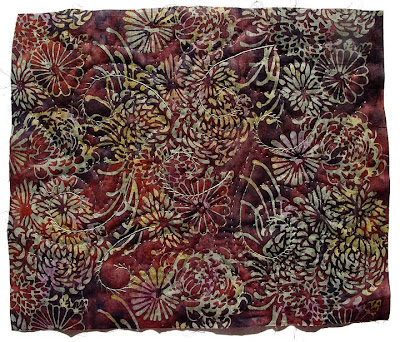
Here's how it looks. It's improvisational quilting... I just made a spiral shape in the center and worked my way out using a running (quilting) stitch and some embroidery stitches.
Some of the quilters wondered why I was bothering to quilt the inside-bottom of the box (where it won't show) and with a thread color that hardly shows. I didn't really know why at the time... now I think it's part of that stitching Mom, Dad and me together thing I mentioned above. Seeing it isn't as important as doing it.
quilted fabric, bottom of memory box, detail, by robin atkins
This is a detail.

quilted fabric, bottom of memory box by robin atkins
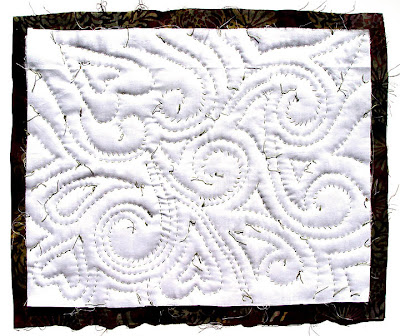
This is how it looks on the back side.

Quilting the bottom was fun! I enjoyed it so much that I decided to quilt the inside of the sides too!

quilting pattern for sides of memory box by robin atkins
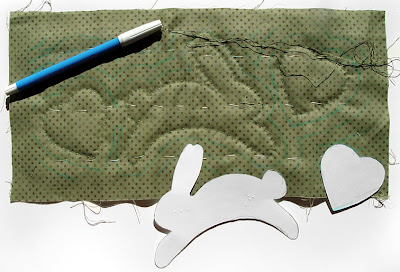
I cut a template of a rabbit (my totem animal) and a heart (my favorite symbol) from stiff paper and drew around them on the fabric with a water-erase marking pen. This is the start of one of the sides.

quilted side of memory box by robin atkins
Above is one of the finished sides. Again, my quilting was fairly improvisational and I added some embroidery stitches as well. Each side is different.

quilted side of memory box, back side, by robin atkins
This shows the back of the same side. To add a little more dimension to the rabbits and hearts (so they would show more), I cut the shapes out of stiffened felt and whip-stitched them to the back as you can see above.

easy felt
Stiffened felt (Easy Felt), such as I used to pad my quilting, is also great for beading - inexpensive, stiff and easy to stitch through. I get it at Michaels.

Now came a part that I didn't photograph... sorry.

I made a tight-fitting sleeve for the bottom of the box and each of the four sides. To do this, I cut the outside fabric, laid the cut out book board on the wrong side and drew around the book board. Then I put the quilted inside fabric and the outside fabric right sides together and sewed just outside the drawn line on three sides. After turning it so the seams were inside, like a pillow case, I slipped the book board into the sleeve.

The fit needed to be snug. One sleeve was too snug and I had to rip one of the seams. Another was a tad too loose and I had to re-stitch inside the previous stitching on one seam. It was a learning process... I got better at it by the time I did the lid. These seams I stitched by machine.

Next, I turned under the remaining edges and whip-stitched the sleeves closed by hand, completely covering each of the box pieces.

picot edge stitch, drawing by robin atkins
To attach the sides to the box bottom, I decided to use the picot edge stitch. Above is a drawing showing how to do this stitch. I first attached one side to the bottom. With each stitch I tried to catch 4 tiny bits of fabric - one from the inside side, one from the outside side, one from the inside bottom and one from the outside bottom. Although this took quite a bit of time, I think it made a strong join.

four sides of box attached to bottom, memory box by robin atkins
Here's how it looks with the four sides attached to the bottom. This is the inside.

sides of box joined with picot edge stitch, memory box by robin atkins
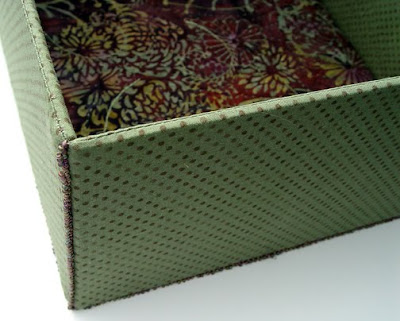
Then using the same method, I joined the side pieces together. Above is a detail showing one corner of the completed box. If you click to enlarge, you can see the picot edge stitch on the sides and bottom. I am satisfied with how this looks and think it will be as strong as any other method. I like it that I didn't have to use any glue.

Making a Lid for the Box

Now the lid! Oh boy, I was terrified that my calculations about the size of the lid would be off and I wouldn't know it until I finished the whole thing... Hours and hours of work! It was only because I wanted to finish the box in time to enter it in our County Fair that kept me going.

Before making the fabric sleeves for the lid pieces, I had to figure out how to attach my two bead journal pages to the top of the lid. First I needed to finish off the two pages. I decided they needed fabric borders made with the same fabric as the sides of the box.

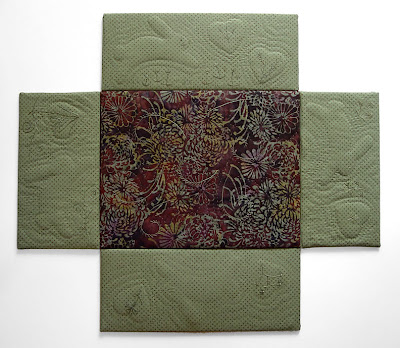
So I cut narrow strips of fabric and hand-stitched them to the sides of my beading. The pictures below show the right and wrong side of two strips sewn to the butterfly piece. This is like log cabin quilting.

bead embroidery, adding fabric borders, by robin atkins
Next, I thought it would be good to have my beaded pieces slightly raised on the surface of the box lid. So I turned again to Easy Felt, cutting out a piece just the size of the beaded area (4" x 6").

bead embroidery with fabric borders, back side, by robin atkins
Then I folded the fabric border to the back side, so that just 1/2" showed on the front. I tacked it down with running stitches to the Easy Felt on the back side. I finished each BJP piece with picot edge stitch around the outside of the fabric border.
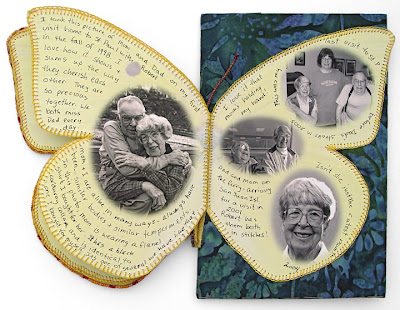
bead embroidery, mom's butterfly, with fabric border, by robin atkins
Here's Mom and Me ready to attach to the lid.

bead embroidery, dad's tie, with fabric border, by robin atkins
Here's Dad and Me ready to attach to the lid.

Next I stitched the finished BJP pieces to the cut out lid fabric (brown batik), using two lines of tiny running stitches - one at the outer edge and one at the inner edge of the fabric borders.

detail of box lid showing quilting stitches, by robin atkins
Before I made the fabric sleeve for the lid top, I decided I needed something to integrate the BJP pieces with the lid. A little quilting might do the trick. So, I made a sandwich of fabric, batting and muslin. I began quilting straight lines of stitches about 1/4" out from the BJP pieces. Nope. It looked too square, too formal. So rip, rip... out came the straight lines and back to improvisational quilting... Ha! Way better... a little spiral, some curved lines, more spirals... It worked!
The picture below shows the quilting, but even if you click to enlarge, it's a bit hard to see since I quilted with the same color thread as the fabric.

stitching bead embroidery to fabric, detail, by robin atkins
Then, finally, I made the lid the same way as the bottom of the box - machine sewn sleeves, whip-stitched closed, sewn together with picot edge stitch.

At last, came the test. Will the lid fit over the box? Will it be too loose? Ah, my lucky day! It fits perfectly. Here is a top view of the finished lid.

memory box lid showing attached bead embroidery by robin atkins
Important TIP!!!

My bead embroidery is very textural and both of these BJP pieces have parts that open to reveal books of pictures inside (see pictures at end of post). Think about stitching around these pieces to sew them to the lid fabric and about stitching the lid pieces together. Can you imagine how many times one could get the stitching thread tangled in the beads, around the butterfly wing or the flap of the necktie? It's a nightmare to contemplate.

So here's the tip! I stitched the butterfly wing closed and the antennae down. And I covered the entire necktie piece with fine netting, basted to the surface, as you can see below.

beadwork covered with netting to prevent snagging with thread while stitching to lid
It really helped! The thread got caught a few times around the crystals in the butterfly wing. (Guess I could have covered that piece with netting too.) Yet all-in-all, I had very little hassle. When finished, I removed the stitches holding the wing, antennae and netting.... good as new!

Ribbons at the County Fair

I finished the box just in the nick of time to get it entered in our County Fair last week. I wasn't surprised that it won a blue ribbon (1st place), but blown away that it took Best of Show in the Needle Arts Division!!! Here it is with the ribbons...

bead embroidery, quilting, memory box by robin atkins wins ribbons at fair
Remembrances

Now it's home again and I get to tie olive-green ribbons around packets of letters and pictures, and find my mother's wedding gloves and other remembrances of my parents to tuck into the box for safe-keeping. I also plan to use more of the green polka-dot fabric to make a fabric case to protect the box.

In case you didn't see these pictures in previous posts, here are a couple pictures of the butterfly piece, my November BJP, about my Mom. She's 92 years old and still doing fairly well in assisted living. She lives in St. Paul, MN. I plan to spend a week with her in October.

bead embroidery, bead journal project, mom's butterfly, by robin atkins
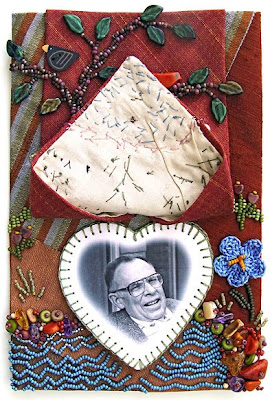
And below are pictures of the necktie piece, my July BJP, about my Dad. He died three years ago on July 13th. Although I miss him every day, more than I can say, the beading and stitching help me to feel connected with him in a way that is special and comforting.

bead embroidery, bead journal project, dad's tie, by robin atkins

Using Two of My BJP Pieces

Making this memory box required that I take two of my BJP pieces for the year out of sequence. That means I have 10 remaining pieces and can not show them all together in one group as I did last year. I feel a little separation anxiety about this.... But the memory box is important to me, so it's OK.

Now that my BJP set is already in two parts, I may continue with that thought and put the four pieces that have to do with spirituality together (make something with them... haven't decided what yet) and the three pieces that have to do with my relationship with my husband together. That leaves three fairly unrelated pieces... Maybe I'll frame them individually... or??? We have four months between now and when the BJP begins again. Lots of time to see what happens with my 10 remaining pieces!

Friday, July 03, 2009

Bead Journal Project ~ May ~ Open the Door

Ahhh, back to improvisational bead embroidery for me!!!! Here is my finished May BJP page...

bead journal project, Robin Atkins, Open the Door, May '09
Here is the poem I wrote from the piece after it was finished.
Open the Door

I am old and rusty.
Yet still I am a key.
Yet still I hold power
to open the door.

I am old and rusty.
Yet still fierce tiger waits.
Yet still I find courage
to open my heart.

I am old and rusty and empty.
Yet still red blood courses.
Yet still I have strength
to open the door.

I am old and rusty and afraid.
Yet still I want to know.
Yet still the river flows
and tiger takes me there.

Are you wondering about the tiger? It's machine sewn. Fabulous, isn't it?! Karen L. Cohen, BJP participant, gifted it to me after I asked her how she stitched the elephant for her April BJP (here). My old sewing machine doesn't do this type of thing, but apparently one can buy programs for newer machines that create images for you. Here is the program Karen used to stitch both her elephant and my tiger.

Karen offered me a choice of animals and colors. Since Tiger is one of my totem animals, I was immediately drawn to it. Saturated colors were calling me, strong and true... red, yellow, blue! Karen picked the background fabric and determined which of my suggested colors to use for the different parts. I'm so pleased with red as the main color!!! Red, the color of blood and love and energy and protection! Thank you, Karen!

The beading fell together easily on this piece. But the meaning of it wasn't clear until the last 15 minutes of working on it. I seemed to be inside looking at Tiger through a window or a door. I felt a strong urge to get through the door, to open it. At the last minute, I realized I needed a key.

Odd thing... I've been suggesting to several BJPers and to my brother, Thom, (who was just here for a week) that they/he add a key to their work. HA! Duh... It was I who needed a key all along!
Right after finishing this piece, I began my June BJP. Below you can see the fabrics I selected. Do you think maybe this could be the river??? Did Tiger take me to the river? We shall see.

bead journal project, Robin Atkins, ready to bead, June '09

Sunday, November 09, 2008

November Bead Journal Project ~ Mom & Me

Wow! I've been reading the BJP blogs, catching up after my week in Minnesota with Mom ... I'm vividly impressed with all the creative expressions of our hearts!!!! This just gets better and better, don't you think?

butterflies
Before departing for Minnesota on Nov. 1, I gave some thought to my Nov. BJP. Since I was visiting Mom, who is a real a sweetheart, and since this important trip has been on my mind for several months, it makes total sense that my journal page for Nov. should be about Mom (and a little about me too).

With that decision made, visions of photographs of Mom came to mind... also the image of a butterfly. Mom was a scientist at heart, she studied entomology (insects) and ornithology (birds) in college and graduate school. She doesn't get into what things symbolize as much as I do. Yet, she's always been drawn to butterflies.

So, I googled butterfly images to see what might inspire me. At first I was impressed with the fancy ones. But after skimming 20 or so pages of images, I found myself repeatedly noticing a plain little yellow butterfly with a single distinguishing spot on the upper wing.

dogface butterfly, female
As it turns out this beautiful creature ( Zerene eurydice, commonly known as the Dogface butterfly) is the California state insect. Mom was born and raised in California. Although I considered using the more dramatic male version (see below), the more subtle and shy female coloring seemed more appropriate for Mom.

dogface butterfly, male
OK, I thought... now what? How can I use this image AND the photos of Mom? A book!!! I decided to make a book on my page, with a beaded butterfly wing for the front cover and the background fabric of the page for the back "cover."

I drew the butterfly on interleaving paper, and basted it onto some yellow dupioni silk from my stash. I basted around the wing and the along the veins to give myself beading guidelines (see back and front below).

bead journal project, Robin Atkins, butterfly outline, back
bead journal project, Robin Atkins, basted guides for butterfly wing, front
Here is an example of one of the inside pages of the book. I used Photoshop to make the images into vignettes and collage them onto a partially screened version of the wing. Then I journaled in the yellow areas, writing little thoughts that came to mind as I looked at the images.

bead journal project, Robin Atkins, butterfly book page
Basted silk, beads, yellow embroidery floss and the wing pages traveled with me to MN. Mom was quite impressed that she was the subject of this month's BJP page, also delighted to see some images of herself that she hadn't seen in many years. Here are two of them that are included.

Mom and me, taken in 1943 when we lived in Palo Alto, CA.

baby Robin and Mom, 1943
Mom, taken in 2004.

Robin's Mom, Ferne Cook, 2004
While I was there, I worked on beading the wing for the cover. I got it finished the last day I was there, but only have the in-progress picture below.

bead journal project, Robin Atkins, beaded butterfly wing
My sister-in-law, Julie, said I should consider it done... She said the silk has a papery-like texture, similar to the appearance of a butterfly's wing. I agreed with her, but decided to try beading the entire wing, giving myself the option to undo it back to how it is shown above if I didn't like it. You will see my decision in the next post!

* * * * * *

You know I'm a bunny person, right? One of my two totem animals is the rabbit, right? Well, arriving at the Seattle airport a tad early on Nov. 1, I decided to do a little window shopping. Look what I found at Fireworks!!!!! Is he cute or what?!

bunny with sweater
bunny with sweater
* * * * * *

While in MN, Julie, Brenda, Terri and I got together one evening to bead. We had a whee!!!! Brenda brought her beautiful gate (September's piece) and was working on her October pathway. Terri has 5 (or maybe it's 6) of her "pages" started, some nearly completed. Like her Pirate book from last year, this year's piece will be a sort of "book." Julie was working on a free-form woven bracelet for a sale she's having next month, but brought her BJP work to show'n'tell. I'm totally in love with the way she visually described her experiences in Yellowstone National Park this fall in her September piece (see below).

bead journal project, Julie Cook, Yellowstone Impressions
* * * * * *

Mom's doing fairly well, especially considering that she'll be 92 years old in a couple of months. We braved Minnesota's chilly night to go to my brother's house to watch the election returns... and celebrated with champagne during President-elect Obama's speech!!! Mom still reads the newspaper every day and was much relieved to know there will be some changes in the years ahead.

Having read and appreciated Obama's second book, The Audacity of Hope, a year ago, I was convinced we needed him in the oval office. A couple of weeks ago I bought his first book, Dreams from My Father, which I've been reading during the past week. It feels like an amazing privilege to be watching our new president on TV while at the same time reading about his struggles to find himself, to identify his authentic place within race and other issues, during his youth. I believe he has the potential to be a great leader!

* * * * * *

Long travel day to get home yesterday... I flew from St. Paul to Seattle, took a shuttle to Boeing Field, and caught a puddle-jumper flight, which landed and took off in Oak Harbor and Orcas Island before finally arriving at San Juan Island, where I live. Ordinarily, I'd enjoy the extra flying time (over beautiful emerald islands), but yesterday was totally weird weather... high winds at certain altitudes, three levels of clouds (the lowest of which barely skimmed over the surface of the land and was extremely fast-moving). Some of the middle layer was busy dumping a load of rain, and once we saw the most brilliant rainbow.

view from small plane over Whidbey Island
However, if you know about flying small planes, you may be able to guess at what a nail-biter it was to be landing and taking off. Rock'n'roll, you say? Bounce, you say? Swerve to the side, you say? Yup! Took me an hour for each of the three landings to calm down after getting home. Had to put the cat on my lap... But, here I am, safe and sound!