Showing posts with label symbols. Show all posts

Friday, December 21, 2012

Two More BJP Blessings Finished - Family & Health

I finished November's and December's BJP pieces earlier this week and finally got them photographed today. All of my pieces this year are about blessings in my life.


Family (for November) is all about the blessing of a relatively close-knit family. We're not as close as sometimes I'd like, but we all like each other pretty well. My brother, Thom, and I lost our biological father in a car accident when I was 5 and Thom was 3. That could have been a disaster, but Mom met and married a wonderful man 2 years later, who soon became our new Papa. I'm fortunate to have always felt that he was my dad, that he loved me as much as he loved his own 3 children, my other 2 brothers and sister.


I don't really know what this piece says about family. Usually, by the time I finish a piece, the meanings have become obvious. Not so in this case. Anybody have any ideas?  It seems possible that the three buttons in the upper half represent my mom (the bird), my dad (the small blue-bordered button), and my step-dad (the square). Then, maybe the other 5 buttons represent me (well, that would be the rabbit, of course), and my 4 siblings. Whatever the significance/meaning, I do like the colors and the way it looks rich and inviting.


Health (for December) is all about the blessing of good health, with which I am unusually blessed.


I have no idea why I used chakra colors for this piece, or why I worked with a Goddess figure to represent health. I've never known much about chakra theory or particularly subscribed to other than Western treatments for health issues. Maybe this piece portends something for me in the future. If so, maybe this dear, healthy Goddess (along with her association with growing plants and a little kitty-energy) will continue the blessing of good health as I grow older.

<*>  :  <*>  :  <*>  :  <*>  :  <*>


Because of working on my new book, I didn't get started on this year's BJP until June, my first piece for the year. I've done 7 pieces (June - December). Think I'll try to do double pieces for the first 5 months of 2013, so that in the end I will have 12 blessing pieces for this year... I do like them quite well.

<*>  :  <*>  :  <*>  :  <*>  :  <*>

 Hope you all have a wonderful, magical, joyful Christmas. May the year ahead be just beadiful! Thanks for visiting today!

Monday, March 19, 2012

BJP ~ Finished November ~ Celebrate BFF!

Yep, I'm still working on my Bead Journal Project for last year, one month to go! This is my finished piece for November.

Lunnette & Me, November BJP
 Like the others for 2011, it is intended to be a visual description of the intersection between me and some important person or force in my life. This one tells of my friendship with Lunnette. She, Christy and I have been getting together on Tuesday afternoons for several years to share lunch and do handwork together, quilting and beading mostly.

Turtle in the center representing a slow-growing friendship
Whereas Christy and I dove into a relationship of trust and easy companionship right off the bat, the development of mutual trust and respect grew more slowly between Lunnette and me. That's probably why I put a turtle in the center of this piece.

Pinks and turquoise colors are mingled
Turquoise isn't a comfort color for me. Lunnette is totally at ease with it, frequently wearing it and using it in her work. However, rather than make the arm representing her all turquoise and the arm representing me all pink, I mingled the colors. Lunnette and I seem  to influence each other quite a lot. When faced with technical or artistic decisions regarding our work, we bounce ideas off each other, frequently finding a solution that is a combination of our ideas. The mingled colors must represent this aspect of our friendship.

The arm representing Lunnette is the one with the little, square, vintage, glass buttons (less than 1/4 inch in diameter). I puzzle a little bit about the differences between us, as shown by the two arms. For reasons I don't understand, I see more circles and flow in the arm representing me; more attention to little details, and a steady marching progression through life in hers. Since I bead improvisationally, without much thought, things show up in my work that elude my analytical skills. This is one of them.  Yet still, I like it and think she does too.

Finished quilt block.
Here is the finished square, shown on point as it will appear in the quilt I plan to make with my 12 pieces for the year. I'm excited to get going on it... Well, OK, first I have to bead December's piece. I know the subject and have the fabric ready to go. Time to get back to beading!

Friday, September 16, 2011

Recognize this Bead????? Mystery Solved!

vintage blue glass bead
Anybody out there recognize this bead... how old? where made? (Click to enlarge!)
Answers revealed at end of this post.

Here's what I know about it:
  1. made of transparent, medium blue glass
  2. round in shape
  3. about 14 mm in diameter
  4. probably a lampwork bead, because I can see bits of what seems to be kiln slip in the hole
  5. seemingly hand ground on the ends
  6. seemingly hand engraved, carved or etched because the cut designs are slightly different on each of the 13 beads I have
  7. at least 25 years old because that's how long I've had them
  8. carved design (three circles on each bead) looks a little like the Chinese symbol for longevity
  9. although I don't recall how (or from whom) they came into my possession, I do recall being told they were "vintage"
  10. I think I was told they were "vintage Japanese," but am not sure about that

vintage blue glass bead, hole
I need to know about these beads for a book I'm currently writing, especially how old they are and where they were made. Anybody know the answers? Educated guesses are OK. If you know somebody who might know, please pass the link to this post on to them. Thanks!

vintage blue glass bead, hole
* * * * * * * * * * * * * * *
Sept. 18, 2011 ~ Origins of mystery bead are revealed, thanks to Robert K Liu, founder and editor of Ornament Magazine, who wrote: These are lapidary-cut or ground Chinese Qing Dynasty beads, at most probably early 20th C.

Thanks to everyone who offered suggestions about who to contact, especially Beady Ann, who suggested contacting Dr. Liu.

Thursday, February 10, 2011

Finished February BJP

What better intersection to explore during February than my relationship with my husband?

bead embroidery by Robin Atkins, BJP, detail
Since we're struggling right now, working with a marriage counselor, trying to fix problems with both expectations and communications, my Bead Journal Project piece for February seems to be more about what I wish than what is.

I started out thinking this piece would be about our current relationship (and maybe it is that... more than I realize). But as the beading progressed, it seemed more and more to represent how I'd like the intersection of our pathways to look. I'm curious what our counselor might think of it... maybe I'll take it to show her next time. Maybe I'll ask my husband what he thinks it means. That would probably throw him for a loop, as he usually doesn't know what to say about my beadwork.

bead embroidery by Robin Atkins, BJP, detail
Clearly there's love at the center of our relationship, not a glamorous love, more like a plain, wooden, heart-shaped button kind of love with two funky, silver wedding-rings attached. Yet the large heart dominates the center of the story.

The line of me in the intersection is represented by red/pink beads, my favorite colors since childhood. The line of my husband is represented by blue beads, the color he painted his room when a boy, the color of his eyes, the color shirts I like to buy for him. I notice that his color gets into my line and vice-versa, which I think is important, although I'm not sure why.

My work is improvisational which means I don't start with a pre-conceived plan of any kind. Rather, I select whatever beads I'm drawn toward and start sewing them on the piece. It's fun to do it that way... and fast.

bead embroidery by Robin Atkins, BJP, intersection between me and my husband
For those who like to know:
-- fabric: cotton batik
-- thread: nymo, size D
-- stabalizer: interleaving paper*
-- finished size of block: 9 1/4 inches across the diagonal
-- length of the "arms" on the beaded X-shape: 5 inches
-- beads: size 15, 11 and 8 seed beads, vintage nail heads, pressed glass shapes

* I'll remove the interleaving paper from the underside in all areas that are not beaded. Thus when I sew the blocks together to make my wall quilt, the fabric will have a soft/natural hand.

The heart and the spiral are my favorite symbols, both appearing frequently in my art and beading. So let's go with it! Let's revisit my February pieces for the past three years of the BJP:

beaded valentine for little Robin
February, 2008 - This is Valentine for Little Robin, a gift for the child within, the little sweetie who loves flowers (fossies, as I called them at age 2), bunnies and duckies.

bead embroidery by Robin Atkins, beaded vlaentine
February, 2009 - This is Abundance, like a candy box filled with love, each cluster representing a special loving relationship in my life.

bead embroidery by Robin Atkins, Cry
February, 2010 - This is a detail image, showing the beaded portion of Cry, a piece that tells the story of my relationship with my wonderful mom pictured in the tear-shaped center of the heart, the heart being my love that surrounds her always. She is 94 and still hanging on, although sometimes only by a thread.

It's fun for me to look at these again, to see how strong the heart is, to view with gratitude the abundance of love in my life!

Friday, June 04, 2010

Change - May BJP - Finished!

collage, bead journal project, Robin Atkins, detail
Major changes (which came into full swing during May) are happening in my life. All six of my words for the month are relevant. They are: change, remember, forgive, seek, open and thank. Can you find them in the finished piece below? (You may need to click to enlarge.)

fiber and bead collage, bead journal project, Robin Atkins
I named the piece Change because that's the most important word of the six. Although I've decided not to delve into the personal changes I'm making in this post, it's not really a secret. If you're interested to read about it, you can check out my journal-blog, Words Paint, which I write under the pseudonym of Peacefulbird.

Obviously, the butterflies are symbolic elements of change and metamorphosis. A once-closed envelope (me) is now open with butterflies flying free. Feathers are another symbol of freedom, flight and good perspective... My husband found these two in our yard. My best guess is that a Northern Flicker gifted some tail feathers to us. The turtles are all about getting there, no matter how long it takes.

I started with the second, luscious, butter-soft, piece of resist-dyed felt made and given to me by Sweetpea. Without thought, I immediately folded and pinned it into an envelope shape. What could go in it? Oh, maybe those flicker feathers I've been saving! Oh, OK, now what paper will I use for the background?

Auditioning papers: This one seems to dark, don't you think?

auditioning painted papers for bead journal project, Robin Atkins
This one seems too busy.

auditioning painted papers for bead journal project, Robin Atkins
This one is really too busy; it competes with the pattern on the felt.

auditioning painted papers for bead journal project, Robin Atkins
This one was my second choice. I like it a lot, but it seems a tad too pale or washed-out looking with the felt.

auditioning painted papers for bead journal project, Robin Atkins
Here's the one I chose. Doesn't look like much in this picture, but the color has lots of life without being overpowering.

auditioning painted papers for bead journal project, Robin Atkins
Once that was decided, I started playing around with various beads and elements I might use. I had 4 plastic butterfly-shaped buttons in my stash which looked really nice coming out of the felt envelope and had appropriate relevance to change.

How could I apply my words to these buttons and where could I find two more? Hmmm... gave up on that one and decided to make my own butterflies by sawing them out of copper sheet and metal-stamping the words. Tried that. Too big, and way too visually heavy for the delicacy of a butterfly. OK, well, maybe I could make butterflies out of heavy, water-color paper, write the words on the wings and paint them. Here are the three ideas. You can see why I rejected the copper...

collage elements, bead journal project, Robin Atkins
So then I played around with drawing butterflies free-hand. Ummm, I'm not so good at that. However I had a sheet of butterfly stickers that gave me an idea. I peeled off the background part of the sheet and placed it lightly on the water-color paper. Then I used a #2 Micron pen to draw around the inside (where the sticker was), which gave me some nice shapes.

template for drawing butterflies, bead journal project, Robin Atkins
I wrote the words vertically along the edges of the left-hand wings, extending some of the letters to look like the veins. For the right-hand wings, I wrote the words backwards. Ruined a few, but finally got six usable butterflies. Next I painted them with watered-down, transparent acrylic paints.

painting butterflies for bead journal project, Robin Atkins
After painting, they looked like this.

painted butterflies for bead journal project, Robin Atkins
Before cutting out the butterflies, I used an embossing stylus to score along the body on each side so that I could easily fold the wings into flying position.

Next, I had to figure out how to attach them to my piece. Everybody knows how much I don't like glue. So, I needed a way to sew them on the paper and felt. I also needed antennae. A double-layer body might do the trick...

I cut out six little, body shapes from heavy, black paper and made antennae from bent pieces of 28 gauge brass wire. Using PVA (acid-free, bookbinder's glue) and a toothpick applicator, I put a little glue on the back side of the butterfly bodies and along the duplicate body shapes. Then I placed two pre-cut lengths of Nymo thread in the glue, perpendicular to each body and laid the antennae in the glue at the head. When the glue was slightly set, I joined the duplicate body layer to the back of each butterfly. My plan, if the glued layers worked, was to use the four Nymo threads to sew each of the butterflies to my piece. It did work! I hope the picture helps to make sense out of what I just wrote.

underside of painted butterflies for bead journal project collage, Robin Atkins
I also used 28 gauge brass wire to wrap beads around the feather quills. In a similar manner to the butterflies, I laid two pre-cut Nymo threads along each quill before wrapping, which would allow me to sew the feathers to the paper.

Here's what the back of my piece looks like. You can see where I tied the Nymo threads to secure feathers and butterflies. I used Tyvek (from a mailing envelope) as a backing to prevent the thread from cutting the paper. You can also see where I sewed the felt envelope to the paper using Nymo thread.

back side of collage, bead journal project, Robin Atkins
Well, there you have it, probably more how-to than anybody needs or wants... but I can't help myself sometimes...

I love this piece and what it represents in my life! Hope you like it too.

Tuesday, August 25, 2009

Memory Box and How to Make It

Memory Box


memory box, bead journal project, robin atkins, bead embroidery
Stitching my Bead Journal Project piece for July on neckties I had made for my Dad (here), gave me the idea to create a Memory Box I can use to safe-keep letters, photos and other remembrances I have of my parents.

The box, made from scratch using book board, fabric, thread and beads (no glue!), is 10" x 13" x 5" high, which should be large enough to hold most of the dearest things I have.

I'm going to show pictures and write about how I made it.
But first I just want to say that it's not so much a tribute to my parents (although that's part of it). More significantly, this box, with thousands of hand stitches and hundreds of hours in its making, represents a connection with them. In my mind and heart, each stitch binds us together - birth, memories, history, love, good-bad-ugly-quirky-beautiful, death - all that we were and are to each other symbolized by all the stitches in this box. I put me in the box too, in the form of quilted rabbits and hearts all around the inside. You'll see.

Many Ways to Make a Box ~ Here's One of Them
To make the box... I used a rather improvisational or just do it approach, since I've never made one before and didn't have a clear idea about how to do it. One step at a time... do what I know and figure out the rest later. That's one of my guiding lights. The other is: it doesn't have to be perfect.
First I decided on the finished size. Using a box-cutter, I cut the pieces for the box and lid from heavy, dense, book board (Davey board). The lid pieces are about 1/8" larger all around than the bottom pieces.

Then I chose some fabrics that I loved and picked one of them to cover the inside bottom of the box. I happened to be going to an all-day quilting sewcial at our local Sr. Center and needed something to do. So I decided to quilt the bottom of the box. I sandwiched thin cotton quilt batting between the bottom fabric and some muslin and then stitched using embroidery floss.
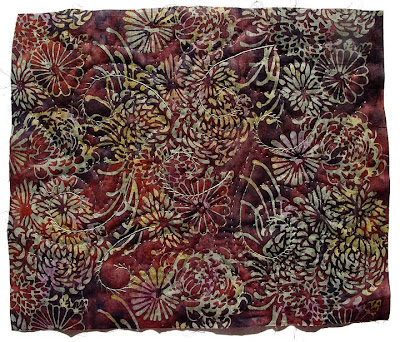
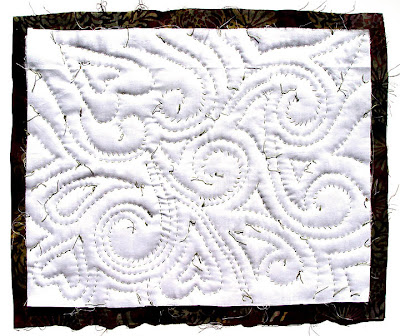
quilted fabric, bottom of memory box, back side, by robin atkins
Here's how it looks. It's improvisational quilting... I just made a spiral shape in the center and worked my way out using a running (quilting) stitch and some embroidery stitches.
Some of the quilters wondered why I was bothering to quilt the inside-bottom of the box (where it won't show) and with a thread color that hardly shows. I didn't really know why at the time... now I think it's part of that stitching Mom, Dad and me together thing I mentioned above. Seeing it isn't as important as doing it.
quilted fabric, bottom of memory box, detail, by robin atkins
This is a detail.

quilted fabric, bottom of memory box by robin atkins
This is how it looks on the back side.

Quilting the bottom was fun! I enjoyed it so much that I decided to quilt the inside of the sides too!
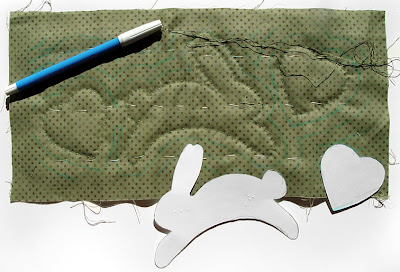
quilting pattern for sides of memory box by robin atkins
I cut a template of a rabbit (my totem animal) and a heart (my favorite symbol) from stiff paper and drew around them on the fabric with a water-erase marking pen. This is the start of one of the sides.

quilted side of memory box by robin atkins
Above is one of the finished sides. Again, my quilting was fairly improvisational and I added some embroidery stitches as well. Each side is different.

quilted side of memory box, back side, by robin atkins
This shows the back of the same side. To add a little more dimension to the rabbits and hearts (so they would show more), I cut the shapes out of stiffened felt and whip-stitched them to the back as you can see above.

easy felt
Stiffened felt (Easy Felt), such as I used to pad my quilting, is also great for beading - inexpensive, stiff and easy to stitch through. I get it at Michaels.

Now came a part that I didn't photograph... sorry.

I made a tight-fitting sleeve for the bottom of the box and each of the four sides. To do this, I cut the outside fabric, laid the cut out book board on the wrong side and drew around the book board. Then I put the quilted inside fabric and the outside fabric right sides together and sewed just outside the drawn line on three sides. After turning it so the seams were inside, like a pillow case, I slipped the book board into the sleeve.

The fit needed to be snug. One sleeve was too snug and I had to rip one of the seams. Another was a tad too loose and I had to re-stitch inside the previous stitching on one seam. It was a learning process... I got better at it by the time I did the lid. These seams I stitched by machine.

Next, I turned under the remaining edges and whip-stitched the sleeves closed by hand, completely covering each of the box pieces.

picot edge stitch, drawing by robin atkins
To attach the sides to the box bottom, I decided to use the picot edge stitch. Above is a drawing showing how to do this stitch. I first attached one side to the bottom. With each stitch I tried to catch 4 tiny bits of fabric - one from the inside side, one from the outside side, one from the inside bottom and one from the outside bottom. Although this took quite a bit of time, I think it made a strong join.
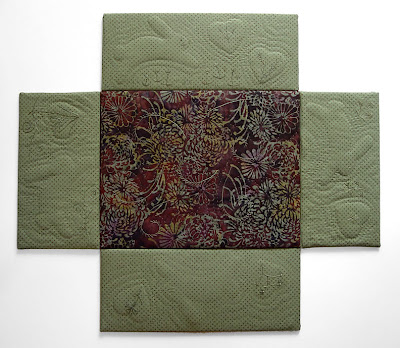
four sides of box attached to bottom, memory box by robin atkins
Here's how it looks with the four sides attached to the bottom. This is the inside.
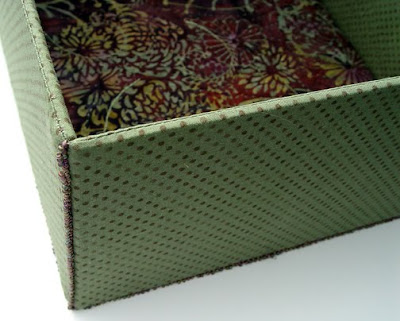
sides of box joined with picot edge stitch, memory box by robin atkins
Then using the same method, I joined the side pieces together. Above is a detail showing one corner of the completed box. If you click to enlarge, you can see the picot edge stitch on the sides and bottom. I am satisfied with how this looks and think it will be as strong as any other method. I like it that I didn't have to use any glue.

Making a Lid for the Box

Now the lid! Oh boy, I was terrified that my calculations about the size of the lid would be off and I wouldn't know it until I finished the whole thing... Hours and hours of work! It was only because I wanted to finish the box in time to enter it in our County Fair that kept me going.

Before making the fabric sleeves for the lid pieces, I had to figure out how to attach my two bead journal pages to the top of the lid. First I needed to finish off the two pages. I decided they needed fabric borders made with the same fabric as the sides of the box.

So I cut narrow strips of fabric and hand-stitched them to the sides of my beading. The pictures below show the right and wrong side of two strips sewn to the butterfly piece. This is like log cabin quilting.

bead embroidery, adding fabric borders, by robin atkins
Next, I thought it would be good to have my beaded pieces slightly raised on the surface of the box lid. So I turned again to Easy Felt, cutting out a piece just the size of the beaded area (4" x 6").

bead embroidery with fabric borders, back side, by robin atkins
Then I folded the fabric border to the back side, so that just 1/2" showed on the front. I tacked it down with running stitches to the Easy Felt on the back side. I finished each BJP piece with picot edge stitch around the outside of the fabric border.

bead embroidery, mom's butterfly, with fabric border, by robin atkins
Here's Mom and Me ready to attach to the lid.
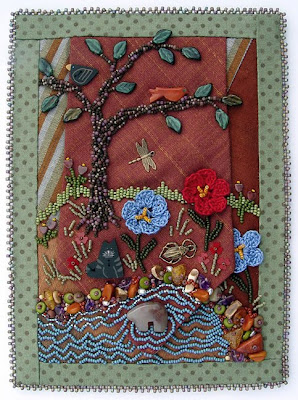
bead embroidery, dad's tie, with fabric border, by robin atkins
Here's Dad and Me ready to attach to the lid.

Next I stitched the finished BJP pieces to the cut out lid fabric (brown batik), using two lines of tiny running stitches - one at the outer edge and one at the inner edge of the fabric borders.

detail of box lid showing quilting stitches, by robin atkins
Before I made the fabric sleeve for the lid top, I decided I needed something to integrate the BJP pieces with the lid. A little quilting might do the trick. So, I made a sandwich of fabric, batting and muslin. I began quilting straight lines of stitches about 1/4" out from the BJP pieces. Nope. It looked too square, too formal. So rip, rip... out came the straight lines and back to improvisational quilting... Ha! Way better... a little spiral, some curved lines, more spirals... It worked!
The picture below shows the quilting, but even if you click to enlarge, it's a bit hard to see since I quilted with the same color thread as the fabric.

stitching bead embroidery to fabric, detail, by robin atkins
Then, finally, I made the lid the same way as the bottom of the box - machine sewn sleeves, whip-stitched closed, sewn together with picot edge stitch.

At last, came the test. Will the lid fit over the box? Will it be too loose? Ah, my lucky day! It fits perfectly. Here is a top view of the finished lid.

memory box lid showing attached bead embroidery by robin atkins
Important TIP!!!

My bead embroidery is very textural and both of these BJP pieces have parts that open to reveal books of pictures inside (see pictures at end of post). Think about stitching around these pieces to sew them to the lid fabric and about stitching the lid pieces together. Can you imagine how many times one could get the stitching thread tangled in the beads, around the butterfly wing or the flap of the necktie? It's a nightmare to contemplate.

So here's the tip! I stitched the butterfly wing closed and the antennae down. And I covered the entire necktie piece with fine netting, basted to the surface, as you can see below.

beadwork covered with netting to prevent snagging with thread while stitching to lid
It really helped! The thread got caught a few times around the crystals in the butterfly wing. (Guess I could have covered that piece with netting too.) Yet all-in-all, I had very little hassle. When finished, I removed the stitches holding the wing, antennae and netting.... good as new!

Ribbons at the County Fair

I finished the box just in the nick of time to get it entered in our County Fair last week. I wasn't surprised that it won a blue ribbon (1st place), but blown away that it took Best of Show in the Needle Arts Division!!! Here it is with the ribbons...

bead embroidery, quilting, memory box by robin atkins wins ribbons at fair
Remembrances

Now it's home again and I get to tie olive-green ribbons around packets of letters and pictures, and find my mother's wedding gloves and other remembrances of my parents to tuck into the box for safe-keeping. I also plan to use more of the green polka-dot fabric to make a fabric case to protect the box.

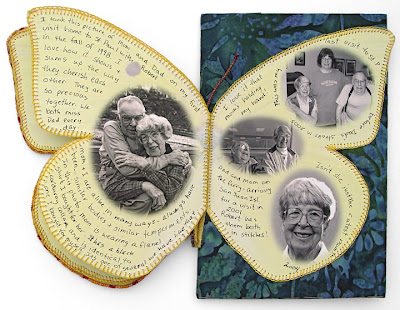
In case you didn't see these pictures in previous posts, here are a couple pictures of the butterfly piece, my November BJP, about my Mom. She's 92 years old and still doing fairly well in assisted living. She lives in St. Paul, MN. I plan to spend a week with her in October.

bead embroidery, bead journal project, mom's butterfly, by robin atkins
And below are pictures of the necktie piece, my July BJP, about my Dad. He died three years ago on July 13th. Although I miss him every day, more than I can say, the beading and stitching help me to feel connected with him in a way that is special and comforting.
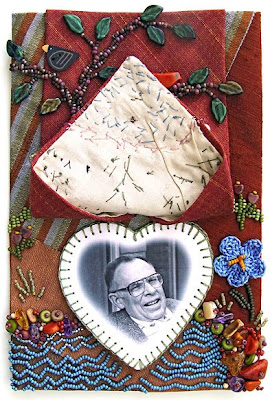
bead embroidery, bead journal project, dad's tie, by robin atkins

Using Two of My BJP Pieces

Making this memory box required that I take two of my BJP pieces for the year out of sequence. That means I have 10 remaining pieces and can not show them all together in one group as I did last year. I feel a little separation anxiety about this.... But the memory box is important to me, so it's OK.

Now that my BJP set is already in two parts, I may continue with that thought and put the four pieces that have to do with spirituality together (make something with them... haven't decided what yet) and the three pieces that have to do with my relationship with my husband together. That leaves three fairly unrelated pieces... Maybe I'll frame them individually... or??? We have four months between now and when the BJP begins again. Lots of time to see what happens with my 10 remaining pieces!