Showing posts with label hexie quilt. Show all posts

Thursday, January 18, 2024

Hexie Quilts - How to Make a Hexie Facing to Finish a Quilt with a Hexie-shaped Edge

Of course there are many ways to finish the edges of a hexie quilt, including making them straight by sewing partial hexies to fill the gaps, and then binding it like any other quilt. I happen to like seeing the hexie shape along the edges. This post is about the facing method I use to achieve that look.

1. The facing will be made of the same size hexies as the top. I generally use matching fabrics. In the image below, you can see the fabrics in the strip of facing hexies match the fabrics on the top.


 2. The facing can be a single row of hexies, as shown above, or more. In the example below, I have created a double-wide hexie border for my Grandma's Flower Garden quilt. The hexie facing is a duplicate of this border. In the photo below you can see a bit of both the front (border) and back (facing) of the folded quilt corner.


3. Make each of the facing hexies the same way you made hexies for the quilt top, then stitch them together to form separate strips for each side of the quilt. I also made separate strips for the corners of the above quilt.


4. After making the strips, spray them lightly with spray starch and press well. Then remove the basting stitches and papers. Press again. The facing is ready to attach to the quilt top.

5. Now comes the slightly tricky part, and (sorry) I don't have pictures. This step is to trim away the excess backing fabric and batting. The goal is to clip enough away so that the quilt edge is not overly bulky. Trim the batting a full quarter inch back from the outer edge of the quilt top. Trim the backing fabric an eighth inch back from the outer edge of the quilt top. Imagine looking at the quilt after you've trimmed the excess. Imagine it face down on a table. All the way around the edge you will see about 1/8 inch of the top fabrics under the trimmed backing fabric. If you lift the backing fabric, you will see 1/4 inch of the top fabrics under the batting. 

6. Lay the strips of hexie facing along the edge of the quilt, and baste them in place.

7. Stitch the top and bottom hexies together using a slip (hidden) stitch along the outside edge. Then stitch the inner edge of the facing to the quilt backing. Alternatively, you can use a decorative stitch along the outside edge, such as the button hole stitch, as shown below.
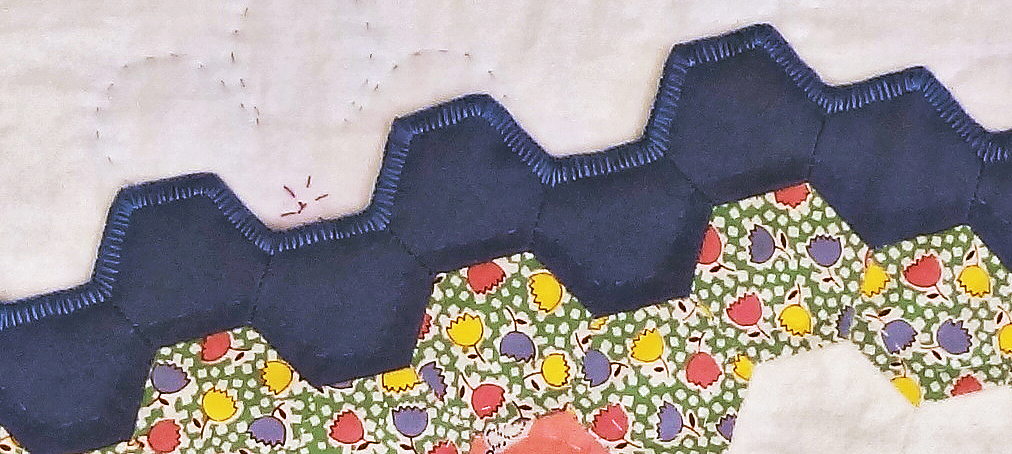

8. There are some decisions to be made about quilting the facing area of the quilt. In general, just as with normal quilt binding, I recommend quilting before the facing is added. Quilt the top to within 1/4 inch of the edge, then add the facing. There is no need to quilt the facing. However, in the case of Grandma's Flower Garden (above), the facing mimics the border on the top, which was ignored when quilting the flowers. So, after attaching the facing, I quilted 1/4 inch from the edge of the blue and the floral hexies all the way around, stitching through all the layers. This gave a nicely finished look to it. You can see the quilting stitches in the photo above. Below is the finished quilt. It's big enough to be a topper on a queen sized bed. The hexies are 3/4 inch. Here's a link to a time-line post listing all of the steps and how long each of them took to complete: https://beadlust.blogspot.com/2015/04/grandmas-flower-garden-34-inch-hexie.html


Saturday, May 14, 2016

Hexie 2 Report - 733 Hexie Flowers Finished!

hexie flowers, detail, Robin Atkins

I started cutting scraps of fabric to make hexie flowers on September 1, 2015. After 9 months of labor, I have just finished stitching the 733rd flower!  I'll do the math for you... That's 5,131 hexies. They are small ones, 3/4 inch per side. The finished flowers measure just under 4" in diameter.

44 hexie flowers, Robin Atkins

To give you an idea, this is what 44 hexie flowers look like. In case you don't know, for each hexie, the fabric is cut, and then basted over a paper, hexagon-shaped form. The hexies are then hand-stitched together to make the flowers. It takes about 1 hour to make one hexie flower, start-to-finish; thus 44 hours to make the batch above. Click the photo to see better detail of this process, which is called English paper piecing.


733 hexie flowers, Robin Atkins
And here are all 733 hexie flowers! Each flower is a different fabric. Although a few of the flower petal fabrics were also used for flower centers, I'm certain that there are over 1,000 different fabrics used in these flowers.

What's next? Well, I'm going to build a design wall using sound-proofing foam-board covered with a king-sized flannel sheet. I haven't quite figured out how to make it yet.

When the design wall is ready, I'll get out my hexie flowers and start to "paint" with them. Who knows what will emerge? Not me. I only have a vague idea that I might want to try "painting" an abstract view of our island shoreline.

When the "painting" process is finished, I'll stitch the flowers together in small groups, and then stitch the groups together. The result, hopefully in my lifetime, will be a queen-sized, non-traditional style, hexie quilt!

Thanks to everybody who shared scraps of fabric for me to use!

*  *  *  *  *  *  *  *  *  *  *  *  *  *  *  *  *  *  *  *  *  *

For those interested, here is a link to a "time study" and photos of my previous hexie quilt, Mama's Garden!

Friday, November 13, 2015

Brother & Sister: Both Quilters & Beaders

My brother, Thom Atkins, is a very talented quilt and bead artist!

Thom Atkins, quilter, beader, artist gives a lecture about beaded quilts

He's written a popular book about how to make beaded quilts.

Beading Artistry for Quilts by Thom Atkins

Recently he sent me a wonderful birthday present - a box of his scraps to use for making hexie flowers for my in-progress, hand-pieced, hexie quilt. Forty-nine different fabrics makes quite a stack of flowers.

Robin Atkins, hexie quilt, stack of 49 stitched hexie flowers made with Thom Atkins fabric scraps

Here they are again, this time arranged on a flat surface (click photo to enlarge for details). It's way fun to play with the flowers, re-arranging them in different ways, re-stacking them, and then spreading them out again.

Robin Atkins, hexie quilt, 49 stitched hexie flowers made with Thom Atkins fabric scraps

All the while I was cutting, basting, and stitching these flowers I was thinking about Thom, about our history and our mutual love of stitching. I recognized most of the fabrics. One was in a quilt we made 19 years ago for our mom's 80th birthday. Some were from blouses, dresses, shirts he made for himself and his wife. Some were from pillows and other home decor he made for their home. Some were from his early quilts. Most of them brought up a ton of memories for me!

I always like (and sometimes love) things that Thom makes, and yet I've also noticed when we are in a fabric store together, we do not gravitate toward the same fabrics. I wouldn't have guessed that I would use almost every one of the fabric scraps he sent. There were a few that were too glitzy, had a stronger metallic look than I like. But 90% or more could have come from my own stash. That's how much I like them.... leaving me to conclude that we are more alike than I thought.

Robin Atkins and Thom Atkins, sister and brother, circa 1947

Here we are as kids... book ends.  Me 16 months older than him.

What's it like when brother and sister, close in age, are both quilters and beaders, both of us entering our quilts in shows, both of us teaching workshops and writing books?

Are we competitive?

A little, but not very much in my opinion. I admit to being a little "nervous" when he took up bead embroidery a few years after I make it the focus of both my art and my career. In artistic matters, he has a quicker learning curve than I do, rapidly achieving excellence in any medium he tries.

The fact that he likes bling and representational, while I like matte and symbolic, makes our work look different, which helps. We're also very different in our approach to quilt designing. While I am heavily influenced by traditional quilts, his quilts are all "art quilts." Most of his are heavily beaded, while mine are mostly not. Right from the start, he usually has a complete "picture" in his mind of what his quilt will look like when finished; whereas I rarely have a clue what mine will be like until I'm nearly finished with it.

Nor have we had issues with our teaching. I mostly teach beaders, emphasizing bead embroidery techniques rather than projects. He mostly teaches quilters, concentrating on methods for sewing beads onto quilts. There are enough teaching opportunities for both of us to accept as many gigs as we can handle.

What's the best thing about our mutual passions for beading and quilting?

Well, we talk on the phone for hours at a time about our current projects. Our conversations would bore everybody else in our families to death, but for us it's exciting to share our ideas, challenges, and victories. We do it often! It seems each of us has always respected the artistic sensibility and skills of the other. It's great to have somebody you can count on to say, "That's really wonderful," when you show them your latest work.

We also share information about photography, opportunities for showing our quilts, inspirations, promotion of our books, and countless other related things. We help each other to solve problems and to grow artistically.

It seems pretty ideal; was it always like that?

If you've read my first book, One Bead at a Time, available here as a free download, you know that Thom grew up favored to be the artist in the family, showing his talents at a very early age. My bend was more academic, although I had no clear pathway. After majoring in art in college, Thom rapidly became established as an artist. After majoring in English and psychology, I muddled around in a couple of careers for many years. I didn't discover my passion for beading or start to think of myself as an artist until I was 46 years old. Until then I always admired Thom's art, but didn't relate directly to him about it. I'm glad it is different now; glad we are both talented and creative... together!


Thursday, October 08, 2015

Tips for Cutting Fabrics for a Hexie Quilt

I'm making 3/4" hexies, which means each of the six sides measures 3/4 of an inch. For these I need to cut 2" squares. (At the end of this post there is a table showing the size of fabric squares that corresponds to each of the standard sizes of hexie paper pieces.) To make each hexie flower, I need 6 squares for the petals and 1 square for the center. This is how I cut them.

hexie tutorial: for 3/4" hexies, cut rows of 2" strips into 2" squares
The first thing I do, is sort my scraps into piles by size. The easiest to work with are strips. These I iron, sort by approximate width, and stack 6 strips high, aligning the top and right side edges. Then I cut each stack of 6 strips to exactly 2" wide by slightly more than 14" long. From each one of the strips, I will get one set of petals and one center. After cutting 5 stacks of strips (a total of 30 different fabrics), line them up next to each other as shown above, and cross-cut 2" squares through all of the strip piles at once.

hexie cutting tutorial: pile stacks of 2" squares, alternating orientation of each stack

Now, pick up the piles of 2" squares, and place them in stacks, alternating the orientation as shown above.

hexie tutorial: trim corners off squares, cutting 6 at a time

Next, use dressmaker's shears to trim the corners off of each of the piles. Each pile has 6 fabrics, so you are trimming 6 at a time. Re-stack them as shown above. Note that there are only 6 piles in each row. The 7th pile in each stack, I have set aside to use for centers. These I keep separate from the petal sets, selecting a center for each petal set later in the flower-making process.

hexie tutorial: the yield from cutting the strip is 36  petal sets

The final step is to separate each of the piles into 6 separate piles, one for each of the fabrics. You will end up with 30 singles piles, or petal sets, each with 6 of the same cut and corner-trimmed fabric, enough to make 30 hexie flowers.

Certainly there are other, and even possibly more efficient ways to cut fabrics for hexies, but this way works well for me. Some quilters recommend using the squares without trimming the corners. I tried it that way, but went back to corner-trimming because I like not having the extra bulk toward the centers of each hexie. I'm especially glad I trimmed the corners on my Grandmother's Flower Garden hexie quilt, because it was that much less to stitch through in the hand-quilting process.

Sometimes, the fabric scraps are not strips, or would more effectively be cut as a chunk rather than strip. Basically it's the same process. I stack 6 different fabrics, aligning the top and right hand edges. From this stack, I cut a 4 x 6 inch block, and then cut that in half to make two 2 x 6 inch strips. I align the strips the same way as the 14" strips above, cross-cutting several at one time, and finish the same way as described above.

Fabric Cutting Guide for Different Sizes of Hexies

1/4" hexie  --- cut 1" squares
1/2" hexie  --- cut 1-1/2" squares
3/4" hexie  --- cut 2" squares
1" hexie ------ cut 2-1/2" squares
1-1/4" hexie - cut 3" squares
1-1/2" hexie - cut 3-1/2" squares
2" hexie ------ cut 4-1/2" squares
3" hexie ------ cut 6-1/2" squares
4" hexie ------ cut 8-1/2" squares
6" hexie ------ cut 12-1/2" squares

A very handy, and more complete cutting guide is available from Paper Pieces, which is where I get my pieces. Nope, I don't cut my own; too boring, and I really like the precision of die-cut paper pieces!

For a lot more helpful tips on making a hexie quilt, please see these posts:

Grandma's Flower Garden - 3/4 Inch Hexie Quilt - Time Study

Hand Quilting a Hexie Quilt

Hexie Quilt - Embroidery Quilting in Flower Centers

Hexie Quilt - Paper Pieces are GONE + Tips

Hexie Quilt - To Fix or Not to Fix

Hexie Quilt Top - Almost Finished

Hexies Galore - Grandma's Flower Garden

Grandma's Flower Garden Quilt - I'm Doin' It!

