And I think maybe that's the subject of my September BJP piece... Depression Lifting... although I'm never sure because sometimes the beads and fabric change their implication or significance as I continue to bead.

This piece is a long way from finished. I've done some work in the upper and lower sections, but only the bare minimum in the center sections. It just began with four fabrics I liked at the moment and the intention to try folding the over-lapping sections around rat-tail cording to make a raised division between the sections. As it turns out, the raised divisions are not especially noticeable, particularly in flat photos. But it was still fun to try.
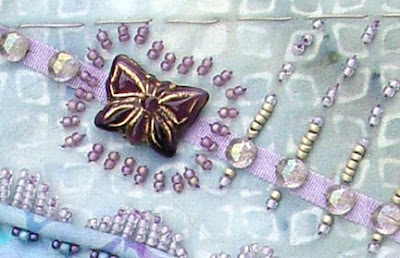
I had this little bit of purple ribbon from a gift that was just there on my work table... gotta use that! But it was only enough to do two of the sections, so of course, I had to make a trip to a rubber stamp store in Bellingham, WA to get more ribbons. Whoo-hoo, that was fun... at 15 or 20 cents a yard, I picked up quite a nice little stash of narrow, somewhat transparent ribbons.


Here are some detail shots to show the treasures I've used on this piece. The Sacramento coin with a cut-out heart in the center is a bus token, probably from the 40's that my Grandfather had in his coin collection. The vintage, abalone button is from another of my Grandfather's collections. The purple, carved-glass cabochon is a vintage piece I picked up somewhere in Germany years ago. The purple butterfly is a modern pressed glass bead, but the little transparent nail-head beads along the ribbon are definitely old (and long-hoarded by yours truly).

Here's how my Sept BJP piece looks while I'm working on it, with the extra fabric around the edges showing. If you click to enlarge, you can see how I stitched the ends of the ribbons down so that my beading thread doesn't get caught around and tangled with them.
* * * * * *
OK, on to a discussion of backing for bead embroidery. I noticed a number of posts on the BJP blog about backing. Many participants are using Timtex, Pellon, Stiff Stuff, or some other type of thick, stiff interfacing as a backing. Please let me throw in my 2 cents worth about this subject.
The primary reason to use backing is to stabilize your work and keep it from puckering. If your tension is too tight, it can pucker no matter which backing you use or how stiff it is. Especially bead weavers (peyote, right angle, etc.) tend to have trouble with tension when doing bead embroidery because it's so important to keep your work tight when weaving. That type of tight tension is NOT so good with bead embroidery.
I've been doing bead embroidery constantly for over 20 years. (Gaaak! Can it be that long?!) Except for trying Stiff Stuff one time, I've ALWAYS used paper for my backing. It is very easy to sew through it, isn't sticky, doesn't add bulk, costs only pennies, and most importantly, it works! Here is a picture of the back of my September BJP piece.

If you click to enlarge, you can see the holes where I've put my needle in at what turned out to be the "wrong place." You can also see how I end the thread by "weaving" it under a few stitches. Also, notice how I've run a line of little stitches around the whole piece so I can see where my beading area is on the right side. I leave an extra inch or so of both fabric and paper all around the piece. When I've completed the beading, I will tear away the extra paper around the edges and fold the fabric to the center along the stitched guideline (as in the top picture of this post).
Then it will be ready to finish any way I want.
If I want to applique it onto another fabric, such as for a wall-hanging or quilt, I just whip stitch it in place around the folded edge. Or I could glue it onto mat board using book-binding PVA glue or other acid-free glue. The paper backing/stabilizer takes glue really well!
If I want it to be stiff, I can cut a piece of template plastic or acid-free mat board just slightly smaller than my finished piece and a lining of Ultrasuede or other non-woven fabric and make a sandwich with the stiffener in the middle. I could either whip stitch the lining to the top or use a decorative edge stitch.
I always use acid-free interleaving paper to back my bead embroidery, but any acid-free paper works, including computer paper, hemp paper, Sumi painting paper, scrap booking papers, etc. If any of you would like to try the interleaving paper, send me a self-addressed, stamped envelope (just one 42 cent stamp is fine), and I'll send you a free sample to try. (837 Miller Road, Friday Harbor, WA 98250) It's available through some art supply and archival supply stores, or you can purchase it through my website here.


