Showing posts with label collage. Show all posts

Tuesday, October 16, 2012

Anne Bagby & Lynne Perrella - Clown Workshop

It was my over-the-top-LUCKY day when I learned Anne Bagby and Lynne Perrella were coming to my island (little, remote San Juan Island) to teach a 4-day workshop! Their theme was clowns... they would alternate teaching, two days each.


I've taken classes from both of them previously (at Art Fest), learning much of what I know about painting with acrylics and collage from them. I've incorporated painted, decorative papers into all of my beaded books. Above all, I owe to them the techniques of layering and glazing.

I want to write more posts about the workshop, which just finished yesterday, and show some of the teachers' and other students' work. But for today, I'm just going to show my own work.

Day 1

Anne taught some methods for drawing faces, and how to alter a picture of a face (perhaps taken from a magazine) to suggest a clown's face. We used white oil markers to make the faces white. I had two types. The whiter face was done with a Sharpie marker. Some of the other students used color pencils to shade the faces and make them look realistic. Since I've never even attempted to draw a face, I just stuck to outlines this time. But I envied the more realistic look.

Clown with Beard
Using painted 5x7 canvases, we collaged papers over the surface as a background for our "clowns." On other canvases, we simply sponged paint on the surface to give it a more complex look.

Lee and Madeline
We cut a "lump" out of painted papers from our stash (or Anne's stash) for the body, and used matte medium to attach it to the canvas.

Clown with Red Hat
Finally we added the face. To complete the pictures some students added ephemera, such as lace, buttons, etc. to make them more clown-like.

Babushka
 I chose to keep them simple, but did glaze most of them to soften the look.

Day 2

Lynne taught how to work with a toner-copy of a photograph, how to make it our own using her new favorite medium, Portfolio brand water soluble oil pastels (24-colors). She showed us how to cut stencils and masks to enable coloring in certain areas and to make lines like the shoulders on my painting below.

Alfred Tomkin
Using gel medium we attached our pastel-worked faces on 8 x 10 canvas boards, which in my case, were pre-painted. Lynne showed us how to collage papers and work with paint and/or pastel layers to integrate the faces with the background. Since my face images were face only (no neck, shoulder, or body), I had to create those parts with paint and pastels.

Lilly Tomkin
The images I used were family photos - my great grandmother, Lilly Tomkin, and great grandfather, Alfred Tomkin. I never knew them, but always loved these pictures of them. I just couldn't make them into clownish, clowns. So I just suggested the clown idea with colors and the use of the diamonds (harlequin) motif, while trying to preserve the dignified portrait look.

 Day 3

Anne taught four different methods for creating masks and stencils of figures. She also taught us how to make complex papers, which are collages of various painted papers, used then as a single sheet of painted paper. Her work using these methods is phenomenal (as you'll see in a future post), but I struggled hugely this day.

Cab Calloway
We were supposed to do four figures. I only did one. His face is one I drew on day 1... again, I wished I knew how to shade the features. One student was using water soluble pencils to shade her work, and the results were stunning.

A problem for me was that I couldn't find a way to relate, personally, to the faces and figures, to care about them, to find meaning in doing them. This one, for example, didn't have meaning for me until last evening when I showed it to my husband. He said it reminded him of the musician, Cab Calloway. OK... now I like it better.

Day 4

Lynne worked with us to pull it all together... everything we learned in the previous three days. The project was to make a vertical or horizontal panel with several faces.

Directors
What fun it was to turn a photo of my husband, our Siamese cat, and my grandmother into a painted-collaged piece! I call it "Directors," because these are three influences that in different ways direct my life journey. The night before, I re-read favorite chapters in one of my favorite books, "Improv Wisdom," by Patricia Ryan Madson. Brilliant! It really freed me to have fun, to play, to let go of "doing it right." I love the results!

More pictures from the class soon. Don't forget, you can click on Lilly and Alfred (day 2) to enlarge and see more details.

Thursday, February 03, 2011

Workshop with Karin Franzen!!!!

A Time to Dance, July by Karin Franzen
When I saw the above wall hanging by Karin Franzen at the La Conner Quilt and Textile Museum, I nearly swooned! My reaction was partly because of the subject matter, fire weed and cranes, so realistically, yet so compellingly portrayed and partly because the transparent quality of the layers of silk organza used in her hangings gives a sense of ephemeral spirituality to her work.

It's a whole day trip at a cost of about $100 to go to the Museum from our island, yet I managed to go three times to see Karin's work during her exhibition there. No wonder, when she emailed that she was teaching a three-day workshop, I HAD to do it. What follows is a little about her techniques and a little about my experiences in the workshop.

Karin Franzen, Egret
Above is one of her current pieces. Her work has evolved, as you can see if you take a good look at her gallery (here), from being quilts (layers stitched together) with borders to her current pieces which are layers of hand-dyed silk organza joined at the top with the subject and background sewn partly on the front and partly on the back sides of the organza... no batting, no borders, no quilting...

Karin Franzen, Egret, layers of organza under top (subject) layer
Here she has flipped up the top (subject) layer of the piece to reveal one of the hand-dyed layers of silk organza.

Karin Franzen, Egret, back-lit
Here you can see the same piece back-lit by sunlight. Her pieces change entirely depending on the lighting. Wouldn't this be lovely hung as a room divider where it would get front-lit part of the day, back-lit the rest of the day and entirely different lighting at night?

Karin Franzen, Egret, head detail
While we're on the subject of this piece, above you can see a detail of the egret, the many little pieces of fabric that she uses to reveal her subject and the stitches that further bring out the details.

Karin Franzen, Egret, eye detail
And here is the eye. Sometimes Karin uses fabric paints or dyes to create detail, texture, or alter the color of her fabrics. In this case, I think she may have painted the egret's eye.

Below are some pictures showing the steps Karin takes in developing her subjects.

She starts with a good-quality print of a picture, most often one she has taken, of her subject bird or flower. She then takes the image in Photoshop Elements and applies a filter called poster edges to the image. Then using a sheet of transparent acetate, she traces around the edges to create a cutting pattern. In the picture below, she has outlined the edges right on the image, but that's not how we did it in class.

Karin Franzen workshop, step 1,trace photo to make value map
The next step is to reproduce the acetate tracing on plain paper using a copy machine to get the desired size. This will become the cutting pattern for the fabrics.

Karin Franzen workshop, step 2, cutting pattern
Karin's method for creating the subject is to fuse bits of fabric to a very thin piece of non-fusible interfacing. She uses Pellon 805 Wonder Under (nothing else will do!) to fuse fabric to the interfacing. Below you can see the bird outline traced from the cutting pattern onto non-fusible interfacing. Now we're ready to begin fusing!

Karin Franzen workshop, step 3,trace subject on interfacing
Starting with the medium value colors, select appropriate fabric. Take a small piece of Wonder Under and place it paper side down over the subject cutting pattern. Use a fine point marker to trace the shape on the glue side of the fusible. Cut around the shape, leaving a 1/4" edge. Iron to wrong side of fabric. When cool, peel off the paper backing. You will be able to see the traced outline on the glue side. Cut out the shape. Place your non-fusible tracing over the cutting pattern and align the cut piece. Iron to fuse it to the interfacing.

Karin Franzen workshop, step 4, fuse medium value fabrics
Following the same steps, trace, fuse, cut and fuse the fabrics of lighter value next.

Karin Franzen workshop, step 5, adding light value fabrics
Next do the dark fabrics. I didn't say this above, because there was already a lot of information, but the first fabrics applied, generally the medium value fabrics, should be cut about 1/8" larger than the actual area. These pieces will be overlapped by the more precisely cut darker or lighter fabrics in the next steps. Below the little chickadee is now recognizable.

Karin Franzen workshop, step 6, adding dark value fabrics
Last, cut and fuse the small detail pieces to complete the subject.

Karin Franzen workshop, step 7, adding small detail fabrics
When all the details are in place, the next step is to stitch around all the fabrics using a free-motion foot on your sewing machine. The stitching is used to keep all the bits of fabric in place and to enhance the detail. You can see this stitching in the picture above of the egret's eye.

After the stitching is complete, Karin cuts around the outside edge of the subject, cutting away all of the interfacing that isn't covered with fabric and stitching.

She then places her subject on a piece of silk organza and stitches it in place. Finally, she hand-dyes other layers of organza, fusing background fabric pieces directly to the organza and hand stitching on them to enhance design elements, and combines layers with her subject layer to achieve the look she wants. She then stitches the layers across the top and mounts them on a hanging rod.

Obviously, I've simplified her methods greatly here, as I do not intend this as any kind of tutorial. Indeed, in three long days of class, we only touched the surface of how she creates her pieces.

The first day of class we did some sketching and used our sketch to create a background for our subjects. Her suggestion was that we sketch a dream, a childhood memory, or a childhood fantasy. And then, using the same methods outlined above, cutting and fusing fabrics to an interface backing, we were to make a piece from the sketch. Below you can see mine, from a sketch of a childhood fantasy about being a ballet dancer.

fused picture from sketch by Robin Atkins
Here it is again showing a layer of dyed organza over the background and the picture of a northern flicker, which is my chosen subject for my class piece.

fused fabric background made by Robin Atkins in Karin Franzen workshop
Not having a good idea of the whole when I started, my background did not seem to relate very well with my subject.

The second day, we spent a lot of time evaluating the backgrounds we had made, trying to find a way to make them work with our subject, deciding on which organza to use and how big to make our subject. At the end of day two and for all of day three, we worked on our subjects. I learned several things right away:

- It's so easy to iron the wrong side of fusible, making a terrible mess on the iron.
- It's so easy to trace on the wrong side of the fusible, making a mirror image piece.
- It's so easy to iron the fusible to the right side of the fabric, making a mirror image piece.
- Cutting out intricate little pieces is not very easy.
- Knowing which piece to cut bigger so they can be overlapped later isn't easy.
- Keeping track of which pieces you've already applied isn't easy.
- It takes concentration, concentration, concentration to get it right, and at the same time, it's a bit like paint-by-number, something I never enjoyed much.

Perhaps this type of work is all about me deriving great pleasure from looking at Karin's pieces and not at all about me doing it. At the end of a whole day, I didn't have much to show for my efforts. Below you can see that my flicker still needs spots, two feet, a wing, a tail and lots of TLC stitching.

photo of flicker next to in-process fused fabric version by Robin Atkins
My plan is to make the background a separate piece, to make the subject for it a rabbit which will be placed on the organza so that it covers the white bunny on the background and be much more realistic. The white bunny will be its spirit or totem energy.

For the flicker, I plan to make a new background of madrona trees in berry phase. The flickers come to our property every year to feed on the abundant madrona berries. The subject layer will include a madrona branch, some leaves and berries as well as the bird.

We'll have to see if I actually do these two pieces. For me they are character building. Also, if you know my work, you know that it's quite abstract. Even the few somewhat representational pieces I've done are not very realistic. I'm fairly certain that my primary role here is to be a huge fan of Karin's, to swoon at each new piece...

In case you're still interested, I thought I'd end with a few photos of other student's work. (My apologies, I only took my little camera and had to contend with the affects of indoor lighting sources.)

The first photo is Lunnette Higdon-Hertel's swan. She's the only one in class to finish fusing her subject. Like mine, her background story didn't quite match her subject. In the background review, it was suggested she turn her background upside down, which is how it's shown below. However, she plans to make a new and more appropriate background.

Karin Franzen workshop, swan by student
Karin Franzen workshop, loon by student
Karin Franzen workshop, heron by student
Karin Franzen workshop, row boat by student
Karin Franzen workshop, lotus by student

Useful TIP for Beaders

In order to stabilize the silk organza so that you can sew on it, Karin taught a very useful method using Solvy.

Karin Franzen workshop, demo, spraying solvy on organza as stabilizer
She tore off small pieces (4" x width of roll) of Solvy and one by one dissolved them in about a cup of warm water, stiring all the while. When the mixture was slightly thickened, like pancake syrup, she poured it into a spray bottle. She pinned the organza on a piece of insulation foam covered with plastic and then sprayed it with the Solvy mixture. When it dried (2-3 hours later), the organza was impregnated with Solvy, giving it a stable hand for stitching. After the stitching is complete, she simply puts the piece in a tub of water to rinse the Solvy away.

I believe this method might work well to stabilize cotton or silk fabrics for bead embroidery! I now use acid-free interleaving paper under the fabric as a stabilizer, which works fine. However, I'm going to try the Solvy method as soon as I get off-island to buy some. I'll let you know!

Friday, December 31, 2010

Adieu to 2010

rabbits dancing toward the sun
As the year closes, I find myself in a space of gratitude, feeling like one of these bunnies, holding hands paws with a more spiritual double, skipping toward the sunshine, grateful for my husband and family, meaningful friendships, space and time for making art, opportunities to explore and learn, support and inspirations found through blogging, another year of good health, our beautiful world, and so much more!

Sometimes seeking pleasure and happiness seems to get in the way of experiencing it... the seeking itself takes over and becomes the goal. Duh~ I am more mindful of that trap now, more open to seeing simply what IS with delight.

Looking back at 2010, I blew it on some of my goals, yet there were many accomplishments, some completely unexpected. A few reflections:

Bead Journal Project: I dropped the ball on both blogging and stitching after August. My September piece still sits unfinished. Although I did make progress in collage art and using words in my art, I also learned that setting multiple rules for myself hampered my enthusiasm. I don't know if I'll ever finish the last four pieces for 2010. But here's the good news... my exuberance for 2011 is steadily growing!

Personal stuff: One thing most cyber-followers of Beadlust don't know about me is that I've struggled with weight, overeating and compulsive binging for most all of my adult life. Being pretty good at periodic dieting, I've never gone higher than 240 pounds (gaaaak!), yet always ballooned right back to my high after every diet. Finally this year I faced the fact that I have an addiction going on and that I'm powerless to do anything about it. I joined Overeaters Anonymous, miraculously became free of obsessions with food sugary-fatty-crap, have gone from tight size 18 jeans to good-fitting size 12s, and most importantly, with the support of my OA group and higher power, I'm beginning to get in touch with emotions long suppressed by compulsive overeating. (My recovery journey is here.)

One other personal note: My husband and I came close to divorce this summer. Fortunately he is willing to get help and fortunately we found an excellent marriage counselor. A lot of my energy is going into spending more time with him... more quality time, more communication, more connection. I'm grateful to be in our marriage at the end of a rocky year.

New horizons: Beading, my passion for 25 years, is extremely important to me and I know without a doubt that it still holds amazing potential as a creative outlet. However, this year has been a year of exploring other things like quilting. Right now I'm making a God's Eye quilt using scraps saved from many, many projects over the past 20 years or so. It's thrilling to make the blocks, each a mini-journal in fabrics. I'll post some pictures soon. I'm also hand-quilting a large 1930's reproduction 25-patch quilt. Weaving a foundation for a wall quilt from re-purposed silk garments (with bead and thread embroidery embellishments) is calling me too!

As I've been dealing with addiction recovery and marital difficulties, failing in the process to keep up with the many blogs which delight and sustain me, I'm aware that connections are breaking or lost. This is a sad side-effect of shifting my focus. I hope plan to do better in 2011!

If you're one who is still following Beadlust, I thank you for your support and wish you all the best in the year ahead!

Wednesday, September 01, 2010

July BJP Finished ~ Focus

bead embroidery, Robin Atkins, bead journal project, detail Focus
As always, I chose my words for July's piece on the first day of the month...

focus
share
trust
create
imagine
inspire

Of the six words focus seemed super significant. I'm trying to make some changes in my life and the idea of focusing my full attention on the process seemed (and still seems) very important.

When I went through the felt pieces I made in Chad Alice Hagen's workshop, I immediately chose the one with the circle of red. The painted paper choice was easy too... first one I tried with the felt was a keeper. In fact nearly all the decisions regarding this piece were quick and easy... beads, threads, embellishments and the idea to bead the words were all no-brainers. Here it is finished...

bead embroidery, Robin Atkins, bead journal project, Focus
The finished size (not including the black background) is 7 inches square. The stitching is done with button hole thread and is a combination of back stitch and straight stitch. The beads are size 15s. It's less embellished than my other pieces this year, which seems appropriate to its meaning. To focus means to gather your attention toward one spot and not be distracted by other things... to keep it simple.

It was with this piece that my theme for the year finally became clear to me: Words to Live By! The notion to incorporate words in my pieces this year has been really challenging (I almost gave up after the first two months). But, piece by piece I feel that I'm improving. Besides that, having all these great action words in my life (my pieces as a constant reminder of them) is really satisfying.

You may recall that I've already posted my piece for August (here) and notice that this one is out of order. Although it was nearly finished in July, I was still missing the ribbons that hang from the pole on each side. I had ordered silk ribbons on line from Garden Fairies Trading Company. I waited and waited. Finally I called. Then I emailed. Someone wrote back that the order had been sent. 10 days went by. No order. I contacted them again. "order shipped," they said. Ha. Two more weeks went by before it arrived, post marked more than a month after I placed the order. On top of that they charged me for an item that wasn't enclosed and more than doubled the actual cost of shipping. Although they appear to have a good selection of silk ribbons, I'm sorry to say that I can not recommend them based on this experience. Anybody know of a friendly and reliable on-line seller of silk ribbons?

Friday, June 04, 2010

Change - May BJP - Finished!

collage, bead journal project, Robin Atkins, detail
Major changes (which came into full swing during May) are happening in my life. All six of my words for the month are relevant. They are: change, remember, forgive, seek, open and thank. Can you find them in the finished piece below? (You may need to click to enlarge.)

fiber and bead collage, bead journal project, Robin Atkins
I named the piece Change because that's the most important word of the six. Although I've decided not to delve into the personal changes I'm making in this post, it's not really a secret. If you're interested to read about it, you can check out my journal-blog, Words Paint, which I write under the pseudonym of Peacefulbird.

Obviously, the butterflies are symbolic elements of change and metamorphosis. A once-closed envelope (me) is now open with butterflies flying free. Feathers are another symbol of freedom, flight and good perspective... My husband found these two in our yard. My best guess is that a Northern Flicker gifted some tail feathers to us. The turtles are all about getting there, no matter how long it takes.

I started with the second, luscious, butter-soft, piece of resist-dyed felt made and given to me by Sweetpea. Without thought, I immediately folded and pinned it into an envelope shape. What could go in it? Oh, maybe those flicker feathers I've been saving! Oh, OK, now what paper will I use for the background?

Auditioning papers: This one seems to dark, don't you think?

auditioning painted papers for bead journal project, Robin Atkins
This one seems too busy.

auditioning painted papers for bead journal project, Robin Atkins
This one is really too busy; it competes with the pattern on the felt.

auditioning painted papers for bead journal project, Robin Atkins
This one was my second choice. I like it a lot, but it seems a tad too pale or washed-out looking with the felt.
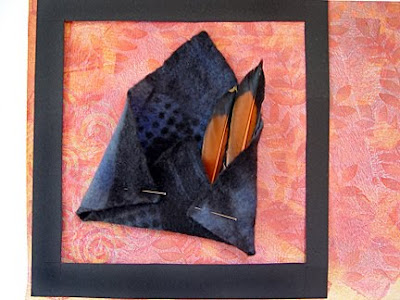
auditioning painted papers for bead journal project, Robin Atkins
Here's the one I chose. Doesn't look like much in this picture, but the color has lots of life without being overpowering.

auditioning painted papers for bead journal project, Robin Atkins
Once that was decided, I started playing around with various beads and elements I might use. I had 4 plastic butterfly-shaped buttons in my stash which looked really nice coming out of the felt envelope and had appropriate relevance to change.

How could I apply my words to these buttons and where could I find two more? Hmmm... gave up on that one and decided to make my own butterflies by sawing them out of copper sheet and metal-stamping the words. Tried that. Too big, and way too visually heavy for the delicacy of a butterfly. OK, well, maybe I could make butterflies out of heavy, water-color paper, write the words on the wings and paint them. Here are the three ideas. You can see why I rejected the copper...

collage elements, bead journal project, Robin Atkins
So then I played around with drawing butterflies free-hand. Ummm, I'm not so good at that. However I had a sheet of butterfly stickers that gave me an idea. I peeled off the background part of the sheet and placed it lightly on the water-color paper. Then I used a #2 Micron pen to draw around the inside (where the sticker was), which gave me some nice shapes.
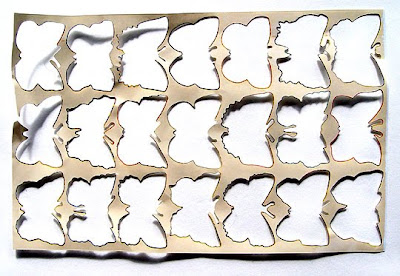
template for drawing butterflies, bead journal project, Robin Atkins
I wrote the words vertically along the edges of the left-hand wings, extending some of the letters to look like the veins. For the right-hand wings, I wrote the words backwards. Ruined a few, but finally got six usable butterflies. Next I painted them with watered-down, transparent acrylic paints.

painting butterflies for bead journal project, Robin Atkins
After painting, they looked like this.

painted butterflies for bead journal project, Robin Atkins
Before cutting out the butterflies, I used an embossing stylus to score along the body on each side so that I could easily fold the wings into flying position.

Next, I had to figure out how to attach them to my piece. Everybody knows how much I don't like glue. So, I needed a way to sew them on the paper and felt. I also needed antennae. A double-layer body might do the trick...

I cut out six little, body shapes from heavy, black paper and made antennae from bent pieces of 28 gauge brass wire. Using PVA (acid-free, bookbinder's glue) and a toothpick applicator, I put a little glue on the back side of the butterfly bodies and along the duplicate body shapes. Then I placed two pre-cut lengths of Nymo thread in the glue, perpendicular to each body and laid the antennae in the glue at the head. When the glue was slightly set, I joined the duplicate body layer to the back of each butterfly. My plan, if the glued layers worked, was to use the four Nymo threads to sew each of the butterflies to my piece. It did work! I hope the picture helps to make sense out of what I just wrote.

underside of painted butterflies for bead journal project collage, Robin Atkins
I also used 28 gauge brass wire to wrap beads around the feather quills. In a similar manner to the butterflies, I laid two pre-cut Nymo threads along each quill before wrapping, which would allow me to sew the feathers to the paper.

Here's what the back of my piece looks like. You can see where I tied the Nymo threads to secure feathers and butterflies. I used Tyvek (from a mailing envelope) as a backing to prevent the thread from cutting the paper. You can also see where I sewed the felt envelope to the paper using Nymo thread.
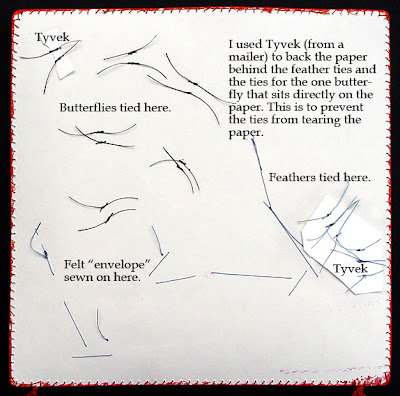
back side of collage, bead journal project, Robin Atkins
Well, there you have it, probably more how-to than anybody needs or wants... but I can't help myself sometimes...

I love this piece and what it represents in my life! Hope you like it too.

Friday, May 21, 2010

April Bead Journal Project ~ Finished!

Well finally!!! At last the words, felt, painted paper and beads all flowed together easily (and fairly quickly)... Here is Forgive, my BJP piece for April!

improvisational bead embroidery by Robin Atkins, Forgive, April 2010 BJP
It must be due to the fabulous hand-dyed felt that Sweetpea gifted to me. She made it in a workshop taught by Chad Alice Hagen. When she showed me the precious bundle of resist-dyed felt she had made in the workshop, I about went nuts... drooling, petting it, rubbing it on my face (sooooo soft!), tracing the patterns with my fingers, admiring the saturated colors... What could she do? Of course, she gave me not one, but TWO, of the pieces!!!!

Until this month, I've used store-bought, wool felt and covered it with beads so that you couldn't see it. I was bored with it... bored with plain, solid color... and frustrated by the way the beads would sink down into the felt. I kept wondering WHY on earth I had decided to use felt this year.

Well now I know! Working of this piece of butter-soft felt with its uneven, felted edges (must be a proper term for this type of edge) was such a tactile pleasure!!! I did not use paper or any other stabilizer under the felt, which made it pleasing to touch on both sides of my piece!!!

improvisational bead embroidery by Robin Atkins, Forgive, detail
The other thing that made this piece come forth so beautifully was the lime-green felt. I was visiting my family in Minnesota and beading with Julie (my brother's wife) and we got to wondering if it would work to rubber stamp on felt. It does! She had a scrap of lime green felt from which she had punched out a Christmas tree (see the shape on the bottom?) So we stamped it with a bird stamp. I liked it and asked if I could have it. (Who me a shameless beggar? You bet!)

The scrap looked a little different when she gave it to me. For this piece, I cut it in half (the lime green beads flow between the two parts), frayed out the edges using a needle and embroidered the birds and branch using single strands of standard embroidery floss (mostly back stitch).

improvisational bead embroidery by Robin Atkins, Forgive, detail
I painted the tags in the same colors as the background paper and wrote the words on them with a #3 micron pen.

The words are special to me for the month of April and so is the piece because of some personal changes I began making then. To forgive myself and others is an important part of this change... I see the words flow and forgive working together in this piece to guide me in the process. The other words are part of it too, especially to rest and to finish what I've begun.

One other reason this piece went together so easily is that I worked improvisationally, without a plan. On last month's piece, I worked more representationally (the mesa or butte), which is always more difficult because I'm trying to make it recognizable.

Unexpected things happen when I work improvisationally. In this case, after completing the piece, I noticed the over-all shape of the felt reminded me of a house... a bird house? a house for a Robin? This metaphor applies to the changes I am making, yet I didn't plan it at all! Improv just works for me and I'm always more satisfied with the end results.

I hope you like it too.

