Showing posts with label improvisation. Show all posts

Monday, January 15, 2018

"Eclipse" - Scrappy Improvisational Quilt

Robin Atkins, "Eclipse", scrappy improvisational quilt, detail
When my brother, Thom Atkins, visited last fall, he showed me (and a few quilting buddies) his new method for designing and constructing "scrappy improv wall quilts," a technique that turned out to be a lot of fun for me, especially given my long history with an improvisational, intuitive approach to bead embroidery.

Basically, what we did was to empty our bags or boxes of scraps onto a large table and start pawing through them, pulling out ones that appealed to us at that moment. For me it was all about color - red, magenta, fuchsia, with hints of pink, golden-yellow, orange, lavender, and dark green. All of the fabrics were in my scrap box. We had two days of Thom's demonstrations and guidance. During that time, each of us in our small group produced a unique and very pleasing "piece" or "block," measuring roughly 18 x 21 inches, the size of a fat quarter.

One of my red scraps, cut in a nice arc at one end, was the start of it all because I liked the shape and the color. Next I picked up a small strip of yellow, and held it behind the arc of red. Ooooh! Nice enough to repeat. The scrap of orange/red batik was large enough to cut a similar arc, and the strip of yellow was long enough to go behind that one too. These two arcs formed the basis of my piece.

Robin Atkins, "Eclipse", scrappy improvisational quilt, in process
You can see the two arcs above; the lower right was the first. The yellow strip was only about 3" wide, not enough to go all the way around the arcs, but I cut two shapes that would echo the top of each of the arcs. I layered the remaining scraps from that on top of the arcs along the vertical edges of the design. Then I put a dark green scrap behind the arcs and the yellow, which set them off nicely. The rest was just filling to the edges of the quilt with more scraps, including fussy-cut leaves and flowers.

The next step was to glue it all together along the 1/4" seam overlap, working in layers from bottom to top, and cutting away the excess fabric from the underside after each piece is glued. Cutting away the excess fabric leaves a double layer of fabric only at the seams; the rest is a single layer. The glue is Elmer's School Glue, Disappearing Purple, as shown below. It is an organic stick glue, relatively easy to sew through, repositionable, (in case you change your mind), and purple when first applied, drying to transparent (so you can see where exactly you are putting it).

Elmer's Washable School Glue, Disappearing Purple, 3 sizes
Thom's method is a type of raw edge applique, typically accomplished with heat-fusible web, such as "wonder under." The typical method, given a complex, layered design such as mine, would have resulted in a thick, stiff, multi-layer surface, which would be difficult to quilt, even with a machine. In Thom's method, there is no web, and in most places only one or two layers of fabric. Like all raw edge techniques, the raw edges must be sewn down, and the resulting quilts are not very suitable for bed quilts unless there is heavy stitching over the raw edges (for example, dense, zig-zag, machine stitching).

After gluing my original (shown above) quilt top, I assembled the quilt, using a spray glue to layer the backing, batting and top. The next step was to stitch along the "seams," the overlapping, glued edge of each piece. From there, it was up to each of us as to how to finish the quilt, perhaps with machine quilting, such as stippling or contour stitches, or perhaps with beading, all of which Thom does on his quilts.

A couple of months went by after getting to the unfinished stage shown above. I liked it, but didn't know what to do with it, until one day when I was at our Senior Center, getting foot care from a trained nurse who comes a couple times a week to help those who need it. Her treatment room, about the size of a walk-in closet, has no windows. Her client faces the door to the room, a plain, wooden door.  "That door needs a quilt," I told her. The rest is history; my scrappy improv quilt, Eclipse,  hangs there now.

Robin Atkins, "Eclipse", scrappy improvisational quilt
Only first I had to finish it. Above is the finished quilt, Eclipse. Below I'll tell you some of the finishing steps and about how I transformed it from looking flat and ordinary to sharp and textured using embroidery embellishments. Please click on the photo so you can see the details!

You might have noticed that the finished quilt is longer (better suited for hanging on a door) than the original piece. That was a challenge, although less than you might expect, because Thom had demonstrated for us how he sometimes extends the size of his quilts. In short, I roughly planned out the addition, the mock-up shown below, then created it using the same process and scraps as the original piece.

Robin Atkins, "Eclipse", mock up of added part at bottom

I used fusible "tape" made for butt-joining pieces of batting, to add a new piece of batting to the bottom edge of batting on the original (upper) part of the quilt. The horizontal strip of striped fabric overlaps the two parts of the quilt and the joined batting underneath. As you can see below, I added a fussy-cut flower over the striped fabric to break up the horizontal strip and visually join the two parts.

Robin Atkins, "Eclipse", added part at bottom, detail

Confession time... I'm not good at machine quilting, and don't even have a proper quilting foot for my old machine (1972 Pfaff). I tried stitching around the fussy cut flowers to secure the glued edges, but failed miserably. What to do? Ah, hand-sew with embroidery stitches and floss? Yes! It took a few tries, but eventually I found stitch and thread combinations that worked.

It looked so good that I decided to add stitching and knots to the yellow arcs next. Wow! That popped the eclipse look! In the photo below, you can see bits of all the embroidery stitches I added. Not only does the embroidery provide embellishment and emphasis, it also further quilts the piece. Click the photo to see the detail and better read the stitch identification.

Robin Atkins, "Eclipse", embroidery embellishment, stitch identification

Here are two more detail photos of the finished quilt (without the text boxes).

Robin Atkins, "Eclipse", scrappy improv quilt, embroidery embellishment

Robin Atkins, "Eclipse", scrappy improv quilt, embroidery embellishment

Lots of fun, and I like the results! Will I do another one? Well, right now I've finally returned to my hexie project, where I'm likely to remain for many months, but after that, scrappy improv may be just what I need!


Wednesday, March 25, 2015

Exhibition of My Beadwork... April 1 - May 3!!!

Beadlust 

an exhibition of bead and fiber works by Robin Atkins

This is the first solo exhibition of my work! I am very pleased and honored that the La Conner Quilt & Textile Museum offered me a show in their new Local Artist Exhibit Program's first-floor Landmarks Gallery.

There are 28 pieces in the exhibition, including beaded quilts, books, dolls, and framed art. Several of the pieces are new and have not been exhibited previously. Below is one of them, a beaded and embroidered collage using some of my hand-dyed, re-purposed fabrics.
hand-dyed, beaded, embroidered fabric collage
Every Child Should Have Her Own Tree, hand-dyed, beaded, embroidered fabric collage
I hope some of you will be able to come see my work, as well as the work of the other two featured quilt artists in the upper floor galleries.

Exhibition Information:
Exhibition Events: 
  • Opening reception at the museum: April 1, 4 to 7 pm; all three artists will be there; free admission
  • Demonstration at the museum: Robin demonstrates process and techniques of bead embroidery, April 1, 2-4 pmWorkshop: 
  • Robin teaches Improvisational Bead Embroidery, May 2-3 in La Conner http://www.laconnerquilts.org/improvisational-bead-embroidery.html
A couple of readers have contacted me asking if the above work, or any of the other pieces will be for sale...  Nope, afraid not... exhibition only, although the museum's excellent gift shop does carry my books.

Monday, May 12, 2014

The Best Reward.... Ever!


bead embroidery by Becki Applegate, detail
I've been teaching a two-day workshop called Improvisational Bead Embroidery for more than 25 years now, teaching both techniques and process to more than 2,000 women + a few men. In every workshop, there are one or two students who really stand out, who learn the stitches quickly and easily, and who embrace the idea of working intuitively. Often, they are the quiet ones, the ones who focus on their work and get a lot done in class, who don't ask many questions, but who pay rapt attention to all that I say and demonstrate.

bead embroidery by Becki Applegate, detail
Sometimes a promising student sends me an email with a photo of the project they started in class, which I always love to see. But the most gratifying reward of all, the thing that makes all the prep time and all the travel time worth while, is when I meet a student again and they bring the finished piece, the one they started in class, to show me in person. That is the best reward for teaching... ever!

bead embroidery by Becki Applegate, detail
Last week, I taught a group of 19 ladies from the Camano Island Quilt Guild, a very lively and talented group, many of whom will make me proud in the future! See how focused and hard-working they are?

my students - Camano Island Quilters and 3 visitors
One of the students, Becki Applegate, of Whidbey Island, took this same workshop one year ago when I taught it here on San Juan Island. At the time, she was definitely one of those stand out students, and she later joined the Bead Journal Project, continuing to make compelling bead embroideries.

bead embroidery by Becki Applegate, detail
When I asked her why she was taking the workshop for a second time, she said she was tired at the end of the second day (a year ago), and had not been able to absorb some of the things I taught, especially the finishing techniques. This time, since she already knew all the basics, she figured she could conserve her energy for that last segment about how to finish various types of bead embroidery, how to frame, line, back, sculpt, etc.

bead embroidery by Becki Applegate, detail
That is gratifying to a teacher, for sure! But even more gratifying, in this case, was seeing the finished project, Becki started in my class a year ago. She gave me permission to photograph it and show it here. Below is the front of her beaded pouch. It snaps closed at the bottom center.

beaded pouch by Becki Applegate, front
Below is the back of the pouch. I especially love the patchwork design with the gradation from orange to yellow beads. As always, you can click on any of the pictures to open a "slide show" of enlarged versions, which better reveal the details.

beaded pouch by Becki Applegate, back
Below is the front and back, how it looks when the pouch is open and laid pocket-side down, showing all of the bead embroidery. Becki uses many size 15 seed beads, which is how she gets so much detail into a small pouch (about  3.5 inches wide).

beaded pouch by Becki Applegate, front and back
If you flip it over, you can see the pocket inside, suitable for a special treasure or photo. The pouch is lined with Ultrasuede Soft Premium, a synthetic leather. The color is "Carrot."

beaded pouch by Becki Applegate, showing pocket inside.
I couldn't be happier or more proud of Becki and the beautiful bead embroidery she is doing!

Monday, May 27, 2013

Happy Red Balloon Purse

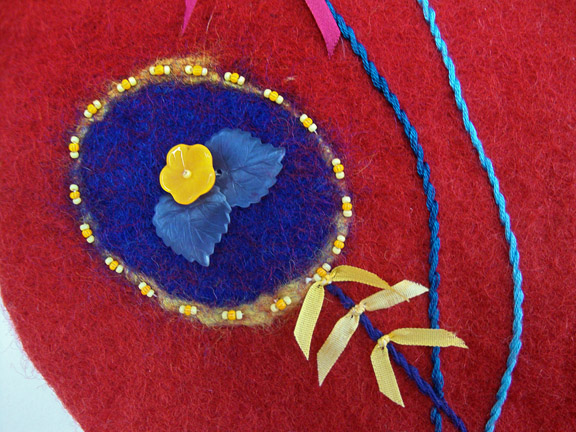
A few years ago I impulsively bought a red felt bag with circles of color on one side, made in Nepal. $40. I never used it... guess I'm conservative at heart when it comes to purses. Yet still, it always makes me happy to look at and touch it.

The original purse just had the "spots" of color. I embroidered the "strings" to make them look like balloons.

While moving, it surfaced. Wow, I thought, bet it would be fun to bead this bag! Maybe a more flamboyant person than I will buy it at the Artist Studio Tour (next weekend). So, for the last two days, my worktable heaped with stuff, I turned the circles of colors into balloons.


I started with the strings, embroidered with 6 strands of floss (detail picture above). Then I began adding beads, buttons and ribbons... Whoooohooo! Balloons!


Here are a couple of them.


I finished the bag at midnight last night. Most fun things were stitching into felt and adding the ribbons at the end. Most difficult thing was getting inside the purse to knot off the threads. Happy colors, happy red, happy Robin! How do YOU like it?

Monday, January 28, 2013

Still Have a Couple of Openings!


Bead Embroidery
Beautiful San Juan Island
March 30-April 1

Join me, Peggy Kemp from Hawaii, and 12 other beaders
for a fun-filled two and a half days
intensive bead embroidery workshop
bead sharing
and beadwork show-tell-solve session!


Spring Getaway! 

As of today,
we still have a couple of openings!
Email Peggy for information
or to register.


More information
here on Beadlust!

Saturday, January 12, 2013

Marriage & Beading

Today is my wedding anniversary. Sadly, it is not the happy day it should be.

Robert and I tied the knot January 12, 2001 in Victoria BC after being together for 3 1/2 years. We were both over 50 and had never previously been married. When we were saying our vows, Robert jokingly answered the 'til death do you part query under his breath, whispering maybe (not yes, but maybe). Although it was sort of funny at the time, perhaps I missed an undertone of truth, a current of unease that has run through our relationship.

Intersections - Robert & Me, 2011

If you know me, you know my bead embroidery is almost always improvisational, meaning unplanned and spontaneous. I like to stick a thought in the back of my mind, letting it guide my beading in a subconscious way. During our 16 years together, I've beaded about our relationship several times. I thought it might be interesting to take a look at some of these pieces in this post.

Marriage Bag, 2000

This is the first. It is Marriage Bag, started shortly after I met Robert and completed just before we got married. My intent was to explore the idea of marriage and commitment, to ask the question, Do I want to get married to this man?

Marriage Bag, Totem Animals, 2000
The first side of the bag I beaded seems to have a division. Looking at it 12 years later, I think it's about the two of us as individuals, apart from one another. My totem animal is the rabbit, so I think the left area is about me. There seems to be a lot of sunshine on my side. Robert's totem animal is the bear. His part is a bit darker, with just a hint of sunshine. There is a small heart at the bottom in each part connected by intertwined strands of beads, in retrospect a rather frail connection.

Marriage Bag, Intertwined Pathways, 2000

As I beaded the second side, the intertwined strands, representing our connection, grew much longer and stronger. It suggests a good and lengthy future together, don't you think? Back then beading this part gave me great encouragement and optimism about our relationship and marriage. Things looked pretty good during the "honeymoon phase" of the marriage, a time when we both turned blind eyes toward the signs that all was not well.

His Parents Were Alcoholics, 2007

This piece, from the first year of the Bead Journal Project,  is a portrait of Robert, showing childhood wounds, inflicted by parents, altered by alcohol, who probably did not meet his needs. I see scars, a wall, and the spirals of recovery passing under small holes in the wall. I see beaver, able to pass to either side of the wall, facing outward toward the light. I hoped that the wall would gradually fall apart, allowing us to be closer.

Hearts in Delicate Balance, 2008

A year later, I beaded this visual statement of our relationship. Look what showed up.... the same intertwined path, which I think represents the part of me that still held optimistic hope for our marriage to be well-rooted and to grow upward in a healthy way. But more dominate in this piece is the precariously balanced hearts. Even the thing upon which they stand is unbalanced. Bear is there, climbing up hill. Will we make it?

Lunar Marriage Dance, 2009

Three months later, this piece again shows my optimism. Yes, we sometimes drift apart, but then, like the cycles of the moon, we come together again, a "close dance" in the fullness of the moon. As I stitched the last bead and looked at it, I had a sense that the dance between us is good and that it passes naturally through phases, yet remains and will continue to remain a good dance. Looking at it now, I wonder if it actually predicted how the future would find us drifting apart, spending more time in solo dancing than in partnership.

Forgive, 2010

The next year, I was trying to re-invent myself, trying to make changes that would improve our marriage. This piece is inspired by two words: forgive and flow. I wanted to flow through our relationship in a peaceful way and to forgive us both for all the rough spots along the way. In retrospect, I notice that the flow divides the branch and the birds. The two birds closest to the flow have their backs to one another. Improvisational works seems to be like that, suggesting different interpretations at different times. Ten years earlier, on Marriage Bag, the two birds on the branch were facing each other (see the second loop of the intertwined pathways).

Intersections - Robert & Me, 2011

Here is another improvisational piece about our relationship, the intersection of Robert and me. I am the red/pink arm of the intersection; he is the blue arm. This is a tough one to interpret. There is a small black heart at the top of the wooden heart in the intersection. What does that signify? Wedding rings are most often shown overlapping. In this case, they are side by side. Again, I believe my choice of fabric with spirals represents hope and optimism.

None of my beadwork in 2012 is about our marriage or him. I don't know what will happen in the year ahead with either my beading or our relationship. Maybe it's time to tuck the word marriage in the back of my mind, pick up some beads, and start stitching...

Wednesday, January 02, 2013

Spring Getaway - The Isle of Beads!

It's all Peggy Kemp's idea... her dream comes true March 30 through April 1, 2013... something to cure the winter blues for sure... and YOU are invited too!


Two and a half days to have fun with beads - learning, practicing and creating - on lovely San Juan Island - at the friendly Earthbox Inn and Spa! You can bring your partner, friend or spouse to enjoy spring wildflowers, hikes, kayaking, bicycle exploring on San Juan Island, while YOU play with beads.


March 29 - evening

Gathering at a local shop (yes, of course, beads) to meet me and the other students, and enjoy some light refreshments.

March 30-31 - all day + optional evenings + delicious, hot, catered lunch on both days

Improvisational Bead Embroidery, my favorite in the whole-world workshop to teach.
Learn all of the basic techniques for sewing beads on fabric, including high relief and textural variations, bezels, edge stitches, and fringing techniques. Practice them on a sampler similar to the one below.
Then begin to work on a small piece of bead embroidery, which can be made into a pouch, appliqued on a large bag, framed, sewn into a quilt, or one of many other possibilities. Throughout the two days, I will be teaching how to work improvisationally, without a plan or drawing, in a way that is fun and very empowering!

April 1 - morning

 Beady Problem Solutions
This optional half-day session is an opportunity for you to bring, show, and discuss your own work. I am prepared to assist you with "problem pieces," perhaps beadwork you like except that something doesn't "feel right," or pieces that you don't know how to finish. Bring any type of beadwork to this session.
Register now! Enrollment is limited to 12 students to provide for one-on-one instruction for every student.
Cost:
$250 for Gathering and Improvisational Bead Embroidery workshop
$50 for Beady Problem Solutions
$275 for both of the above (save $25)

To get all the details and/or to register, please contact:

The workshop organizer - Peggy Kemp - email


Join us... we'll have a blast!


Friday, December 21, 2012

Two More BJP Blessings Finished - Family & Health

I finished November's and December's BJP pieces earlier this week and finally got them photographed today. All of my pieces this year are about blessings in my life.


Family (for November) is all about the blessing of a relatively close-knit family. We're not as close as sometimes I'd like, but we all like each other pretty well. My brother, Thom, and I lost our biological father in a car accident when I was 5 and Thom was 3. That could have been a disaster, but Mom met and married a wonderful man 2 years later, who soon became our new Papa. I'm fortunate to have always felt that he was my dad, that he loved me as much as he loved his own 3 children, my other 2 brothers and sister.


I don't really know what this piece says about family. Usually, by the time I finish a piece, the meanings have become obvious. Not so in this case. Anybody have any ideas?  It seems possible that the three buttons in the upper half represent my mom (the bird), my dad (the small blue-bordered button), and my step-dad (the square). Then, maybe the other 5 buttons represent me (well, that would be the rabbit, of course), and my 4 siblings. Whatever the significance/meaning, I do like the colors and the way it looks rich and inviting.


Health (for December) is all about the blessing of good health, with which I am unusually blessed.


I have no idea why I used chakra colors for this piece, or why I worked with a Goddess figure to represent health. I've never known much about chakra theory or particularly subscribed to other than Western treatments for health issues. Maybe this piece portends something for me in the future. If so, maybe this dear, healthy Goddess (along with her association with growing plants and a little kitty-energy) will continue the blessing of good health as I grow older.

<*>  :  <*>  :  <*>  :  <*>  :  <*>


Because of working on my new book, I didn't get started on this year's BJP until June, my first piece for the year. I've done 7 pieces (June - December). Think I'll try to do double pieces for the first 5 months of 2013, so that in the end I will have 12 blessing pieces for this year... I do like them quite well.

<*>  :  <*>  :  <*>  :  <*>  :  <*>

 Hope you all have a wonderful, magical, joyful Christmas. May the year ahead be just beadiful! Thanks for visiting today!

Thursday, November 29, 2012

Home - Oct. BJP Finished


Home
What does home mean to you?
A building, a place where you live?


If you ask a poet, "What is home?"
They might reply
"A home protects and nourishes the soul."


My home, the physical place where we live,
is a funky, crowded, owner-built, cabin-like place
on a fantastic rock-moss-tree chunk of land.
I love living here.

My home, the spiritual place surrounding my soul,
is safe and supportive.
I love living here.

Home is my place of belonging,
the key to creativity, the dragonfly of the moment,
the heart of love, the flowers of beauty, the tree of life,
the kitty of whimsy, the pathway to inner peace,
the amber of courage, and the rabbit of gentle grace.

The Bead Journal Project, for me this year, is a place to explore some of the blessings in my life. So far I have beaded Vision, Freedom, Hands, Nature, and now Home. They are small pieces, only the size of an artist's trading card - 2.5 inches wide x 3.5 inches high. To get the detail, I have to use mostly size 15 beads. Not a problem... I love those little guys!


Home has a lot of texture, and thus took quite a while to bead. I guess that's my excuse for being behind. I don't think I'll be finishing November's piece before the month is over. Ha... I haven't started it yet... except I know the blessing is Family.

>*<    >*<    >*<    >*<    >*<

Don't miss this... only one more month to see this fabulous exhibition of quilts made by men!