Wednesday, May 13, 2009

Blogiversary Giveaway!!!

Comment to Win!

Lusting for beads must certainly have its origins in the garden with Adam and Eve. But, for me it began in 1985 and has grown more acute with each passing year. When I wrote my first post, three years ago today, there was nary a moment of hesitation about naming my baby blog ~ Beadlust!

improvisational bead embroidery by Robin Atkins, Rosie, The Uncaged Hen, detail
Today, in celebration of Beadlust's 3-year blogiversary, I'm having a giveaway! Three weeks from now, I'll find a magic way to select three readers who have written a comment on today's post! (Please be sure I have a way to reach you.) Each winner will receive a gift package containing an archival giclee print (signed & numbered) of Rosie, The Uncaged Hen and a little goodie bag of vintage beads from my stash. Whooo-hoo!

This is just a small way for me to tell you all how much your support and readership means to me. I'm not so clever and entertaining as many blog authors and don't post nearly as often as I'd like... Yet, you check back and make wonderful comments and enrich my life more than I know how to say. Thank you!

BJP Presentation ~ Seattle ~ May 21st

Bead Journal Project, small collage of details of work by a few members
For those of you in the Seattle area, I'll be doing a PowerPoint presentation for the Northwest Bead Society featuring BJP work from our first year! Guests are totally welcome!

Visual Journaling with Beads, Fibers, Threads and Fabric

View over 200 beaded journal pieces by 42 artists participating in the 2007-08 Bead Journal Project! Compelling and inspirational, this unique beadwork tells stories, reveals emotions and follows important events in the lives of the artists who create a visual journal each month during the year-long project. In this presentation, you will see the best of the best!


Date: Thursday, May 21st
Time: 7 pm
Location: Greenwood Masonic Lodge
7910 Greenwood Ave N, Seattle (driving directions here)

If you are in the area and participated in the BJP last year or are participating this year, PLEASE COME and bring your BJP pieces for show and tell!!!!

Allison Aller and Baltimore!


Allison Aller, one of samplers for class in crazy quilting, surface sculpture
Above is one of Allie's samplers for the classes. She offered a choice of kits for curved piecing of the block ~ black, white or green. I chose black because I thought it showed off the flowers beautifully! My block is nearly finished... I'll post a picture of it soon. If you think Allie's sample block is pretty, you'll enjoy regular visits to her blog, Allie's in Stitches, which is tops for gorgeous pictures, tips, tutorials and inspirations!

Susan Elliott (Plays with Needles), with her fabulous photography and way with words, has captured the fun of Allie's visit to Baltimore and our experiences taking her classes much better than I could. So, please check the links! There are even a couple of pictures of me...

Allie is a breath of fresh air on a peaceful spring day, with much more to offer her students than techniques! Here are two important things I learned from her...

"Keep lots of white space on your calendar!" If we want to do our art in any significant way, we must learn to keep our calendars white. Duh! Yes, of course. The difficult thing is doing it. One way that Allie does this is to set aside the hours between 8 am and noon EVERY DAY for herself and her art. Prolific writers and painters are known to keep a schedule like this too. Me? Well, I've never really tried it... Guess it seemed too much like a job. Allie just MAY have converted me to the idea!

Allie calls her work "surface sculpture." I LOVE this term. It applies to our beadwork too.

One reason I went all the way across the country to take Allie's class in Baltimore, is because I taught there last fall and totally love my students, who in turn, totally got it about bead embroidery! They are embroiders, a chapter group of EGA, and very skilled at stitching with threads. Many of them enjoyed my methods of improvisational bead embroidery so much that they've continued making more pieces since the class. It was such a joy to see them again and to see their bead embroidery! Below is a dear-to-my-heart piece by Bobbi Pohl!

improvisational bead embroidery by Bobbi Pohl, Dance,
Wildflower Season!!!

I returned home from Baltimore last week to find our wildflower season in its peak! I adore wildflowers - all of them, from the tiniest little blue ground cover to the rarest of the rare Fairy Slipper Orchid (Calypso bulbosa) shown below! Be still my heart... I'm in heaven!

calypso orchid, fairy slipper orchid, calypso bulbosa
The calypso (fairy slipper) orchid is native to Canada and the Pacific Northwest U.S. However, it is extinct over much of its range and is now quite rare. It does not survive contact with man and readily dies in cultivation. The beautiful flower head is about the size of a quarter. I counted 8 of them on our walk yesterday!!!!

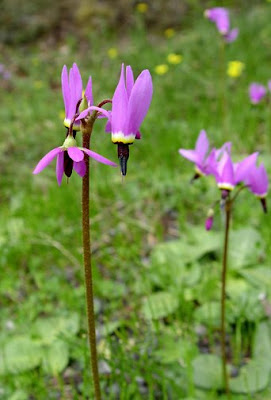
calypso orchid, fairy slipper orchid, calypso bulbosa
shooting star wildflowers
These are Shooting Stars (Dodecatheon meadia). Along with companion butter cups, they grow in abundance on our property. I took the picture below right out our kitchen door! Could we be more blessed?!

shooting star wildflowers and buttercups

Wednesday, April 15, 2009

Bead Journal Project ~ April Challenges

Lots on my mind today... guess I'm avoiding the teach-in-Denver-checklist. But since I won't be an active blogger for the next two weeks, you get four subjects today. I'll begin with the two short ones:

Two Thimbles & Exciting Gallery Show

fabrics, buttons, ribbon from Two Thimbles Quilt Shop
Two thumbs way up for this chuck-a-block, full-of-great-fabrics-and-more shop! Two Thimbles Quilt Shop is located in Bellingham, WA on Cornwall Ave. If you're into batiks (like me!) or Civil War reproduction fabrics, you will be in heaven there. OMG, what a selection! I only had a half hour to shop, but would have been happy browsing for 2 or 3 hours. Above is a picture of a few things I bought there. These may have to be part of my May BJP. I also bought some interesting batiks that I hadn't seen anywhere else. The shop motto - Fabrics to inspire & delight! - is right on target!

And while you're in Bellingham, don't miss seeing a collaborative show of beads, fiber & photography by Carol Berry (my bead mentor!) and Paul Brower at the One of One Gallery (1418 N. State Street). Carol and Paul are there Friday - Sunday with works in progress to show how they do their magical pieces. The show runs through May 9th. Their work is fascinating, original and unique. I've never seen anything like it and I love it!

Bead Journal Presentation in Denver April 23

If you're in the Denver area, you might want to attend the meeting of the Rocky Mountain Bead Society Thursday evening, April 23rd. I will be giving a Powerpoint presentation about the Bead Journal Project!


Visual Journaling with Beads, Fibers, Threads and Fabric

View over 200 beaded journal pieces by 42 artists participating in the 2007-08 Bead Journal Project! Compelling and inspirational, this unique beadwork tells stories, reveals emotions and follows important events in the lives of the artists who create a visual journal each month during the year-long project. In this presentation, you will see how the first year of the BJP developed into quite an amazing body of art!

April BJP ~ Progress Report & New Challenges

In all my 20 years of bead embroidery, I have never attempted (or been interested in) making a realistic picture of anything. I admire work by artists who do, but it just hasn't been my thing.

Well, here are a couple of pictures of why I'm going to give realistic a try for my April BJP:

waterfall on Three Corner Lake Road, San Juan Island
waterfall on Three Corner Lake Road, San Juan Island, detail
Nearly every day, my neighbor and I take a 2.2 mile walk - up and back down an unpaved, back road starting from her house. It winds through an old-growth forest, undisturbed for many decades. The road criss-crosses a small creek along the way, a creek that runs strong in the spring and nearly dries up, leaving only a few sultry puddles, by the end of summer. Right now it's running strong. At night the sound of millions of frogs is a symphony of volume! And by day, one can spot the sunlit, bright-yellow skunk cabbage blooms from far away. I love this creek! And most of all I love the little waterfall near its headwaters. Every day, in both directions of our walk, we stop for several minutes to pay tribute to this small and wonderous gift of nature.

How could I not proclaim my gratitude by featuring it for my April BJP??? And how could I do it any other way than realistically?

Well for me, that's a challenge for sure!

I began by taking the above photos. Then I studied the light and dark pattern in the photo and cut my fabrics to repeat this pattern. After beading two skunk cabbages, the base of the waterfall and the tree, I began to be bored with realistic and bored looking at my work. For several days, I didn't want to bead on it at all. What to do?

Robin Atkins, Bead Journal Project for March, in progress
Texture! Flat just doesn't do it for me. I needed texture! So here are two pictures to compare.

Robin Atkins, Bead Journal Project for March, in progress, skunk cabbage detail, flat
The first shows my original flat skunk cabbage. The second shows how it looks after I removed one of the leaves and made it three-dimensional. Better, eh? I also made the tree more dimensional and added texture to the moss-covered rocks in the stream. I'm definitely liking it better now and am re-motivated to keep beading it. Next I will start beading the water in the pond, but will save the waterfall for last as it will probably be fringed (a definite tangle-maker if I did it now).

Bead Embroidery ~ Tips

I've been receiving a number of emails lately asking about how to do bead embroidery. (If you're just getting started, I recommend getting my two books, One Bead at a Time and Heart to Hands Bead Embroidery.) Two of the most frequent questions involve what to use as a stabilizer and how to get a design on the surface...

There are many good answers to both of these questions, many different methods that all work very well. What works best in most cases for ME is to use an acid-free paper backing to stabilize my work and keep the stitches from puckering. I use either interleaving paper or Japanese Sumi painting paper. The photo below shows how I get the design on the surface.

Robin Atkins, Bead Journal Project, March, back side
A. I draw the shape of my piece on the paper and pin it to my fabric. Then I baste along my drawn lines in a color of thread that will show on the surface. The basted line becomes my guide, and I stay within it when beading. After I finish my piece, I tear away the paper outside the basted line, fold the fabric edges to the inside and back the piece with Ultrasuede or other backing, which hides the fabric edges and my stitches.

B. To sew two layers of fabric together, as in my April piece, I pin the top layer on the underlayer and, leaving the edges raw, I whip stitch them together. Here on the back side you can see my whip stitches. Look for them on the click-to-enlarge view of the right side above.

C. To transfer design elements, important lines and/or shapes to the fabric side, I first draw the shapes on the paper. (Sometimes I draw them on a different paper until I get what I want, then hold the paper to a window and trace the lines with a soft pencil on the wrong side. I put that side down on my paper stabilizer and re-draw the lines, which transfers the traced pencil marks to the stabilizer paper.) Then, I baste along these lines using a color of thread that I'll be able to see on the right side. Look for the basted lines of a second skunk cabbage to the left of the first in the click-to-enlarge view of the right side above.

Happy spring, everybody!!!

shooting star wildflowers, photo by Robert Demar
The first of our native wildflowers is heavily budded now! In a day or two, there will be a riot of purple and yellow shooting stars to delight our senses!!!! Above is one of my husband's pictures of these beautiful harolds of spring...

See you in a couple of weeks..... or maybe in Denver???!!!

Thursday, April 02, 2009

Bead Journal Project ~ March ~ Zero Circle

Zero Circle, bead journal project for March, Robin Atkins, detail
My piece for March was definitely influenced by an incredible fiber book made by Marty S (who is also a member of the BJP). Her arched pages (see here and here) sang a beautiful song to me... a little like a window, a little like a doorway, a little like a house, the stability and the reaching of the basic triangle shape... You get the idea.

I began by folding the top (dark green) batik fabric in half and cutting out the arch shape. Then I layered it over a lighter fabric and started fingering through my stash in search of whatever wanted to be in the window. Right away, an unglazed, ceramic face said, "Me, me!" There was no hesitation about the other things or the colors of beads. It all fell into place very quickly and effortlessly. Nice when that happens!

Zero Circle, bead journal project for March, Robin Atkins
While stitching, I didn't really give a lot of thought to what it means, except when I was sewing the beaded bezel for the stone at the top of the face. This stone came from the headwaters of the Ganges River in India. My friend, Liz, did a treck there and brought it back for me. When I hold it in my hands, I have a sense of timelessness, the source of life and spiritual contentment... a warm pulse seems to eminate from it. Had to include it.

Zero Circle, bead journal project for March, Robin Atkins, Ganges R. rock
Working on this piece was one of the most peaceful and meditative experiences I've ever had stitching beads on fabric. After finishing it, I was trying to think what to name it and turned to some of my poetry books for inspiration. As soon as I read Zero Circle by Rumi (written in the 13th Century; translated by Coleman Barks), I knew the name of my piece is Zero Circle. Here's a few lines from the poem:
Zero Circle by Rumi

Be helpless, dumbfounded,
Unable to say yes or no.
Then a stretcher will come from grace
to gather us up.
...

So let us rather not be sure of anything,
Beside ourselves, and only that, so
Miraculous beings come running to help.
Crazed, lying in a zero circle, mute,
We shall be saying finally,
With tremendous eloquence, Lead us.
When we have totally surrendered to that beauty,
We shall be a mighty kindness.

I think this piece is about me reaching and seeking to surrender and become open to a saving grace. It frightens me a little to write this, to say it publically. Yet, on the other hand, it is my truth at this moment.

* * * *
4 April ~ Update

If you are interested in reading the whole of Rumi's poem, you will find it here. I have it in a wonderful book that was gifted to me several years ago: ten poems to change your life, by Roger Housden.

About the winged rabbit... It was a pin, a gift from a friend a long time ago. But I rarely wear pins and the wings caught on my purse strap so I didn't wear it. One day I put it in with my treasure stash and there it was when I needed it for this piece. It wouldn't have worked to pin it to my piece as it would flop forward and stick up too high. So I clipped the pin part off and sewed it to my piece. Originally it had a purple rhine stone glued to the bunny's belly. Didn't like the purple with my piece, so I easily removed that to expose the top of the rivet which held the whole thing together. Didn't like that either, so I drilled a hole through the rivet top and sewed a flat-bottomed, rose-colored crystal through the rivet.

Sunday, March 29, 2009

Bead Memories ~ New Bag!

International Bead Conference tote bag, detail
Time line:
  • 1985 ~ started making beaded necklaces and buying a few beads
  • 1987 ~ joined the Pacific NW Bead Society, a small group of researchers and collectors
  • 1988 ~ quit my job and started making my living with beads
  • 1990 ~ attended my first international bead conference and discovered my clan

Not in my make up to be much of a joiner or identify myself with any groups. All that changed on October 5th, 1990 when I walked into the Mayflower Hotel in Washington, DC to register for the Second International Bead Conference. As I looked around at the milling group of beaded-necklace-wearing registrants, a warm sense of belonging flooded through me and I remember thinking, THIS is MY CLAN! For the first time, I knew, without a doubt, that I was not alone in my beadlust.

Mostly these folks were collectors and researchers... They wore and craved the really ancient beads, wanted to understand trade routes, wanted to know how and where beads were made. A few like me were also interested in more modern beads, the types now considered vintage, in designing jewelry with beads and in seed beads. Yet, we were there together and strongly felt our clanship.

International Bead Conference tote bag
With our registration materials, we received this conference bag, which I immediately adopted as my every-day purse. Being more of an LL Bean type than a Nordstrom girl (not much into fashion trends), I carried this bag around every day since 1990... for 18 years! I added an inside pocket (now frayed) and leather on the bottom (which after a few years had developed significant holes in the corners). But despite my patching efforts, it finally got too shabby-looking even for me to use as a purse. So, with respect for my clan, I am retiring it to grocery tote duties in the future.

In 18 years of using it, I am dependent on its size, strap length and sturdy leather bottom. Nothing I've tried could take its place... Only one solution: make a new, similar bag!

layered quilted fabrics
I twisted my sister-in-law, Julie's arm to give me this hand-dyed fabric some time ago. It's not quite upholstery weight and not stiff; it's somewhat textured and feels like cotton. I wanted the inside of my new bag to be a lighter color. So I took Julie's fabric and some batik and machine stitched them into one fabric.

purse, bag, handmade by Robin Atkins
Here's my new bag!

purse, bag, detail leather binding, Robin Atkins
To avoid wear/fray problem at the top of the bag and inside pocket, I bound both with leather (yes, it's real). I also sewed leather to the bottom of the bag to protect the corners and avoid wear.

Funny how difficult it is to let go of the old and worn, even when I have nice and new to replace it. Maybe grocery shopping will be more fun these days....

Wednesday, March 25, 2009

How to Make Your Photos "Click-to-enlarge"

Many times I am asked how to upload photos on a blog so that they will be click-to-enlarge. Today, I will answer that question for all Blogger (blogspot) blogs!

We are talking about digital photos, either taken with a digital camera or scanned and saved as a digital file. I’m going to keep it fairly simple, yet hint at the technical reasons behind my method.

Simple basics

Are you going to print your photos? Or, are you going to upload them to your blog? These are two very different things. Decide before you shoot your pictures!

Have you ever printed an image from the web and it was all pixilated? You could see the little squares (pixels) of color on the print? That’s because to print photos requires higher resolution than the web.

Many of today’s digital cameras offer the possibility of very high resolution. You can get an idea of the resolution possibilities of your camera by looking at the designation on the front. Is it 3 megapixels, 8 megapixels, 11 megapixels? The higher the number, the higher the possible resolution.


Sony 8 mega pixel cameraHigh resolution (or high number of megapixels) is good for printing your photos, yes! But not good for the web. Ever open an email with an attached photo that's so bloated you can’t get any idea of the whole thing, even by scrolling up and down, back and forth? Yes? Me too. That photo might print well, but it has too many pixels for the web.

My suggestion, if you are taking photos just for the web? Pass up those expensive, high megapixel cameras, and get one that offers around 3, which is perfectly adequate for web pictures!

What size images do you need for Blogger to engage the click-to-enlarge feature?

This is the rule:

To upload a photo that will
click-to-enlarge in Blogger,
your image size must be
more than 100 KB.

If it is way over 100 KB or if it is some amount of MB, it will click-to-enlarge, but it will also be gigantic, take a long time to open and begin to fill up your total photo space allowed by Blogger.

If it is under 100 KB, it will not click-to-enlarge.

Note: this is the current Blogger rule... be aware that they change the rules from time to time!

How can you tell the size of your image?

In my documents, find the folder with your image in it. On the top toolbar, click on view and then click on details. You should now see the image name, followed by a number, which is the size of your image. It maybe expressed in KB (kilobytes) or if it’s extremely large in MB (megabytes). Far to the right you will see the dimensions, which are expressed in pixels.

Other important image size considerations.

The size of an image is expressed in both total kilobytes (or megabytes, if it’s huge) AND in pixel dimensions. A third variable is the resolution. It’s nice to understand the relationship of these three variables, but not necessary.

Most digital cameras have a way to adjust these variables. Look for mode or settings. If you are taking pictures for the web and not to print, set your mode as closely as possible to the following:

Resolution: 72 ppi (exressed as automatic in most small cameras)
Size: 640 x 480
Format: jpeg (may be expressed as normal; do not select tiff)

These settings will give you images that are perfectly sized to be click-to-enlarge on Blogger as long as you don’t crop them.

Cropping

If you crop your images, it will reduce the size. Cropping may reduce the overall size to less than 100 KB, in which case they will not be click-to-enlarge.

After cropping, save your image and check the file size as described above. There are photo editing programs you can use to increase the size of your cropped image to over 100 KB. If you don’t have such software, there is another option.

If you know you will want to crop a group of images to show detail and you still want them to be click-to-enlarge, do this. For these images only, reset the mode on your camera to higher file size. Shoot your pictures, crop and check size. Should be OK. Don’t forget to reset the mode on your camera.

What if you are taking pictures for both the web AND to print?

In that case, you will need a simple photo editing program that will allow you to resize your images. Set your camera mode to a higher resolution and size, suitable for printing. My camera mode is set to the following:

Resolution: 72 ppi
Size: 2560 x 1920
Format: jpeg

This gives photos that are about 2,000 KB each, large enough to print, even in books or magazines. However, they are about 20 times too big for the web! Remember we want them to be just over 100 KB each. I use a photo editing program to resize them.

How to print these directions?

Click on the title of this post. That should open a window which has only this post in it and not the other posts on my blog. Then go to file and click print.

Or, highlight the entire text of the post, go to edit on the upper tool bar and click copy. Open a blank word document, go to edit on the upper tool bar of the new document and click paste. Then save and/or print from the word document.

Hope this helps!
Robin A.

Monday, March 23, 2009

Short Subjects

Feb BJP ~ French knots & Colonial knots

My beading/quilting friends Christy and Lunnette introduced me to Colonial knots, assuring me that they're more secure than French knots. Christy says they're also easier than French knots. Maybe... after you've made quite a few. I agree however that for a consistent look and secure feel, Colonial knots take the cake. So all the knots on my Feb BJP are of the Colonial variety.

embroidery detail on February Bead Journal Project piece by Robin Atkins
The difference? Here is how you make a French knot. The thread is wound around the needle. The more winds, the bigger the knot. Here is how you make a Colonial knot. The thread is passed in a figure-8 around the needle. The size is not variable.

Knots vs. seed beads... I guess one could argue that I could have achieved the same affect sewing a single bead in the same location as each knot. That would work too, although the look might be a bit less soft. I enjoyed the meditative time spent making all the background knots on my BJP piece.

Teaching

As many of you know, I'm not teaching much right now. The reason I always give is that my mother, who is 92 and lives in Minnesota (a day's flight from me), is not in the best of health. I don't want to promise someone I'll teach at their conference and risk the possibility of having to cancel at the last moment because Mom's health takes a turn for the worse.
Also there's a certain quality-of-life right now that I call being on hold. It's based on the certainty that before long I will not be a daughter any more and will not have any parents... I feel a little in limbo, uncertain and adrift, as though I've stopped living while waiting for the change, even though it isn't really imminent and surely I'll adjust once it happens.
So this year, the second in a row for scaling back on teaching, I have only one definite gig. And that is just around the corner.

I will be teaching at the Bead Bazaar sponsored by the Rocky Mountain Bead Society in Denver, Colorado. Advance registration is open now. I'll be teaching:
  • Woven Treasure Bracelet or Tassel on April 25
  • Techniques of Bead Embroidery on April 26
I'll also be giving a Powerpoint presentation at their meeting located here in Denver on April 23. If you're in the vicinity you may want to come! Here is my topic:
  • Visual Journaling with Beads, Fibers, Threads and Fabric
  • View over 200 beaded journal pieces by 42 artists participating in the 2007-08 Bead Journal Project!
  • Compelling and inspirational, this unique beadwork tells stories, reveals emotions and follows important events in the lives of the artists who create a visual journal each month during the year-long project.
  • In this presentation, you will see some of the best!

Colorado beaders are wonderful! I've taught there previously and been very impressed with the level of skill and artistry. Several BJP members live in Colorado, including:

There's also a possibility that I'll be teaching during the first week of October in Arizona. Stay tuned on that one!

Clues ~ Mystery Beadwork

Here is a post showing beautiful fragments of historical bead embroidery, weaving and smocking that I bought 15 or so years ago. The origins of this 100+ year old beading were unknown by the seller, except that he bought it from a peddler in Mexico City. In the post I asked for help in identifying the origins.

Help arrived! I'll post the complete findings in a later post. But, in summary, the work appears to be from Mexico, probably from the Nahua natives of the central Puebla area. My information comes from two main source books: La Chaquira en Mexico and Costumes of Mexico both of which are well illustrated, fascinating books. (By the way, la chaquira = beads!)

Just as a teaser, here is one of the pieces in my collection.

historical beadwork, bead embellished pleating or smocking
Here is a diagram from La Chaquira en Mexico showing the techinque for bead embellished pleating, as done by the Nahua natives.

bead embellished smocking diagram
And here is a picture from the same source showing a blouse made with this technique. Incidentally, I think this blouse is more recently made and with a slightly different technique than the fragments I have. Yet there certainly are similarities.

bead embellished pleating from central Mexico
Choices

Are you familiar with Robert Glenn, the painter who writes a free newsletter about the artistic process, painting and issues affecting artists? I love reading his thought-provoking articles that come to my email once a week and thought I'd share a few words from his latest ~ about choices we make as artists. He writes:
Today I spoke on the phone to several colleagues. We were talking about planning versus improvisation. While many fine artists plan everything in detail and then simply execute, others admit they don't know what they're doing from the get-go, but they start anyway and spend a lot of time fixing up. Both systems work... The nice thing about choices is that they can be changed... The wayside choices we make, however minor or major, determine our signature, our style and our level of personal satisfaction.
So, the ol' improv vs. plan question comes up in all aspects of art, I guess. What do you think of his point about our choices determining our style and level of personal satisfaction?

Sunday, March 15, 2009

Bead Journal Project - February Finished!

bead journal project, Robin Atkins, bird detail, bead embroidery
Actually, I'm sooooo glad this one is finished!

What is it about some of these pieces that gets under one's skin and makes it so hard to appreciate and like it just the way it is?

I began with a background fabric (rosey-peachy pink with slightly metallic polka-dots) that I like, added some little squares and rectangles of a violet-yellow-orange batik that my friend Christy gave me. Nice... so far.

bead journal project, Robin Atkins, materials
Then I gathered some beads and bought a few skeins of silk embroidery floss (yum!). Still nice, eh?

Valentine for Robin was my working title because last year I did Valentine for Little Robin (here), which I loved. Robin's turn, I thought. So, I drew a heart shape on the back (on the paper stabalizer) and basted along the line. As I began to outline the heart with backstitched seed beads, I skipped the first rectangle and instead sewed flower beads there, which set the way I would do the piece.

bead journal project, Robin Atkins, getting started
I wanted to play around with thread embroidery, so decided to use thread embroidery to embellish the area outside of the heart (beads inside). Here 's a detail picture of some of my thread embroidery.

thread and bead embroidery, Robin Atkins
This piece took quite a lot of time... Once in a while, I experienced that glimmer of being completely satisfied with it! Most of the time, however, I was quite critical of it. Do you suppose our weather has anything to do with my mood?

San Juan Island, snow on March 6, 2009
I took this picture from our kitchen window on March 6th... and we had more like this today. Cold, gloomy, windy, driving rain, hail, snow... [gripe, gripe, gripe...]

So maybe it's the weather.
Or maybe it's my expectations for the piece compared to last year's.
Or maybe my critical attitude is valid.

What do you think of it now that it is finished?

bead journal project, Robin Atkins, February finished, bead embroidery
I believe it's important to give it a place in my heart and the scheme of things. How to do that? Think about what it may signify... The flower beads are so crowded on it... Could they signify abundance? Could the piece represent the abundance of love that flows my way? Yes, I think it could. And, y'know what? That thought helps!

Monday, February 23, 2009

Historical Beadwork ~ Smocking, Embroidery, Weaving

two rabbits, historical beadwork, vintage bead embroidery, Robin Atkins collection
This post is about a mystery... one I've pondered for a long time. Below you will see some precious fragments from beaded clothing. Some of it may be more than 100 years old! The mystery concerns the origins. Maybe one of you knows the answer.... And if you don't, just enjoy seeing it!

I bought this collection at a flea market in Seattle in 1992 or so. The seller told me he had bought it from a sidewalk peddler in Mexico City. The peddler and he did not have a language in common, so he learned nothing about them.

In each set, the first picture, the one with the rule, will be approximately the actual size when you click to enlarge it. The other, detail pictures will be larger than actual size so that you can see exactly how this beautiful work is done. When you click to enlarge you can just about see every thread! I'll show them in sets and make a few comments about the techniques and materials for each set.

two rabbits, historical beadwork, vintage bead embroidery, Robin Atkins collection
rabbit, historical beadwork, vintage bead embroidery, detail, Robin Atkins collection
I believe these little rabbits may have been part of a sampler, or possibly a practice piece. The fabric is a fine, even-weave cotton or linen and appears to be homespun. The technique seems to be like counted-thread, slanted Gobelin needlepoint embroidery, worked on the diagonal across three threads of the fabric. There are 21 beads in a one-inch line or 441 beads per square inch. I think the beads are size 20 or 22. The size and colors of the beads suggest that this piece may be from the late 1800s or early 1900s.

historical beadwork, smocking, shirring, pleatwork, Robin Atkins collection
This piece may be the oldest of the lot. The fabric is dark from age and there is much damage to the threads and fabric, which appear to be cotton or linen. Here the technique is bead-embellished lines of running stitches which tightly pleat the fabric. There are about 40 pleats per linear inch. Up to 20 beads per inch are added every other pleat according to the pattern. The same thread gathers and adds beads. There are 15 rows (top to bottom) of gathering stitches per inch.

The beads used on this piece are slightly larger than the ones used on the rabbit piece. I'd say they are a mixture of 20s and 18s. It looks as though the stitches are counted with two threads per stitch. And the rows alternate whether the stitch is on front or the back. I think the technique may be some type of smocking, although I can't find it in the on-line guides to smocking stitches. The band at the top is back-stitched with thread, making a pattern visible on both sides of the piece.

The design seems European, perhaps Transylvanian in origin. There is a suggestion of folk art to the design.

historical beadwork, smocking, shirring, pleatwork, Victorian floral design, Robin Atkins collection
This piece amazes me. Like the one above, the fabric is smocked with rows of horizontal running stitches. One bead is added per stitch. There are 34 pleats per inch, 17 beads per linear inch, 18 rows per vertical inch or 306 beads per square inch. The design again seems European, typical of the late Victorian Era.

historical beadwork, smocking, shirring, pleatwork, Robin Atkins collection
This piece is the same smocking technique, with even smaller beads. Here there are 50 pleats and 25 beads per linear inch. The beads are so small they look like little grains of finely ground pepper. I think they're about size 22 or 24. There are 22 rows per inch, which makes 550 beads per square inch! The bottom is hand-hemmed. Might this have been the cuff on the sleeve of a blouse?

historical beadwork, smocking, shirring, pleatwork, Robin Atkins collection
This piece of beaded smocking has 16 beads per linear inch. The bird and berry design may be a bit more recent than the previous examples, but could still be European.

historical beadwork, smocking, shirring, pleatwork, deer and flowers design, Robin Atkins collection
This deer and flower design has the look of Latin America to me. The beads are a little larger than in the above example, with 15 per inch.

historical beadwork, smocking, shirring, pleatwork, llama and flower design, Robin Atkins collection
This piece seems much more recent to me. The fabric may be homespun cotton or possibly machine made. The hem is machine stitched, unlike all the other pieces which are totally hand stitched. The beads are probably size 13. There are 13 beads per linear inch. This llama (or alpaca design) seems to be Latin American.

vintage bead embroidery, dog design, Robin Atkins collection
vintage bead embroidery, leaf detail, Robin Atkins collection
vintage bead embroidery, border detail, Robin Atkins collection
This piece is a real mystery. What part of the garmet was it from? The technique, like the rabbit piece, seems to be counted-thread stitching. The beads are quite small, mostly size 18. I have no sense of the design origin, especially the coloring of the dog. The thread, like the home-spun fabric, is either cotton or linen. I love this design, so I've shown some of the details. Isn't the leaf great?!

vintage off-loom bead weaving, Robin Atkins collection
vintage off-loom bead weaving, Robin Atkins Collection
This is one of two pieces in the collection that use a different technique. The strips of beadwork are done with an off-loom weaving technique. I'm not sure what the weaving method is... perhaps a type of brick stitch. The woven strip is used as a seam embellishment, with a piece of fabric whip-stitched to each edge of the strip. The beads are quite tiny... size 18 or 20.

vintage off-loom bead weaving, Robin Atkins Collection
This last piece in the collection is so tattered... It's done the same way as the one above with size 20 or 22 beads woven into strips and sewn along the edges to home-spun fabric. I'm intrigued by the design because each strip is a different pattern. What part of a garmet could this be from? It seems to have been sewn to an adjoining pleated or smocked piece.

That's it. Aren't these amazing? My theory is that they are all from some village in Mexico or South America (maybe Guatemala) where a group of Eastern (?) Europeans settled at the turn of the century. The women in this group embellished clothing with these three techniques using tiny glass seed beads they brought with them. They taught their children and the tradition was passed down for several generations. Initially the designs were familiar, floral designs of Europe. But over time, they began to use local motifs. What do you think about my theory? Or do you, perhaps, have more concrete knowlege about this work? If you know someone in the know, please call their attention to this post... This mystery needs to get solved!

Thanks for looking!

* * * * * * * * * *
Feb. 24, 2009

I've just learned what is probably the correct name for this type of smocking from Barbara Meger, who does a lot of smocking and is a member of EGA. She thinks this is a type of pleatwork called Italian shirring, which unlike other forms of smocking is not intended to stretch. Here's something I found on this website that may interest you.

"Shirred fabric is a form of fabric manipulation. Modernly it is a form of smocking called Italian smocking or Italian shirring. Shirring runs the gathering threads in a way that creates designs in the pleats as they are gathered. An alb, credited to be that of St. Bernulf, dating from the 11th century is possibly the earliest form of this technique. A second alb that of Thomas Beckett’s from the 12th century also has this form of shirring in the pleated gores. It does not seem to be a common technique during the next 400 years. It is not noticeably seen in portraiture, nor does it show up in the few extant garments until the end of the 16th century/ early 17th century . One example dating 1600-1650 is on a men’s Italian shirt, currently in the collection of the Los Angeles County Museum of Art."

* * * * * * * * * *
Feb. 24, 2009

The Lone Beader wrote a comment to this post suggesting that I donate this historical beadwork (I love that term for it!) to a deserving museum. That's exactly what I intend to do! I'm considering the The Textile Museum in Washington DC.

* * * * * * * * * *
April 2, 2009

From a couple of books and this site, I have learned that these fragments very likely originated in the Cholula-Atlixco-Puebla Valley region of Mexico and were constructed by Nahua natives. Check this picture...

Mexican blouse from Pueblo region, Field Museum collection
Notice the side panel and it's similarity to the panel pictured above with the pink dog? The mystery seems to be solved at last!

