Sunday, June 20, 2010

Felting + Dying + Book Making = FUN!!!!

Chad Alice Hagen, hand-made wrap-style book, detail
Just returned from a 3-day workshop taught by Chad Alice Hagen... Had a great time learning about felt and how to dye it using resist methods. Wanted to make more (many more) pieces of dyed felt to use in my various beading and collage projects. But after a day of dying, we moved on to book making, which (of course) was also way fun even though much of it was not new to me.

The reason I signed up for the class is because of the luscious, gorgeous, fantastically beautiful pieces of resist-dyed felt made by Christi C. (Sweetpea Path), two of which I've used for Bead Journal Project pieces (here and here).

I LOVE, LOVE the way Chad embellishes bits of dyed felt and creates books and pins with them. Below are a few of her pins... Notice the stitching details and bead embellishments, carefully chosen to enhance the dyed designs on the felt.

Chad Alice Hagen, hand-made felt pins
Some of her pins were for sale... I couldn't resist (ha! pun intended)... bought the one on the top left in the second picture. Difficult choice... I liked them all!

Below is one of her little Coptic-bound books... Ooooh, again, the stitching and beading makes it extra specially precious, don't you think?! Knowing we would be making one too, I just about couldn't contain myself!

Chad Alice Hagen, hand-made Coptic book with embellished felt covers
The first day we felted two large "sheets" of wool, needle-punched, pre-felt bats. Imagine the din as twelve of us literally THREW wads of wet felt onto our tables! When the wool was felted, we cut it into pieces and started up the dye pots (4 baths, 3 color choices each bath).

For each dye bath, we clamped various things on our felt pieces (hair clips, paper clips, metal parts, Popsicle sticks, clothes pins, etc. etc. etc.) and then tossed the pieces into the dye pot. After their 45-minute dye bath when the clips, etc. were removed, the piece would be the dyed color except where the clips were pressing on the wool and resisting the dye. Here are the 11 pieces I dyed that first day.

Robin Atkins, resist-dyed felt
Chad Alice Hagen reviewing resist-dyed felt made by students
Above, Chad is giving some feed back to students about their felt pieces. I'm a tad, just a tad, disappointed in my results. Maybe some of them look a little too much like 60s tie-dyed t-shirts for my taste. I really wanted to spend a second, less rushed, day... further experimenting with this method. However, we moved on.

Day-two, we chose one of our larger pieces of felt and constructed a small, hand-bound, wrap-cover journal. Here's mine... the felt, the bound spine and the finished book...

Robin Atkins, felt used for hand-mand book, wrap style
Robin Atkins, hand-mand book, wrap style with felt cover, binding detail
Robin Atkins, hand-mand book, wrap style with felt cover
At the end of day-two, we selected felt from our stash to make an embellished mini-book with Coptic binding, like the one Chad made pictured above. That evening our home work was to complete the thread embroidery and beading on both the front and back covers of our books. Here is the felt I chose.

Robin Atkins, resist-dyed felt for making cover of Coptic book
Two other students joined my roommate and me in our room... beading, stitching and talking until well past midnight. That was the most fun of the whole workshop for me!

Below are my two embellished covers ready to bind into a book.

Robin Atkins, embellished felt for book covers
Below are all the embellished, felt cover-pieces made by the students in our class.

embellished felt for book covers made by students in Chad Alice Hagen class
Below are pictures of my book, which I finished on the late ferry home just last evening!

Notice that the covers have a hand-stitched edging. We did this with the same waxed linen cord that we used for binding both books. This took longer than any of the other steps and was quite difficult. None of the students finished their edging or had time to bind their books in class. Fortunately, we received good handouts with excellent illustrations which I was able to follow for the binding.

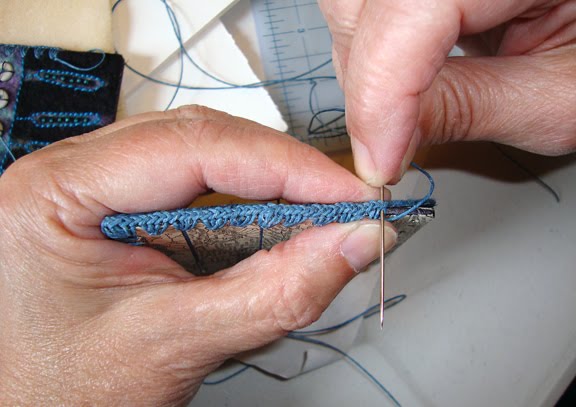
Robin Atkins, hand-mand Coptic book, binding detail
Robin Atkins, hand-mand Coptic book, detail edging stitch
Robin Atkins, hand-mand Coptic book, front cover
Robin Atkins, hand-mand Coptic book, back cover
I love constructing hand-made books!!!! And I love working with hand-dyed wool felt. I'm not so sure I love the dying process, especially the chemicals, the need to carefully monitor time, temperature, water-acidity, etc. I don't think I'll be buying any dye... but I would happily join a dye party at the studio of one of the other students!

Friday, June 04, 2010

Change - May BJP - Finished!

collage, bead journal project, Robin Atkins, detail
Major changes (which came into full swing during May) are happening in my life. All six of my words for the month are relevant. They are: change, remember, forgive, seek, open and thank. Can you find them in the finished piece below? (You may need to click to enlarge.)

fiber and bead collage, bead journal project, Robin Atkins
I named the piece Change because that's the most important word of the six. Although I've decided not to delve into the personal changes I'm making in this post, it's not really a secret. If you're interested to read about it, you can check out my journal-blog, Words Paint, which I write under the pseudonym of Peacefulbird.

Obviously, the butterflies are symbolic elements of change and metamorphosis. A once-closed envelope (me) is now open with butterflies flying free. Feathers are another symbol of freedom, flight and good perspective... My husband found these two in our yard. My best guess is that a Northern Flicker gifted some tail feathers to us. The turtles are all about getting there, no matter how long it takes.

I started with the second, luscious, butter-soft, piece of resist-dyed felt made and given to me by Sweetpea. Without thought, I immediately folded and pinned it into an envelope shape. What could go in it? Oh, maybe those flicker feathers I've been saving! Oh, OK, now what paper will I use for the background?

Auditioning papers: This one seems to dark, don't you think?

auditioning painted papers for bead journal project, Robin Atkins
This one seems too busy.

auditioning painted papers for bead journal project, Robin Atkins
This one is really too busy; it competes with the pattern on the felt.

auditioning painted papers for bead journal project, Robin Atkins
This one was my second choice. I like it a lot, but it seems a tad too pale or washed-out looking with the felt.

auditioning painted papers for bead journal project, Robin Atkins
Here's the one I chose. Doesn't look like much in this picture, but the color has lots of life without being overpowering.

auditioning painted papers for bead journal project, Robin Atkins
Once that was decided, I started playing around with various beads and elements I might use. I had 4 plastic butterfly-shaped buttons in my stash which looked really nice coming out of the felt envelope and had appropriate relevance to change.

How could I apply my words to these buttons and where could I find two more? Hmmm... gave up on that one and decided to make my own butterflies by sawing them out of copper sheet and metal-stamping the words. Tried that. Too big, and way too visually heavy for the delicacy of a butterfly. OK, well, maybe I could make butterflies out of heavy, water-color paper, write the words on the wings and paint them. Here are the three ideas. You can see why I rejected the copper...

collage elements, bead journal project, Robin Atkins
So then I played around with drawing butterflies free-hand. Ummm, I'm not so good at that. However I had a sheet of butterfly stickers that gave me an idea. I peeled off the background part of the sheet and placed it lightly on the water-color paper. Then I used a #2 Micron pen to draw around the inside (where the sticker was), which gave me some nice shapes.

template for drawing butterflies, bead journal project, Robin Atkins
I wrote the words vertically along the edges of the left-hand wings, extending some of the letters to look like the veins. For the right-hand wings, I wrote the words backwards. Ruined a few, but finally got six usable butterflies. Next I painted them with watered-down, transparent acrylic paints.

painting butterflies for bead journal project, Robin Atkins
After painting, they looked like this.

painted butterflies for bead journal project, Robin Atkins
Before cutting out the butterflies, I used an embossing stylus to score along the body on each side so that I could easily fold the wings into flying position.

Next, I had to figure out how to attach them to my piece. Everybody knows how much I don't like glue. So, I needed a way to sew them on the paper and felt. I also needed antennae. A double-layer body might do the trick...

I cut out six little, body shapes from heavy, black paper and made antennae from bent pieces of 28 gauge brass wire. Using PVA (acid-free, bookbinder's glue) and a toothpick applicator, I put a little glue on the back side of the butterfly bodies and along the duplicate body shapes. Then I placed two pre-cut lengths of Nymo thread in the glue, perpendicular to each body and laid the antennae in the glue at the head. When the glue was slightly set, I joined the duplicate body layer to the back of each butterfly. My plan, if the glued layers worked, was to use the four Nymo threads to sew each of the butterflies to my piece. It did work! I hope the picture helps to make sense out of what I just wrote.

underside of painted butterflies for bead journal project collage, Robin Atkins
I also used 28 gauge brass wire to wrap beads around the feather quills. In a similar manner to the butterflies, I laid two pre-cut Nymo threads along each quill before wrapping, which would allow me to sew the feathers to the paper.

Here's what the back of my piece looks like. You can see where I tied the Nymo threads to secure feathers and butterflies. I used Tyvek (from a mailing envelope) as a backing to prevent the thread from cutting the paper. You can also see where I sewed the felt envelope to the paper using Nymo thread.

back side of collage, bead journal project, Robin Atkins
Well, there you have it, probably more how-to than anybody needs or wants... but I can't help myself sometimes...

I love this piece and what it represents in my life! Hope you like it too.

Wednesday, June 02, 2010

Ta-dah!!! The Winners Are....

Quick post to announce the winners of my two recent giveaways!

Metalworking 101 for Beaders by Candie Cooper
The winner of an autographed copy of Metalworking 101 for Beaders by Candie Cooper (read my "review" of this wonderful book here) is:

Sharyn Sowell! I think it's really fun that Sharyn is a paper cutter (I have some of her work and it's fantastic) and now she's interested in learning to cut metal... I am soooo looking forward to seeing what she does with it!

One Bead at a Time by Robin Atkins
The four winners of the last four hard copies of my book, One Bead at a Time, are:

#1 - Madonna (Front Range Stitches) in Colorado embroiders with thread in many techniques. I enjoyed scrolling through her blog to see her many hand-stitched creations. I didn't see beads or bead embroidery, so maybe it's perfect that she's one of the winners.

#2 - Morwyn (AnotherCountry BeadWorks) in Albuquerque is absolutely no stranger to bead embroidery. I first fell in love with Morwyn's work when she participated in the first year of the Bead Journal Project. Later, so smitten was I, that I went to her etsy shop and bought one of her beautiful beaded boxes!

#3 - Dees (W.I.P. Work in Progress) in the Netherlands is also no stranger to bead embroidery or working improvisationally! As a participant in the Bead Journal Project for two years, Dees' beading impresses and inspires me more and more. I'm honored to gift her with my book!

#4 - Marsha, is the final selection of the random number generator. She commented anonymously saying, "Oh how I want to get back to beading, still have a stash, and your book looks like the one to do it with." Sounds like she's a great choice! Note to Marsha: Please contact me (robin at robinatkins dot com)... the email address you gave in the comment is not working.

Thanks to everyone (49 + 128) who entered the two drawings. Your wonderful comments were uplifting and kind! I WISH I had many more books to give away... At least, if you didn't win the drawing for One Bead at a Time, you can download it as an ebook for free, here. If you get a bandwidth problem message, it means too many are downloading at the same time... just try again at a later time.

Friday, May 21, 2010

April Bead Journal Project ~ Finished!

Well finally!!! At last the words, felt, painted paper and beads all flowed together easily (and fairly quickly)... Here is Forgive, my BJP piece for April!

improvisational bead embroidery by Robin Atkins, Forgive, April 2010 BJP
It must be due to the fabulous hand-dyed felt that Sweetpea gifted to me. She made it in a workshop taught by Chad Alice Hagen. When she showed me the precious bundle of resist-dyed felt she had made in the workshop, I about went nuts... drooling, petting it, rubbing it on my face (sooooo soft!), tracing the patterns with my fingers, admiring the saturated colors... What could she do? Of course, she gave me not one, but TWO, of the pieces!!!!

Until this month, I've used store-bought, wool felt and covered it with beads so that you couldn't see it. I was bored with it... bored with plain, solid color... and frustrated by the way the beads would sink down into the felt. I kept wondering WHY on earth I had decided to use felt this year.

Well now I know! Working of this piece of butter-soft felt with its uneven, felted edges (must be a proper term for this type of edge) was such a tactile pleasure!!! I did not use paper or any other stabilizer under the felt, which made it pleasing to touch on both sides of my piece!!!

improvisational bead embroidery by Robin Atkins, Forgive, detail
The other thing that made this piece come forth so beautifully was the lime-green felt. I was visiting my family in Minnesota and beading with Julie (my brother's wife) and we got to wondering if it would work to rubber stamp on felt. It does! She had a scrap of lime green felt from which she had punched out a Christmas tree (see the shape on the bottom?) So we stamped it with a bird stamp. I liked it and asked if I could have it. (Who me a shameless beggar? You bet!)

The scrap looked a little different when she gave it to me. For this piece, I cut it in half (the lime green beads flow between the two parts), frayed out the edges using a needle and embroidered the birds and branch using single strands of standard embroidery floss (mostly back stitch).

improvisational bead embroidery by Robin Atkins, Forgive, detail
I painted the tags in the same colors as the background paper and wrote the words on them with a #3 micron pen.

The words are special to me for the month of April and so is the piece because of some personal changes I began making then. To forgive myself and others is an important part of this change... I see the words flow and forgive working together in this piece to guide me in the process. The other words are part of it too, especially to rest and to finish what I've begun.

One other reason this piece went together so easily is that I worked improvisationally, without a plan. On last month's piece, I worked more representationally (the mesa or butte), which is always more difficult because I'm trying to make it recognizable.

Unexpected things happen when I work improvisationally. In this case, after completing the piece, I noticed the over-all shape of the felt reminded me of a house... a bird house? a house for a Robin? This metaphor applies to the changes I am making, yet I didn't plan it at all! Improv just works for me and I'm always more satisfied with the end results.

I hope you like it too.

Thursday, May 20, 2010

One Bead at a Time ~ Free Download!

As of today, my first book, One Bead at a Time, is available as a free e-book ... Click here!

One Bead at a Time, book by Robin Atkins, cover
After five print runs of this book, I decided to retire it in bound form and instead make it available to you through the internet (pdf format). I hope you will enjoy the journey. And, do tell your friends. I love knowing that many more creative souls will have access to it!

You can read it on line by scrolling through the pages. Also, you are welcome to print it. The margins are wide enough so that you can punch holes and keep it in a 3-ring binder. Please respect my still-active copyright and print this file only for your own, personal use.

The companion or follow-up book, Heart to Hands Bead Embroidery, full of many more techniques and inspirations, is still available in print and can be found in bead shops or ordered here on my website.

Heart to Hands Bead Embroidery, book by Robin Atkins, cover
Note: to enter the drawing to win one of my last four printed/bound copies of One Bead at a Time, write a comment on this post before June 1, 2010!

A few bead shops (both on-line and on-the-street) may still have remaining hard copies of One Bead at a Time on their shelves. Also some book sellers may have used copies available.

Thursday, May 13, 2010

Blogiversary Giveaway!!!

improvisational bead embroidery, robin atkins, beaded bag
I can hardly believe it! Picture me... happily blogging for four years! Time has flown by, I've made wonderful friends and even met some of them in person. In this blogging community there are some of the MOST supportive, friendly, classy, talented, creative and loving people I know. It's changed my life in so many good ways!

improvisational bead embroidery, robin atkins, beaded bag
It just so happens that the 4th birthday of Beadlust coincides with another important marker in my life...

One Bead at a Time, cover of book by Robin Atkins
Ten years ago, I wrote and self-published my first book, One Bead at a Time, Exploring Creativity with Bead Embroidery. It was a remarkable experience in many ways.

When I started thinking about this book, I telephoned Helby Imports, the nation's only distributor of beading books to bead shops. With trembling voice, I asked to talk with the owner and then told him my ideas for the book. He totally discouraged me, saying no book would ever sell unless it included both projects and techniques. He said they wouldn't carry it.

improvisational bead embroidery, robin atkins, beaded button
Not completely daunted, I then called several publishers. They all said the same thing. It almost stopped me in my tracks. Almost. My experience teaching Improvisational Bead Embroidery workshops was so powerful and my students seemed so empowered by it, that I just had to try.

So I wrote it, took the photos for it, designed it in Microsoft Publisher, printed 300 copies of it on my ink-jet printer, had it professionally bound in Seattle and put the word out to my beady friends and students. In just 2 months I had sold all 300 copies!

That was my test run and as far as I was concerned, a successful one! So at that point, I added 8 pages showing basic techniques of bead embroidery and took out a loan to have 2,500 copies printed professionally! I gave Helby Imports a money-back-guarantee if they would just try one case of my book. They took the offer and have sold many, many cases of them since then.

improvisational bead embroidery, robin atkins, beaded bag, detail
Three more times, the press has rolled! Each time, as the number of beading books increases geometrically and others are publishing books about bead embroidery, the book moves more slowly. Today, I have exactly 4 remaining copies from the last printing.

And guess what? I'm going to give away one specially inscribed copy for each year of my blogging life! Details at the end of this post.

Am I going to reprint? No, I think One Bead at a Time had a lot more time on the active book market than most beading books. And for this I'm very grateful. Now it's time to retire it. However, the good news is I'm not retiring it completely. In the next few days, I will convert it to pdf format and make it available as a FREE download through my website. It won't be a pretty, bound book. But a person can print it and read it, which is still a good thing.

improvisational bead embroidery, robin atkins, beaded button
One Bead at a Time has influenced many lives. I know because people write to tell me about it. Bless them. In turn their lives influence mine in the most wonderful ways. I am so grateful to have stumbled on the notion of improvisational bead embroidery and to have the skills to teach others the value of it in developing creativity and artistic self confidence.

If you are one who has purchased this book, I thank you, for you have helped to keep me out of a 9-to-5 job and given me time to do my own art work and to organize the Bead Journal Project, now in its third year.

improvisational bead embroidery, robin atkins, beaded bag

So, today we are having a
Beadlust
birthday party

and a
One Bead at a Time
retirement party
!!!

To have a chance at winning one of the four remaining copies of One Bead at a Time, please leave a comment on this post and include your email address. It doesn't have to be for you; you could win it and give it to a friend, perhaps someone just starting to bead. If you win, you can tell me to whom you'd like it inscribed.

Please remember to include your email address. To keep the hackers away, write your email address like this: WantToWin(at)YourBook(dot)com. Use (at) rather than @ and (dot) rather than .

Thanks, everyone, you are special and tremendous in every way!

Friday, May 07, 2010

Metal & Beads ~ New Book Giveaway!

Metalwork and beads compliment each other so beautifully!

bead embroidery and copper charms by Robin Atkins, bead journal project, detail
Artists who combine their own metal components (whether silver, copper or bronze) with beads always seem to have a competitive edge in the market place. Their work seems more original, more unique, more precious to me.

doll by Kaite, metal and indigo, bead journal project
And it's not just jewelry. Above is a Kaite's April BJP doll, Metal-Indigo. Kaite made all of the little copper squiggles and dangles in a workshop. Don't they add great character to her doll?!

Back in the 70's, I was a metalsmith, fabricating silver and gold jewelry. Below are a few examples of my work.

metalsmith, sterling silver zipper necklace by Robin Atkins
metalsmith, man's ring by Robin Atkins
metalsmith, picture jasper necklace by Robin Aktins
I learned metalworking skills from three sources: 1. Community college and art college classes, 2. from my friend Liz who was getting a college degree in metalsmithing and 3. from several books (best one was The Complete Metalsmith by Tim McCreight, which is still available). I made and sold jewelry for 5 years, loved working in my shop, loved forming metal!

Later, when I shifted into beads, I used my metalworking skills to create findings and components for my beaded creations (two examples below). Handy!

bead necklace with copper charms by Robin Atkins
bead necklace with copper and sterling hand by Robin Atkins
I also taught wireworking and developed a unique style of fibula pins (below), which have sold well over the years.

fibula pin by Robin Atkins
Frequently beaders have asked me, "I want to learn metalworking... what book do you recommend?" Until now, I have had to answer, "Sorry, there is no decent metalworking book for beaders. Get Tim McCreight's book and figure out for yourself how to apply the skills to beadwork."

At last Candie Cooper has given us beaders a really fabulous book on metalworking!!!!!

Metalsmithing 101 for Beaders, book cover
I like everything about this book! Candie's instructions seem easy to follow, yet thorough. She takes you through all the basics... tools, marking, sawing, filing, riveting, soldering, texturing, patinas... everything needed to create findings and components to compliment beads. Plus she gives many wonderful design ideas, projects and patterns.

Good how-to pictures and drawings...
Metalsmithing 101 for Beaders, setting saw blade
Exciting design ideas... fun fish pin...
Metalsmithing 101 for Beaders, fish pin project
Elegant earrings...
Metalsmithing 101 for Beaders, earrings project
Unique charms...
Metalsmithing 101 for Beaders, handmade charms
...and many more!

I read every word of this book (something I rarely do)... I found it entertaining (not expected), accurate/complete (also not expected) and it made me crave the feeling of the tools in my hands, working the metal, transforming wire and sheet metal into beautiful objects again. I give this book FIVE STARS ++++! Bravo to Candie and Lark Books!

This post is a giveaway! I have one copy of Metalworking 101 for Beaders, by Candie Cooper to send to somebody who writes a comment on this post. Please, include your email address in the comment, so I can notify you if you're the winner!

I shall select the winner randomly on May 20th from those who comment... that's two weeks from today. If you can't wait or don't win, you can buy it here or at your local bead shop.

