Sunday, June 30, 2013

Hexie Quilt - Paper Pieces are GONE +Tips

I don't really know how I can spend so many hours working on this quilt, enjoyable hours, inexplicably engaging and not boring hours, time I crave almost like an addict craves a fix. It must be what I need right now, meditative, quiet time.

During the past two weeks, I starched and pressed the back, removed all of the basting stitches and paper pieces, sandwiched the quilt, and began the long hand-quilting process. Pressing and starching (with Best Press, the scent-free variety) helps the hexies to keep their proper shape while and after removing the paper pieces.


Snipping the basting threads and lifting the stitches back to the knots on each end was fairly easy with these fabulous seam-ripping scissors, which I believe are actually suture removal scissors. I highly recommend them! Even with this great tool, it took about 25 hours to get all the stitches removed and another 4 to remove all the papers.


After working for a few hours on it, I started saving the threads. Quite a pile, don't you think? I might try to make an art project with them, spreading them out on a heavy plastic sheet covered with a PVA glue/water mix, arranging them into some sort of picture and then, when dry, appliqueing them onto a background.

Back to the quilt, the next step was to remove the paper pieces. Checking the quilt carefully after finishing, I found 5 or 6 I had missed. Thinking they were all out, I again pressed the wrong side, finding 4 more un-removed paper pieces. Now I had them all... right? Wrong.

I certainly did not want to get the quilt all basted together, start hand quilting and find paper pieces still inside some of the hexies. So I got the idea to hang the quilt top over the edge of my work table in a darkened room with a couple of lights under the table.
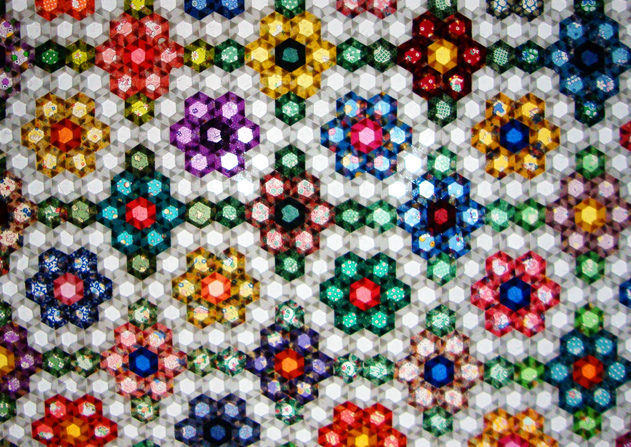

As you can see above, the effect was stunning, like a stained glass window in a cathedral (click on picture to see it bigger)!
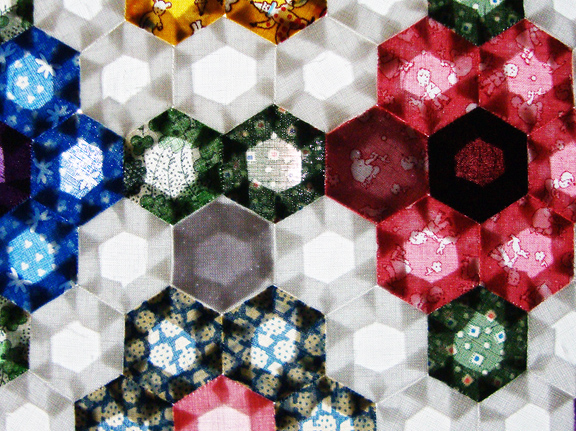

Did I find more paper pieces hiding? Yes, three more showed quite clearly. In the photo above, you can see two of them, one in the white pathway of hexies, the other is one of the pink flower petals. The center of that same flower looks suspicious as well, but it was just the dark red fabric.


Now I'm willing to bet all the paper pieces are out. Of course I saved them to re-use on the next hexie quilt... Did I really say that? Eeeeeeek!

*    *    *    *    *    *    *

Basting Tip


I started basting the fabric around the paper hexie pieces using "junk thread," old cotton and polyester thread, bits and remains on nearly empty spools. I wasted a lot of time because the threads tangled and knotted, especially when I tried to use a longer thread. Using a shorter length (about 2 feet) helped a little with the tangles, but took longer to repeatedly have to thread the needle. I was using a regular sewing needle, one that was a little difficult to push through the card stock of the paper pieces.

Finally, I hit on the perfect thread/needle combination! Here it is, worth every penny of extra cost, and pennies sums it up, not dollars:


Basting thread - YLI glazed, 100% cotton quilting thread - I basted with lengths up to 48" long, and it never tangled or knotted, speeding up the basting process by at least 50%.


Basting needle - Foxglove Cottage straw needle, size 9 - Fabulous, strong, just the right length needle! It even kept its sharp point after basting through 100s of paper pieces. I used only three to baste over 4,000 hexies! Also, straw needles in size 10 were perfect for whip stitching the hexies together. I'll probably try them for hand quilting as well. Most quilting shops carry at least one of two brands, sometimes Foxglove Cottage, sometimes John James, both seeming equally good.

Friday, June 21, 2013

Hexie Quilt - To Fix or Not to Fix?

For the past few days, I've been hunkered down over my beading tables, tables currently cloaked with the top to my Grandmother's Flower Garden quilt, removing basting stitches from more than 4,000 hexies, a job that took about 24 hours.


Here's how it looked last evening with all the stitches finally removed. After taking the above photo, I ran my fingers lightly over the surface of the quilt top, looking, like a person reading braille, for any basting stitches I might have missed. They were there to be found, I assure you. I also found something else.


Do you see what I see? Oooops. How on earth did I get five hexies of one fabric and one from a different fabric in the same flower? See it, the one at center bottom? It's a slightly lighter blue print, one with little white flower, not little red flowers like the others.


Thinking I may have switched hexies in "stacks" for two different flowers, I located the flower made with the "little white flower" print. Ah, no problem there. It was as it should be. I guess it will always be a puzzlement to me how just one wrong hexie got into just one of the flowers.

Back to the problem flower, "to fix, or not to fix" questions buzzed through my thoughts. Would it bother me forever? Would I always notice that one hexie petal, the petal that didn't match its mates? Could it remain as a sign of humility, of acceptance that I am an inexperienced quilter, who like everyone else makes my share of mistakes? Would I offer apologies for it to friends looking at the finished quilt? What if I tried to fix it and cut the fabric of a neighbor hexie as I was removing it? Would it be difficult to replace?

As I do many time when facing a quilting question like this, I talked with my friend, Lunnette, who has been quilting much longer than I have. She too has been making a hexie quilt, although hers is not traditional like mine. One reason I like to consult with her is because she never seems to TELL me what to do. As usual, she just offered a few comments, telling me how she replaced one of the hexies in her quilt, finding it a fairly easy process, mentioning how she couldn't "live" with the way the original hexie looked. She reminded me that we knot at the beginning and end of each little seam, so that ripping it out wouldn't cause unraveling of adjacent seams. She told me how she lifts a stitch in the center of the seam with a pin so she can get the point of the scissors into it without risk of cutting the fabric, unraveling the seam from there with the pin or a seam ripper.

OK! Searching through my 30's reproduction fabric stash, I found the correct fabric, cut a new hexie, basted it, removed the problem hexie following Lunnette's method for ripping the seams, and stitched it in place.  Here you are! All better!


Truth be told, I probably would have been fine with it the way it was; after all, even after stitching the flower, stitching the white hexies around it, and stitching the quilt top together, I hadn't previously noticed it. But, I'm glad I decided to fix it, because of the value of the learning experience. What would you have done and why?

Next step? Turn it over and remove all 4,000+ paper pieces from the back side, another tedious and time-consuming job, one that I completed today!

My next post will be all about Tips for Hexie Quilts, things I've discovered, mostly the hard way, things I don't want to forget if I ever decide to do another one of these, things that might even help you if you're making a paper-pieced hexie quilt.

Thursday, June 13, 2013

Hexie Quilt Top Almost Finished!

I began making three-quarter-inch hexies for a traditional Grandmother's Flower Garden quilt on March 6, 2012.

In the following 15 months, approximately 910 hours of work later, I have nearly completed the top!!!!


Here I am holding up the top, peeking through the last few feet of the last seam still to be sewn. Holding it as I whip stitch along each 3/4" seam, joining hexie to hexie, takes a tremendous amount of finger strength because of the weight of the rest of the quilt pulling it out of my grasp. The weight is more than you'd imagine because the paper pieces are still in each of the hexies.


When I finish this seam, the next step is to iron the top, and possibly spray starch it. Then I'll remove the basting stitches and the paper pieces. Does anybody have any thoughts about the spray starch? Is it a good idea? Is there a brand or type you've used successfully?

Then I have to find a place where I can lay out the back, the batting, and the top on a large floor space or tables. I plan to baste the layers together rather than pin because I think know it will take me a L-O-N-G time to quilt and the pins might leave permanent holes in the fabrics. Yes, I'm going to hand quilt it. I've made a faithful reproduction quilt so far and want to keep it that way if possible. Yes, it will be hugely challenging and character building. Oh well...

Just in case you're interested... here are the steps and the approximate time to complete each of them.


There are 4,428 hexagon-shaped pieces (hexies) in this quilt top. The size of each hexagon is 3/4" measured along one edge.


I used approximately 330 different prints and solids, all of them reproductions of 1930s fabrics. To wash and iron these fabrics, plus cut and baste 4,428 hexies took approximately 270 hours. That's almost 7 solid work weeks just to get the hexies ready to stitch together!


The most fun part was making the flowers, choosing a solid color for the center, and stitching the hexie petals around the center. There are 238 flowers in the quilt. Each flower is a different fabric, although I only used about 20 different colors for the centers. I estimate it took me about 100 hours to stitch the flowers. I'd do this step again in a heart beat, because they are small enough to be easy to handle, relatively quick to sew, and ever so pleasing, each different, each precious in its own way.


The next step was a little more boring... sewing the plain white pathway hexies around 130 of the flowers, which added another 130 hours of hand stitching.


I didn't count the hours it took me to layout all the flowers in a pleasing arrangement and decide which green hexies I would match to which flowers (to suggest leaves) in alternate rows. I'm going to guess about 10 hours, maybe more, because I did it in several stages. The picture above shows the last stage of the layout process, after I'd already stitched many of the flowers together in sections of about 12 flowers.


Making the flowers and stitching the white borders around them is easy lap work. Sewing them together starts to get difficult. I wrote the row number and column letter on the back of each flower after laying them out, so I could keep them in the right order as I sewed them together. I first made large sections, like the one pictured above, about 4 rows deep and 4 to 6 flowers across.


At this point, I decided to add a double border around the whole quilt. Working with the outside sections, I added the border hexies. Then I sewed the sections into larger sections that went all the way across the quilt, still 4 rows deep.There were 7 units spanning the width of the quilt top. The last step was to sew these 7 units together. The picture at the top of this post shows me holding up the quilt with just under half of the last seam yet to sew. This process got more and more difficult as the pieces got larger... It's difficult to hold (very tired fingers, can't sew more than 1 or 2 hours at a time), heavy, takes up a lot of space (no longer a simple lap job... plan on the whole sofa). Time for joining the flowers together to complete the quilt top? It took about 400 hours.

The finished size (before quilting) is 71" x 93", which is a nice blanket size for a single bed, or big enough to use as a topper for a full or queen bed. Total time to hand-sew this quilt top was approximately 910 hours, which is equivalent to 22.75 work weeks, or nearly 6 months on the job.


Why do we do this? Why spend so many hours hand sewing one quilt? I don't know if I would have accepted the job if I had realized how many hours it would take. However, it has been engaging most of the time. Plus, I am able to watch movies or programs on TV while I'm sewing, and many of the hours were spent in the enjoyable company of my quilting buddies. (Some of them are also working on hexie quilts.) All in all, I'd give it close to 5 out of 5 stars as jobs go.

I'm a tad worried about hand quilting it. I hope it's manageable, that my hands will hold up to the effort of it, and that I don't get too bored. I'll keep a time sheet on it and report back after a while.

Oh, and by the way, now you understand why I haven't been blogging much during the past year and a half. It also explains why I haven't finished my Bead Journal Projects for 2012 or 2013. That's the real drawback to making a quilt like this, the one regret I have about it.


Thursday, May 30, 2013

Studio Tour This Weekend - Preview Tomorrow - Pictures!

Been nose to the grindstone getting ready for the Artist Studio Tour. Thought you might like to see some pictures of some of the beadwork for sale...

I'm a guest artist in studio #7, Cinda Sue Dow, pastel artist. I'm happily occupying the whole of her pastel house! The tour is Sat. and Sun. 10 - 5, and we're also having a special preview on Friday, May 31 (that's tomorrow!) from 5-8 pm. The location is in Friday Harbor at 545 Alder Ct. Heading out of town on Argyle, turn rt. on Spruce St., pass Hemlock St. and turn rt. on Alder Ct. Both of us are giving 20% off during the preview.

Necklace, fibula pin, bracelet, and earrings in palette of natural colors featuring jasper and smokey quartz stones.
Necklace and earrings featuring beautifully faceted rubies (man-made) and sterling silver beads.
Selection of bracelets with specialty glass beads, pearls, crystals, and sterling silver or gold elements.

I love wireworking. These are two fibula pins and three pendants that showcase high-end lampwork beads by nationally recognized artists.

I offer a selection of every-day earrings in a wide range of colors, featuring glass lampwork beads, vintage Chinese glass beads, and more. I use sterling silver or gold-filled findings only (no plated pot metal).

This necklace and earrings feature vintage Chinese glass beads (beautiful, soft, translucent blue) paired with sterling silver elements from the Golden Triangle area in Northern Thailand.

I just finished this bead/ribbon/thread/button embellished, red, felt purse! Any fun-loving person with a flamboyant streak would enjoy carrying this on their shoulder!

I named this necklace "Sea to Sky," and based the color scheme on a painting by Monet. It showcases a vintage, magnificent and unique sterling silver pendant from The Hill Tribe peoples of Thailand. This necklace was featured in "The Beader's Color Palette" by Margie Deeb.

This necklace is an example of my "woven treasure necklace" technique. It colors are inspired by the raku glaze on the featured ceramic beads by an artist in Hawaii.


This tassel ornament is another example of the "woven treasure" technique. In the light, it reminds one of stained glass windows in a cathedral.

"Trust" is bead embroidery art to enhance a small space. it is one of the 13 technique samples for my book, "Heart to Hands Bead Embroidery."

Inspired by Emperor Penguins, this bead embroidered brooch looks great on jacket lapel or sweater.
Earrings and fibula pins.

Key fobs, zipper pulls, cell-phone or camera tags on the top shelf.

I display most of the jewelry in color groupings. There's a range of casual to elegant, ethnic to contemporary, and understated to bold looks in my work.

It takes me two days to set up for this thing, plus uncountable hours to make the work. Since I'm actually a rather shy person, it's difficult for me to promote my work in person. When guests come, I sometimes don't talk to them at all. So it's always very gratifying when people show up for the tour and actually buy my work, despite my awkwardness. 

Monday, May 27, 2013

Happy Red Balloon Purse

A few years ago I impulsively bought a red felt bag with circles of color on one side, made in Nepal. $40. I never used it... guess I'm conservative at heart when it comes to purses. Yet still, it always makes me happy to look at and touch it.

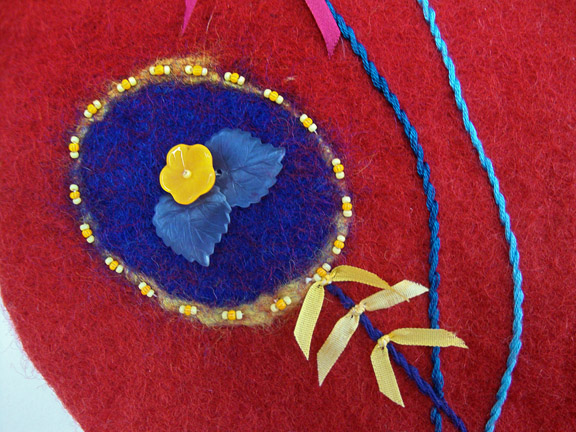
The original purse just had the "spots" of color. I embroidered the "strings" to make them look like balloons.

While moving, it surfaced. Wow, I thought, bet it would be fun to bead this bag! Maybe a more flamboyant person than I will buy it at the Artist Studio Tour (next weekend). So, for the last two days, my worktable heaped with stuff, I turned the circles of colors into balloons.


I started with the strings, embroidered with 6 strands of floss (detail picture above). Then I began adding beads, buttons and ribbons... Whoooohooo! Balloons!


Here are a couple of them.


I finished the bag at midnight last night. Most fun things were stitching into felt and adding the ribbons at the end. Most difficult thing was getting inside the purse to knot off the threads. Happy colors, happy red, happy Robin! How do YOU like it?

Saturday, May 04, 2013

Bead Embroidery Makes Me Happy


Getting back to bead embroidery definitely makes me happy, although this piece really isn't about being happy. It's my Bead Journal Project for April, a month that was all about separation and change, about moving, about finding a new way of being, living alone and being single rather than married. Both the beading and the process of changing my life are still on-going. I don't know what the future will bring with either.

I worked on this piece (no name yet) while teaching two different Improvisational Bead Embroidery workshops during the month. As always, I have the students write poems on the second day of class, poems about self based on words and phrases that come to mind while looking at their beadwork. These are the two poem I wrote based on this piece.

#1

I am scattered
I want to be one of the other
words or phrases
such as I am peaceful
or I am purple
or I am flowing
but the truth is
I AM scattered right now
as I cut through
the crumpled remains
of the soft colors
of my marriage dream
I am scattered
as I pack all my things in a box
drained of energy
traffic noise in my head...
oh flower fabric and aqua beads
may you refill my cup of life
               March30, 2013

#2

I am delicate
emotionally delicate I guess
a little unusual for me
my heart is folded
my wedding rings still on my finger
my life flowing along
as if everything was normal
as if everything was the same
I am circled by beads
beautiful, graceful, pretty beads
are supporting a new phase...
like the butterfly
I will take a new form
yet with the same life blood
and the same heart as before
                  April 14, 2013

I'm doing post-card-sized (5 x 7 inches) pieces again this year, like the first two years. This one seems to be going in the direction of being solidly beaded, which takes a lot of time. I don't know if the others will be encrusted or not.

Wednesday, May 01, 2013

In The Pink ~ Wireworking Tutorial

Maybe I'm back... Or, maybe I'm just avoiding the task of unpacking all the boxes...

Either way, as I put on my pink corduroy shirt this morning, the thought of making some new pink earrings propelled me into the studio. Yay... ignore the boxes and have some beady fun! As long as I was doing it, why not take a few pictures? OK, so here's a mini-tutorial about wire working.


This is how they look finished.


You need half/hard or full/hard wire for these, because they need to have some "spring" to them in order to be able to fasten the hook at the back. I used 20 ga., half/hard, gold-filled wire for this pair.


Cut two pieces of wire, each 4.5 inches long. File one end of each wire, so that the cut end is smooth. Use a small, round-nose pliers to make a small loop at the filed end of each wire.

Load the beads on the wire. Disc-shaped, lampwork beads work well for this style of earrings. I add a gold-plated snowflake spacer bead and a 2mm gold-filled, round bead on each side of the disc. After adding the beads, bend the wire upward at a 90 degree angle as shown in the picture. If the loop is turning the wrong way, grasp it in the jaws of a flat-nose pliers and twist to position it correctly (horizontal).


Use a felt-tip marker to make a mark on the wire 1.5 inches above the right angle bend. This mark will be at the center of the top of the earring.

Place a 3/8" or 1/4" dowel as a mandrel under the wire, centering the mark on the dowel. Bend the end of the wire downward, over the dowel, toward the loop at the back of the earring. Do this step slowly, checking your progress and making sure the bend is directly above the beads.


Cut the end of the wire about 1/8 inch below loop. File the cut end smooth, and slightly round the edges. Then I sand the tip of the wire with #400 (or finer) sandpaper, and polish it with a soft cloth to make it totally smooth.

Use round-nose pliers to round the tip upward a little, allowing it to hook into the loop for security.

These earrings are very comfortable to wear. Because of the hook at the back, you'll never cry over one lost earring!