My "hexie habit" began March 6th, when I folded my first 2 x 2 inch square around a die-cut, paper hexagon shape, and basted it in place - the first of about 3,500 hexies that will eventually become a single-bed-sized quilt, entirely hand-sewn.
Am I crazy? Well, it's entirely possible. It all started because my husband likes to watch TV and movies (DVDs)... a lot! I could easily not even own a TV, much less watch it. He likes me to watch with him, keep him company, somebody with whom to discuss whatever he's watching. Ooops.... big conflict of interests here! In order to oblige him, I have to be doing something with my hands, something simple enough that I can still devote some of my attention to the box. Turns out hexies are the PERFECT solution! They also work well for when we take the ferry off island, parked in the waiting line or on the ship.
In five months, I have:
- cut 3,500+ two-inch squares of fabric
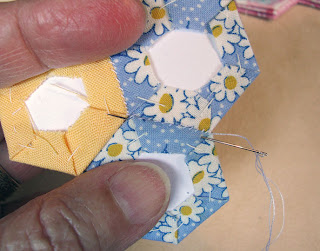
- basted 3,500+ hexies, which are 3/4 inch on a side (pictures on this post)
- hand-sewn 213 single-ring flowers
- hand-sewn a pathway ring of white hexies around 78 of the single-ring flowers
Still waaaaaaay more to do - many more hours of movies, documentaries, etc. with my husband. I reckon I've spent a little over 400 hours on it so far - that's TEN 40-hour work weeks in 5 months. This has actually been fun. Each of the 213 flowers is a different fabric, so there's always something a little new.
Thought you might like to see the steps for making the single ring flowers...
 |
| Arrange petal hexies in pleasing way around center. |
 |
| Put one petal face-to-face with the center, and whip-stitch them together. I generally take about 12-13 stitches per 3/4" side. |
 |
| Join and stitch the first and second petal together along the side seam. Knot at the end of each side. |
 |
| After stitching the side seam and knotting, slip the needle under the folded flap of the side to return to the center hexie. |
 |
| Double knot the center hexie to the second petal. Then whip stitch them together. The first petal will have to be folded a bit. |
 |
| Continue adding petals around the center. This is the side seam between the 5th and last petal. I double knot at the end of each side seam. |
 |
| Whip stitch the last petal to the center. |
 |
| To complete the last side seam, the entire flower must be folded as shown above. |
 |
| The back side of the completed flower looks like this. Click on any of the pictures to see detail of stitching. The paper pieces and basting stitches stay in the hexies until the entire quilt top is whip-stitched together. When the top is complete, it is ironed on the back side; the basting stitches and paper pieces are then removed, and the quilt sandwich is made. |
 |
| Stack of 50 hexie flowers! Only 163 to go.... |
Here's a stack of 50. Altogether, I made 213 of them, all with different prints.
The next step is sewing the white "pathway" around half of the flowers. (The others get green print hexies to represent leaves.) That takes about 1 hour per flower.
Here are the first 50 of them - 67 to go.
After finishing the white rings, I'll start sewing them together in groups of 5 flowers with green hexie leaves between them. I'll post pictures and another progress report after I've done a few.


gorgeous! can't wait to see your finished quilt...does the paper stay in? i've always wanted to try my hand at that....good idea for TV with the hubbie! i do mini-quilts but i've wanted to try a larger one...
ReplyDeleteHi "jean"... thanks for your comment and good luck with trying a larger one. It's a time commitment but rewarding when finished!
ReplyDeleteThe paper pieces (hex shapes) do not stay in the quilt. After the entire quilt top is stitched together and ironed, the hand basted stitches and paper pieces are removed. At least that's what I've read and intend to do.
Basting stitches can just stay in as they are on the back and not visible.they give a bit of extra support.
DeleteGreat Hexie quilt on the go. I do a wall quilt once upon a time.
ReplyDeleteWonderful, requires a lot of patience but great idea. One question, where the sewing machine stiches go? I guess on top between hexies? :)
ReplyDeleteHi Gutukas, Thanks for your comment! In answer to your question, the sewing machine gets a rest on this one. It's totally hand-sewn and hand-quilted!
ReplyDeleteCan't wait to see the results. I had a friend at college who made a quilt this way, it was a way to mediate away the worries of being a high achiever.
ReplyDeleteHexagon craze –
ReplyDeletemy mind's in a daze.
Even when dreaming
I see all that seaming
before me quite clearly
'cause I love hexies dearly.
Every new slipstitch
increases that quilt-itch.
My fingers keep busy,
my grey cells get dizzy.
Where is this leading?
When will I be beading?
I'll invest all my powers
for many more hours,
at the end of which
I will quilt in the ditch.
To Jacqui ~ You're so right about mediating the worries! Hand stitching on such pretty, child-like prints is definitely a stress reducer.
ReplyDeleteTo Sabine ~ I LOVE your poem!!!! I'm in awe of anybody who can write rhymed verse; to do it in a second language is beyond my comprehension. Thank you... it's perfect!
Hello Robin, like you I have been away from my stitching and my beading for quite some time! Not for the same reasons - mine were all internal (body and mind). I am so happy to see your delight in beading again - you are one of my beading heroes and I have already ordered your book. I am thrilled your sight is so much better and wish you much joy from that. I have returned to hand stitching - quilts and other things (refer Jude Hill) - but I have never done paper piecing. Hmmmmm!
ReplyDeleteLove your new habit Robin, this is on my "someday" list. Can't wait to see them in person :)
ReplyDeleteI did this with a diamond shape from old silk ties. Turned it into a graphic tumbling blocks quilt wall hanging. It was worth every minute of every stitch.
ReplyDeleteOh Robin, such memories I have of great times with Grandmother's Flower Garden! I began the same journey as you several years ago, since it was a nice car project, and we seemed to be taking a lot of car trips. I even have many of the same fabrics as yours!!! After completing quite a few blocks, I took up knitting again....and my quilt is not finished. ;-( I applaud you for your stick-to-itiveness! It will be a wonderful quilt...and very soon!
ReplyDeletexo
oh my goodness! so beautiful...and a lot of work. but you will love the results! have never tried the hexies, but adore the look of the finished quilts. thanks for the detailed step-by-step!
ReplyDeleteHi Robin! Have you been peeking in my window? lol I too am using the English piecing method to piece my grandmother's flower garden using 30's reproduction fabrics. I love how the points match so nicely with this method. I too piece while watching tv with my mate, getting another flower finished at every opportunity. I love, love, love 30's fabrics and flower garden and star quilts. Happy quilting!!
ReplyDeleteHi Barbara! Sounds like we're hexie-sisters. I'm now sewing large pieces (strips) together. It takes about 5 hours to sew one strip to the next across the width of the quilt, and there's so much to hold onto that my fingers get really cramped up. I can only work for an hour or so at a time one it. But, still... it's progressing.
Delete