
During the past two weeks, I starched and pressed the back, removed all of the basting stitches and paper pieces, sandwiched the quilt, and began the long hand-quilting process. Pressing and starching (with Best Press, the scent-free variety) helps the hexies to keep their proper shape while and after removing the paper pieces.

Snipping the basting threads and lifting the stitches back to the knots on each end was fairly easy with these fabulous seam-ripping scissors, which I believe are actually suture removal scissors. I highly recommend them! Even with this great tool, it took about 25 hours to get all the stitches removed and another 4 to remove all the papers.

After working for a few hours on it, I started saving the threads. Quite a pile, don't you think? I might try to make an art project with them, spreading them out on a heavy plastic sheet covered with a PVA glue/water mix, arranging them into some sort of picture and then, when dry, appliqueing them onto a background.
Back to the quilt, the next step was to remove the paper pieces. Checking the quilt carefully after finishing, I found 5 or 6 I had missed. Thinking they were all out, I again pressed the wrong side, finding 4 more un-removed paper pieces. Now I had them all... right? Wrong.
I certainly did not want to get the quilt all basted together, start hand quilting and find paper pieces still inside some of the hexies. So I got the idea to hang the quilt top over the edge of my work table in a darkened room with a couple of lights under the table.
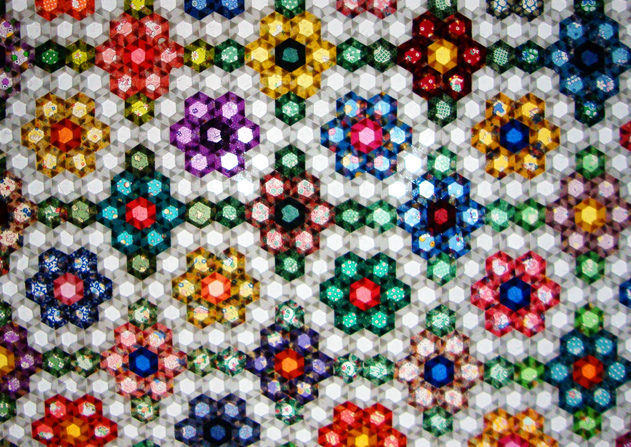
As you can see above, the effect was stunning, like a stained glass window in a cathedral (click on picture to see it bigger)!

Did I find more paper pieces hiding? Yes, three more showed quite clearly. In the photo above, you can see two of them, one in the white pathway of hexies, the other is one of the pink flower petals. The center of that same flower looks suspicious as well, but it was just the dark red fabric.

Now I'm willing to bet all the paper pieces are out. Of course I saved them to re-use on the next hexie quilt... Did I really say that? Eeeeeeek!
* * * * * * *
Basting Tip

I started basting the fabric around the paper hexie pieces using "junk thread," old cotton and polyester thread, bits and remains on nearly empty spools. I wasted a lot of time because the threads tangled and knotted, especially when I tried to use a longer thread. Using a shorter length (about 2 feet) helped a little with the tangles, but took longer to repeatedly have to thread the needle. I was using a regular sewing needle, one that was a little difficult to push through the card stock of the paper pieces.
Finally, I hit on the perfect thread/needle combination! Here it is, worth every penny of extra cost, and pennies sums it up, not dollars:

Basting thread - YLI glazed, 100% cotton quilting thread - I basted with lengths up to 48" long, and it never tangled or knotted, speeding up the basting process by at least 50%.

Basting needle - Foxglove Cottage straw needle, size 9 - Fabulous, strong, just the right length needle! It even kept its sharp point after basting through 100s of paper pieces. I used only three to baste over 4,000 hexies! Also, straw needles in size 10 were perfect for whip stitching the hexies together. I'll probably try them for hand quilting as well. Most quilting shops carry at least one of two brands, sometimes Foxglove Cottage, sometimes John James, both seeming equally good.


Thank you for ALL these tips! I have been cutting hex papers with a 1-1/2 scrapbook paper punch using the good parts of paper I would be throwing away at work. (I can't stand to waste anything). I had planned to use left over thread as you did. I'm am for sure going to get a pair of those scissors.
ReplyDeleteI loved the pic of the quilt top back side. Genius idea to check with a light too.
I bet you WILL make another hexie quilt. I can see that its going to be a mind calming experience.
Glad all is well with you.
xx, Carol
Thank you, Carol! You always "get it" and encourage me... I am so grateful to you!
DeleteAbout those suture removing scissors, mine are 4.75" (12 cm) long, sturdily built of stainless steel, with "Pakistan" stamped on the handle. I use them for all of my seam ripping... LOVE them. I see several sizes and levels of quality on the linked site, all fairly expensive. I found some MUCH cheaper suture removal scissors on Amazon, but am unsure of the quality. I'll be curious to hear about what you find and get.
All I can say is, WOW! I am so inspired by your work on this huge project.
ReplyDeleteThanks, Kelly. It surprises me that I've stuck with it, and even increased the scope of the project, going from my original plan to make a small lap quilt to a full bed-sized quilt. I love working on it.
DeleteOh wow, what a gorgeous surprise you got when you backlit your hexie quilt top!! Very very lovely.. I was oohing and aahing. :-D Makes me want to make one, just to invent a way to stretch it over a frame and lightbox, and hang it on the wall as a lit up show piece! A whole new way to display colorful little quilts. :-D)))
ReplyDeleteYou've got me pondering this one, Retta! I'm thinking bigger hexies, maybe 1.25 inch size, in batiks, backlit for display as you suggest... possibly matte medium on both sides so to protect it and keep the edges from fraying. Might just be my next "quilt." LOL!
DeleteI didn't think about the finish, to protect the fabric. The matte medium would give it a translucent effect, with the light behind that would give it the glow... I was thinking of all the new things they do with LED lights now... low heat, lightweight and easy for diy projects. I hope you do it! It would definitely be an original and something not seen before. What a hit you'd make at a quilt show! :-D
DeleteThat backlit quilt sure looks like beading to me!
ReplyDeleteA glorious project, Robin!
Thanks, Allie!
DeleteRobin, you were really very clever to invent that new kind of x-ray!
ReplyDeletex-ray? Ha! That's a fine concept!
DeleteThanks for sharing your process and the tips. This is such a pretty quilt. I went to see the Quilt Hawaii show on Sunday and really wished you and Christi could have been there to share the beauty. I especially thought of you as I looked at the special award-winning hand-quilted quilt. It wasn't the flashiest quilt visually, but the stitching! Oh, so beautiful, tiny, and even. In these days of machine quilted everything, it is a pleasure to know that folks are still hand-quilting.
ReplyDeleteI wish we could have been with you, Peggy... and I agree about how good it makes me feel to see hand quilting.
DeleteGreat tips! And the 'stained glass effect' is utterly stunning!
ReplyDeleteGlad you like the tips. There will be more.
Delete