Monday, November 24, 2014

Why Are Rosaries Called Rosaries?


rosary
Last week, while in the Portland (Oregon) area, I spent a day driving east along the Columbia River Gorge. Icy, windy, and cold, yet fabulously beautiful, I enjoyed every minute, both in and out of my car. You can see more of my scenic photos of the day here.

Multnomah Falls, Columbia River Gorge, winter ice
Multnomah Falls, Columbia River Gorge, Nov. 2014
At the "Bridge of the Gods," I crossed the Columbia and headed east along the Washington shoreline toward Bingen, stopping to use the facilities at the Columbia Gorge Interpretive Center Museum. Seeing a sign on the admission desk about "the world's largest collection of Rosaries, over 4,000 of them," and remembering that rosaries = beads, I decided to take the time to view the collection.

virtual reality photo of rosary collection
Virtual Reality Photo by Jim Cole - Rosary Collection, Housed at the Columbia Gorge Interpretive Center Museum
You can hardly imagine 4,000 rosaries... so many different types of beads... simple seed pods to elegant gold-capped jet, and everything in between. From a bead lover's perspective, it was heaven (except, of course, I wanted to fondle them all). The "virtual reality" photo above, "borrowed" from the internet, gives a correct impression of the quantity. This rosary collection is the life-work of Don Brown, a founder of the regional historical society.

Here are a few of the photos I took of the collection:

rosaries from the Don Brown collection housed in the Columbia Gorge Museum

rosaries from the Don Brown collection housed in the Columbia Gorge Museum

rosaries from the Don Brown collection housed in the Columbia Gorge Museum

And now, finally, we get to the meat of this post! The word rosary... where did it come from? According to the online Etymology Dictionary, the word rosary dates to the mid 15th Century, and is derived from the Latin words rosarius, meaning "of roses" and rosarium, meaning "rose garden."

But wait, there's more to the story! In Medieval times, monasteries and castles had formal rose gardens, which provided baskets full of fresh rose petals from which to make beads for strands of prayer beads used by Monks and Noblemen. Of roses... the beads were made of roses, hence the term rosary, which over time was applied to most prayer strands (particularly those used by Catholics)  made from any type of beads.

A museum curator at a small natural history museum in Hungary, once showed me a 300-year-old rosary, the beads made from rose petals. "Cup it in your hands for a minute," she said, "and then smell it." WOW! After 300 years, it had the delicate fragrance of roses!

Rose-petal-beads don't look like much. They are matte black, imperfectly shaped, and a little bumpy or lumpy. Yet, in addition to their beautiful aroma, they have great character and charm.

The Don Brown collection includes several rose-petal-bead rosaries, most of which are toward the back of the display pegs. However, I'm willing to bet that the beads of the forward rosary on peg number 159 are made of rose petals.

rose petal beads, from the Don Brown collection housed in the Columbia Gorge Museum

How to Make Rose Petal Beads

YOU can make your own beads of rose petals! Collect a large basket full of fresh, dry (no mist or rain moisture) petals (early in the morning, when they are the most fresh). Mash the petals into a thick paste, using a mortar and pestle, or try grinding them in a meat grinder or food processor. The paste will be black. Allow excess moisture to evaporate for a few days if necessary, stirring several times a day. The natural rose fragrance may be enhanced with essential oil of rose.

Form the paste into bead-shaped balls. Side the newly formed balls onto a straight piece of stainless steel wire (piano wire, or similar). Place a row of balls on the wire, leaving a 1/4 inch space between each bead. Place the wire from side-to-side on the rim of a baking pan, and allow the beads to air-dry. The drying process can take weeks, depending on the humidity and room temperature. Turn the beads daily on the wire to prevent them from permanently adhering to it. Do not hasten drying by placing in an oven or direct sunlight, as they will dry on the outside and remain soft on the inside.

If there is absolutely no "give" when you squeeze them, the beads are ready to take off the wire and string. When properly dried, the beads are very hard and durable. Here is an on-line tutorial about making rose-petal-beads, a bit different than the way I've made them (described above), and very informative.

Other Exhibits at the Columbia Gorge Interpretive Center Museum

Although my intent was to view the rosary collection and then get on my way, I could not help but take some extra minutes to see the Native American Beadwork/baskets and Vintage Quilt exhibits.

Native American beadwork and weaving, Columbia Gorge Museum

Native American beadwork, Columbia Gorge Museum

Native American beadwork, Columbia Gorge Museum

Native American weaving, Columbia Gorge Museum

Native American woven baskets, Columbia Gorge Museum

vintage quilt, feathered star, Columbia Gorge Museum
Feathered Star, c.1869, hand pieced and quilted, triangles are about 1/2" high

vintage quilt, feathered star, Columbia Gorge Museum, detail
Feathered Star, detail

vintage quilt, embroidered wildflowers, Columbia Gorge Museum
Embroidered Quilt, c. 1880, over 400 squares (3" each), wildflower designs embroidered with wool thread

vintage quilt, embroidered wildflowers, Columbia Gorge Museum, detail
Embroidered Quilt, detail showing wool thread embroidery on 3" wool fabric blocks
If you're thinking you might want to visit the Columbia Gorge Museum while vacationing with your husband, he might want to know there are lots of very manly things to see there, including this fabulous 1921 Mack logging truck, which still runs!

1921 Mack log truck, Columbia Gorge Museum
1921 Mack AC Log Truck - It Still Runs!
As always, you can click on any of the pictures to see a larger version (more detail). If your system operates like mine, you'll get a click through slide show of the photos in this post, starting with the one you clicked on.

Wednesday, November 12, 2014

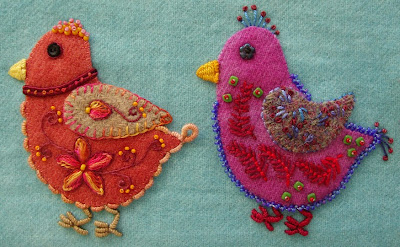
Wool Applique Chicks with Emerging Personalities

Robin Atkins embroidered, wool applique chicks

When I saw an exhibition of Sue Spargo's embroidered, wool applique quilts at the La Conner Quilt & Textile Museum a half a year ago, I was beyond thrilled with her colors, folky designs, and flawless technique. Here are some photos.


Robin Atkins embroidered, wool applique chicks
Imagine my delight when a space became available in Sue's workshop during the La Conner Quilt Festival on Oct. 4th! We would make a sampler using one of three of Sue's motifs: leaves, circles, or chicks. You guessed it... chicks are my thing! To prepare for the class, we were instructed to cut out our chicks (36 of them!) and applique them to the background felted wool using matching wool thread.

Robin Atkins embroidered, wool applique chicks

Not having any wool thread, I stitched my little chicks using 60 weight cotton applique thread. It has a bit of a shine, which shows on the wool if you look closely. The wool thread is rather expensive, even if you just buy bobbins, but I'll probably invest in a set of bobbins if I keep doing this type of work.

Robin Atkins embroidered, wool applique chicks

I also made another deviation from the instructions, deciding that 16 chicks would be enough to practice the stitches and give me an idea if this is something I enjoy doing. Below is the layout for my sampler, ready for embroidered embellishments during the workshop.

Robin Atkins embroidered, wool applique chicks, layout

Of course we didn't get much done, although Sue was great at getting around to each of us, giving individually tailored instructions. Although I have learned various embroidery stitches in the past, there were quite a few that were new to me, my favorites being: rosette chain stitch, palestrina knot stitch, bullion loops, and buttonhole scallops.

Robin Atkins embroidered, wool applique chicks

The other fabulous thing about her class is that she brought LOTS of examples of her work, and allowed us to photograph them, which gave me a library of possibilities for using the different stitches. So far, I haven't needed her examples for inspiration, but I'm sure I'll run out of ideas and be grateful for the photos I took.


Robin Atkins embroidered, wool applique chick, in process
A little over a month has passed since the class, and I've finished half of my chicks!

It's really fun to see the personality of each chick emerge as the stitches and colors are added. I haven't named them yet, but I do recognize definite character traits in each of them. Most are girl chicks, ranging from shy and introverted types, to flamboyant, to high class. A couple are boys, filled with testosterone, chasing the girls.

Robin Atkins embroidered, wool applique chicks

Which two of my first 8 chicks do YOU think are the boys?

Robin Atkins embroidered, wool applique chick, in process

In case you're interested in my process... I stitch eyes, beaks, or feet when I'm at a loss about what to do next, giving myself time to get inspired. I don't always finish one chick before moving on to the next. If I'm stuck, I just work on another chick for a while, one that calls to me (usually because of color). The single chicks pictured in this post need a lot more embellishments.

Robin Atkins embroidered, wool applique chick, in process

After I finish the chicks, the next step is deciding how to finish the piece. I'll probably quilt it, making it into a small wall hanging. But I'm not sure if I'll hand or machine quilt. Look for a related post on threads and embellishing materials soon.

Beads? Oh yes, if you click on pictures of the finished chicks they will enlarge to full size, and you'll be able to see the beads as well as the detail of the stitches.