Wednesday, August 25, 2010

August BJP Finished!

Robin Atkins, visual journaling on resist-dyed felt
I started this one in July, before Aug. 1st when I would list my six words for the month. I needed a stitching project for a sew-day with friends, so why not begin a little early? Recently I got a new prescription for my glasses and they gave me the old lenses. I thought it might be fun to use one of them in the piece!

So first I picked one of the resist-dyed felts I made in Chad Alice Hagen's class that had a circle on it where I might be able to put the lens.

Robin Atkins, resist-dyed felt
Then I started stitching on the felt. This particular piece was quite thin, less than half the thickness of commercial felt. I needed some stiffener to keep my stitches from puckering. I suppose I could have used acid-free, interleaving paper (as I usually do), but this time decided to try a light-weight, non-woven interfacing fabric (which worked quite satisfactorily). Although I didn't finish that day, I worked on some of the stitching shown below.

Robin Atkins, visual journaling on resist-dyed felt, back stitch
The stitches are done with cotton buttonhole twist. I used mostly back stitch (above), but around the circle I used chain stitch and then filled in the centers of the chain with size 15 beads (below). The rock is a chip of slate from some steps we had made on the trail to the studio.

Robin Atkins, visual journaling on resist-dyed felt, chain stitch
After choosing my words on August 1st...

release
listen
talk
shift
risk
commit

I thought long and hard about how to add them to my piece. I wanted them to be under the lens, suggesting the need to really see the words, or even to magnify the importance of them in my current life... words to live by. I considered writing them on paper and then mounting the lens over the paper. That idea didn't seem quite right for the piece, as I wanted to preserve the mottled look of the felt in the circle area.

Finally I got the idea of writing the words on a somewhat transparent fabric, organza, then basting the fabric over the circle and embroidering the words with backstitch (through both the organza and felt). It worked pretty well! After finishing the words, I made a beaded bezel to hold the lens over the words, as per the instructions in my book, Heart to Hands Bead Embroidery. The last step was to cut the outside edges of the organza about a quarter of an inch away from the beaded bezel. I used my finger to scruffle and fray the edges of the organza. Here's how it looks...

Robin Atkins, visual journaling on resist-dyed felt, bead journal project
I used colonial knots (similar to French knots) to mount the felt onto my painted paper and added a twisted embroidery floss border (as on all of my BJP pieces for this year). The finished size is 7 x 7 inches. Here's how it looks...

Robin Atkins, visual journaling on resist-dyed felt, bead journal project

After finishing it, I got out all eight BJP pieces for the year, placed them in order on the table and took a good look at them. Conclusion? It pays great dividends to stick with a challenging technique or artistic concept! Step by step, piece by piece, improvement is seen.

This is the year I took on words... and collage too. I've been fascinated by other BJP members over the three years who so successfully use words in their work and who use paper collage techniques as inspiration for multi-media collage with fibers and beads. I was afraid my need for technical perfection and structure in my art would be a road block, which it was and to some extent still is. But definite improvement is there to be seen, each piece a small victory over the one before it. Yay!

Stay tuned, I'm finally back on the beadlust/BJP track again! My next post, in a couple of days, will feature a tutorial on finishing and after that a post showing my July BJP!

Thursday, July 22, 2010

June BJP Finished!

This was a fun one! My words for the month of June made me think of my totem animal, rabbit.

stuffed rabbit, component for June BJP by Robin Atkins,detail
So this is how it all started. I had a package of bunnies pre-cut out of different batik fabrics and selected one that appealed to me. A black bunny with square spirals... What could be more cute than that?

I decided to make a slightly stuffed (dimensional) bunny, by cutting out a back piece, inserting some quilt batting and beading around the edge with picot edge stitch.

stuffed rabbit, component for June BJP by Robin Atkins
Here's how the back looks.

stuffed rabbit, component for June BJP by Robin Atkins
And here's the front.

Now what? Well, doesn't a bunny just love to leap and frolic across little hills and fields of flowers? And wouldn't pink be just the right color... my favorite color as a child to go with my childhood favorite animal?

decorative paper painted with acrylics by Robin Atkins
I painted the above paper some years ago (acrylic paints on heavy drawing paper... stenciling, stamping, glazes, textures, layers). The white spiral design is purchased rayon lace paper left over from a bookmaking project.

Next I needed some pink felt for the hills and my words. This time I decided to try stitching my words with embroidery floss. I used a double strand of variegated silk floss and the stem stitch. For the first two words breathe and believe), I "just did it." But I could see that my size and spacing weren't very good that way. So for the other four words, I stitched guidelines on the the felt, which you can see in two of the words below.

embroidered words, components for June BJP by Robin Atkins
Next I stitched the hills together using various embroidery stitches. Then came the beads and embellishments! The most fun part! I stitched the flower and leaf beads in place and then embroidered around them. It is so sweeeeeet to embroider on felt.... I love the feel of it!

bead and thread embroidery by Robin Atkins, bead journal project, Believe
Here's how it looks finished. Since my primary word for June is "believe," that's the title of this piece... Believe! (Click picture to enlarge.)

I believe in
  • asking for what I need and want
  • writing, writing, and more writing
  • surrendering rather than fighting
  • breathing deeply and mindfully
  • laughing as much as possible
So there you have it! I believe my dear totem animal guide, rabbit, is enjoying a leap into the stars... definitely in the pink!

Monday, July 05, 2010

I'm Baaaaaaaaad

Robin's motorcycle, Suzuki 800 Intruder
Oh dear! I just looked at my last post... June 20th. Good grief! What have I been doing? Visitor from Europe for a week (including 4-day motorcycle ride... wheee... fun... above picture is my Suzuki at the summit west of Lillooet, BC) and quilting. So guess I'll post about the quilt I'm making...

It's a large double-bed quilt, a graduation present for my niece, Margaret, who is just getting her MA from the U of Minnesota. I suggested we feature pictures of her on the quilt and she asked for soft green as one of the colors.

It started with various pictures I collected from my own albums and from Margaret. Below are three of them.

Margaret in bunny costume
Margaret with her mom, original picture
Margaret graduating with her BA, original picture
Obviously, they needed some work. Here they are again, worked in Photoshop. I took out a lot of the color on all of the pictures and then added a sepia photo filter to even them all out. I gave each a border in a color similar to the fabrics I had collected for the quilt.

Margaret in bunny costume, print-ready image
Margaret with her mom, print-ready image
Margaret graduating with BA, print-ready image
Besides the bunny costume picture above, the one below is my other favorite picture of Margaret. She's looking at a tattoo she had just gotten on her shoulder.

Margaret looking at tattoo, print-ready image
I printed the pictures on poplin fabric using my ink jet printer. The fabric sheets came from Jo-Ann's Fabric. It's easy. Print the pictures, peel off the backing, hand wash to remove the sizing (stiffener), dry and iron. Permanent color and ready to use fabric! (I don't see the product I used by Crafter's Images on Jo-Ann's website anymore, but this product looks similar.)

fabric strips for Margaret's quilt
Then I cut piles and piles of strips of fabrics in various widths... 1 to 3.5 inches wide.

Randomly selecting strips, I sewed them around the pictures to create blocks. Below is a picture of the top 12 blocks (I did 20 in all) on my design wall. The 4 top left blocks and the 4 top right blocks are already sewn together to form two large blocks.

Margaret's quilt, top 12 blocks, in process
Because of the random widths of the strips and different sizes of pictures, the blocks are all different sizes. No problem. Just takes a lot of time and fussing to figure out what to put around and between the blocks to make it all come out the right. I used strips, piano keys and 9-patches to fill in the spaces.

Below are the finished blocks, sewn together and bordered with soft green. Notice the strips of fabric sewn together (piano keys) draped over the chair? I sewed them around the outside edge. They will drape down over the edge of the bed and make the quilt large enough.

Margaret's quilt, center top is complete, needs piano key borders to finish
The next step is to piece the back of the quilt and get it to a professional quilter. I thought about doing the quilting myself, but don't think I could roll it up tightly enough to fit under the small arm of my 1972 machine and I definitely don't have time to hand-quilt this one.

This has taken me many, many more hours than I expected. It turned out to be quite fussy getting the blocks to fit together pleasantly. Plus I ran out of many of the fabrics and had to labor quite a bit to get the piano key border to look good. No pictures of the finished top yet... maybe after it gets quilted.

Quilting is challenging for me. I'll be happy to get back to work on my June piece for the Bead Journal Project. I'm making progress, but haven't taken pictures yet.

My main word for July's BJP is FOCUS! I'm looking forward to starting that one soon... What a great word, eh?!

Sunday, June 20, 2010

Felting + Dying + Book Making = FUN!!!!

Chad Alice Hagen, hand-made wrap-style book, detail
Just returned from a 3-day workshop taught by Chad Alice Hagen... Had a great time learning about felt and how to dye it using resist methods. Wanted to make more (many more) pieces of dyed felt to use in my various beading and collage projects. But after a day of dying, we moved on to book making, which (of course) was also way fun even though much of it was not new to me.

The reason I signed up for the class is because of the luscious, gorgeous, fantastically beautiful pieces of resist-dyed felt made by Christi C. (Sweetpea Path), two of which I've used for Bead Journal Project pieces (here and here).

I LOVE, LOVE the way Chad embellishes bits of dyed felt and creates books and pins with them. Below are a few of her pins... Notice the stitching details and bead embellishments, carefully chosen to enhance the dyed designs on the felt.

Chad Alice Hagen, hand-made felt pins
Some of her pins were for sale... I couldn't resist (ha! pun intended)... bought the one on the top left in the second picture. Difficult choice... I liked them all!

Below is one of her little Coptic-bound books... Ooooh, again, the stitching and beading makes it extra specially precious, don't you think?! Knowing we would be making one too, I just about couldn't contain myself!

Chad Alice Hagen, hand-made Coptic book with embellished felt covers
The first day we felted two large "sheets" of wool, needle-punched, pre-felt bats. Imagine the din as twelve of us literally THREW wads of wet felt onto our tables! When the wool was felted, we cut it into pieces and started up the dye pots (4 baths, 3 color choices each bath).

For each dye bath, we clamped various things on our felt pieces (hair clips, paper clips, metal parts, Popsicle sticks, clothes pins, etc. etc. etc.) and then tossed the pieces into the dye pot. After their 45-minute dye bath when the clips, etc. were removed, the piece would be the dyed color except where the clips were pressing on the wool and resisting the dye. Here are the 11 pieces I dyed that first day.

Robin Atkins, resist-dyed felt
Chad Alice Hagen reviewing resist-dyed felt made by students
Above, Chad is giving some feed back to students about their felt pieces. I'm a tad, just a tad, disappointed in my results. Maybe some of them look a little too much like 60s tie-dyed t-shirts for my taste. I really wanted to spend a second, less rushed, day... further experimenting with this method. However, we moved on.

Day-two, we chose one of our larger pieces of felt and constructed a small, hand-bound, wrap-cover journal. Here's mine... the felt, the bound spine and the finished book...

Robin Atkins, felt used for hand-mand book, wrap style
Robin Atkins, hand-mand book, wrap style with felt cover, binding detail
Robin Atkins, hand-mand book, wrap style with felt cover
At the end of day-two, we selected felt from our stash to make an embellished mini-book with Coptic binding, like the one Chad made pictured above. That evening our home work was to complete the thread embroidery and beading on both the front and back covers of our books. Here is the felt I chose.

Robin Atkins, resist-dyed felt for making cover of Coptic book
Two other students joined my roommate and me in our room... beading, stitching and talking until well past midnight. That was the most fun of the whole workshop for me!

Below are my two embellished covers ready to bind into a book.

Robin Atkins, embellished felt for book covers
Below are all the embellished, felt cover-pieces made by the students in our class.

embellished felt for book covers made by students in Chad Alice Hagen class
Below are pictures of my book, which I finished on the late ferry home just last evening!

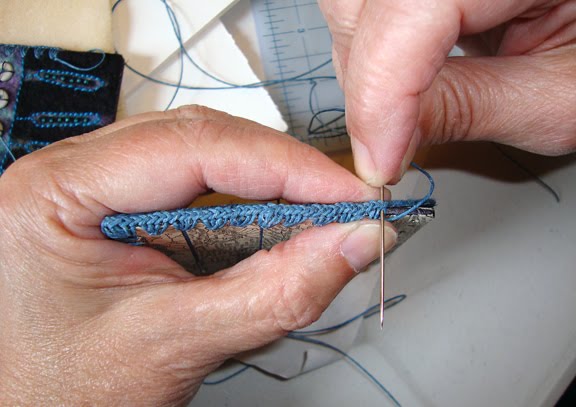
Notice that the covers have a hand-stitched edging. We did this with the same waxed linen cord that we used for binding both books. This took longer than any of the other steps and was quite difficult. None of the students finished their edging or had time to bind their books in class. Fortunately, we received good handouts with excellent illustrations which I was able to follow for the binding.

Robin Atkins, hand-mand Coptic book, binding detail
Robin Atkins, hand-mand Coptic book, detail edging stitch
Robin Atkins, hand-mand Coptic book, front cover
Robin Atkins, hand-mand Coptic book, back cover
I love constructing hand-made books!!!! And I love working with hand-dyed wool felt. I'm not so sure I love the dying process, especially the chemicals, the need to carefully monitor time, temperature, water-acidity, etc. I don't think I'll be buying any dye... but I would happily join a dye party at the studio of one of the other students!

Friday, June 04, 2010

Change - May BJP - Finished!

collage, bead journal project, Robin Atkins, detail
Major changes (which came into full swing during May) are happening in my life. All six of my words for the month are relevant. They are: change, remember, forgive, seek, open and thank. Can you find them in the finished piece below? (You may need to click to enlarge.)

fiber and bead collage, bead journal project, Robin Atkins
I named the piece Change because that's the most important word of the six. Although I've decided not to delve into the personal changes I'm making in this post, it's not really a secret. If you're interested to read about it, you can check out my journal-blog, Words Paint, which I write under the pseudonym of Peacefulbird.

Obviously, the butterflies are symbolic elements of change and metamorphosis. A once-closed envelope (me) is now open with butterflies flying free. Feathers are another symbol of freedom, flight and good perspective... My husband found these two in our yard. My best guess is that a Northern Flicker gifted some tail feathers to us. The turtles are all about getting there, no matter how long it takes.

I started with the second, luscious, butter-soft, piece of resist-dyed felt made and given to me by Sweetpea. Without thought, I immediately folded and pinned it into an envelope shape. What could go in it? Oh, maybe those flicker feathers I've been saving! Oh, OK, now what paper will I use for the background?

Auditioning papers: This one seems to dark, don't you think?

auditioning painted papers for bead journal project, Robin Atkins
This one seems too busy.

auditioning painted papers for bead journal project, Robin Atkins
This one is really too busy; it competes with the pattern on the felt.

auditioning painted papers for bead journal project, Robin Atkins
This one was my second choice. I like it a lot, but it seems a tad too pale or washed-out looking with the felt.

auditioning painted papers for bead journal project, Robin Atkins
Here's the one I chose. Doesn't look like much in this picture, but the color has lots of life without being overpowering.

auditioning painted papers for bead journal project, Robin Atkins
Once that was decided, I started playing around with various beads and elements I might use. I had 4 plastic butterfly-shaped buttons in my stash which looked really nice coming out of the felt envelope and had appropriate relevance to change.

How could I apply my words to these buttons and where could I find two more? Hmmm... gave up on that one and decided to make my own butterflies by sawing them out of copper sheet and metal-stamping the words. Tried that. Too big, and way too visually heavy for the delicacy of a butterfly. OK, well, maybe I could make butterflies out of heavy, water-color paper, write the words on the wings and paint them. Here are the three ideas. You can see why I rejected the copper...

collage elements, bead journal project, Robin Atkins
So then I played around with drawing butterflies free-hand. Ummm, I'm not so good at that. However I had a sheet of butterfly stickers that gave me an idea. I peeled off the background part of the sheet and placed it lightly on the water-color paper. Then I used a #2 Micron pen to draw around the inside (where the sticker was), which gave me some nice shapes.

template for drawing butterflies, bead journal project, Robin Atkins
I wrote the words vertically along the edges of the left-hand wings, extending some of the letters to look like the veins. For the right-hand wings, I wrote the words backwards. Ruined a few, but finally got six usable butterflies. Next I painted them with watered-down, transparent acrylic paints.

painting butterflies for bead journal project, Robin Atkins
After painting, they looked like this.

painted butterflies for bead journal project, Robin Atkins
Before cutting out the butterflies, I used an embossing stylus to score along the body on each side so that I could easily fold the wings into flying position.

Next, I had to figure out how to attach them to my piece. Everybody knows how much I don't like glue. So, I needed a way to sew them on the paper and felt. I also needed antennae. A double-layer body might do the trick...

I cut out six little, body shapes from heavy, black paper and made antennae from bent pieces of 28 gauge brass wire. Using PVA (acid-free, bookbinder's glue) and a toothpick applicator, I put a little glue on the back side of the butterfly bodies and along the duplicate body shapes. Then I placed two pre-cut lengths of Nymo thread in the glue, perpendicular to each body and laid the antennae in the glue at the head. When the glue was slightly set, I joined the duplicate body layer to the back of each butterfly. My plan, if the glued layers worked, was to use the four Nymo threads to sew each of the butterflies to my piece. It did work! I hope the picture helps to make sense out of what I just wrote.

underside of painted butterflies for bead journal project collage, Robin Atkins
I also used 28 gauge brass wire to wrap beads around the feather quills. In a similar manner to the butterflies, I laid two pre-cut Nymo threads along each quill before wrapping, which would allow me to sew the feathers to the paper.

Here's what the back of my piece looks like. You can see where I tied the Nymo threads to secure feathers and butterflies. I used Tyvek (from a mailing envelope) as a backing to prevent the thread from cutting the paper. You can also see where I sewed the felt envelope to the paper using Nymo thread.

back side of collage, bead journal project, Robin Atkins
Well, there you have it, probably more how-to than anybody needs or wants... but I can't help myself sometimes...

I love this piece and what it represents in my life! Hope you like it too.