500 Judaica, published by Lark Books (a recent addition to their 500 series books) offers superb photos of 500 contemporary ritual art pieces of the Jewish faith in a variety of disciplines, including metalwork, woodwork, beading, ceramics and fiber arts. Amidst the beautiful artwork, the words of the 180 or so makers explain what creating Judaica means to them.
I find this book very inspiring. The forms, designs, colors, spirituality, sensitivity and heart-felt sincerity of the work is more than compelling. Collectively it offers me a challenge for my own work, an invitation to focus entirely on what is most important and real to me.
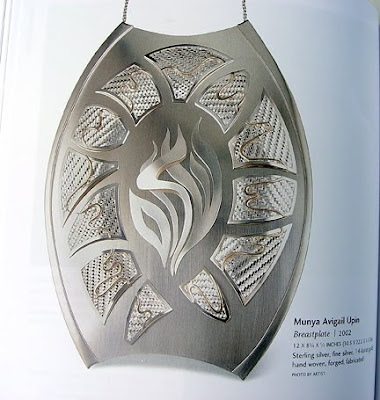
Below are a few of the pieces that call to me. I am not Jewish and do not understand entirely what they mean, yet they are hauntingly exquisite and inspiring.



500 Judaica is my newest art reference book, one I anticipate returning to again and again, because from its pages ideas will fly through my mind and art will happen!
Friday, February 11, 2011
Inspirations from Ritual Art
Thursday, February 10, 2011
Finished February BJP

Since we're struggling right now, working with a marriage counselor, trying to fix problems with both expectations and communications, my Bead Journal Project piece for February seems to be more about what I wish than what is.
I started out thinking this piece would be about our current relationship (and maybe it is that... more than I realize). But as the beading progressed, it seemed more and more to represent how I'd like the intersection of our pathways to look. I'm curious what our counselor might think of it... maybe I'll take it to show her next time. Maybe I'll ask my husband what he thinks it means. That would probably throw him for a loop, as he usually doesn't know what to say about my beadwork.

Clearly there's love at the center of our relationship, not a glamorous love, more like a plain, wooden, heart-shaped button kind of love with two funky, silver wedding-rings attached. Yet the large heart dominates the center of the story.
The line of me in the intersection is represented by red/pink beads, my favorite colors since childhood. The line of my husband is represented by blue beads, the color he painted his room when a boy, the color of his eyes, the color shirts I like to buy for him. I notice that his color gets into my line and vice-versa, which I think is important, although I'm not sure why.
My work is improvisational which means I don't start with a pre-conceived plan of any kind. Rather, I select whatever beads I'm drawn toward and start sewing them on the piece. It's fun to do it that way... and fast.

For those who like to know:
-- fabric: cotton batik
-- thread: nymo, size D
-- stabalizer: interleaving paper*
-- finished size of block: 9 1/4 inches across the diagonal
-- length of the "arms" on the beaded X-shape: 5 inches
-- beads: size 15, 11 and 8 seed beads, vintage nail heads, pressed glass shapes
* I'll remove the interleaving paper from the underside in all areas that are not beaded. Thus when I sew the blocks together to make my wall quilt, the fabric will have a soft/natural hand.
The heart and the spiral are my favorite symbols, both appearing frequently in my art and beading. So let's go with it! Let's revisit my February pieces for the past three years of the BJP:

February, 2008 - This is Valentine for Little Robin, a gift for the child within, the little sweetie who loves flowers (fossies, as I called them at age 2), bunnies and duckies.

February, 2009 - This is Abundance, like a candy box filled with love, each cluster representing a special loving relationship in my life.

February, 2010 - This is a detail image, showing the beaded portion of Cry, a piece that tells the story of my relationship with my wonderful mom pictured in the tear-shaped center of the heart, the heart being my love that surrounds her always. She is 94 and still hanging on, although sometimes only by a thread.
It's fun for me to look at these again, to see how strong the heart is, to view with gratitude the abundance of love in my life!
Thursday, February 03, 2011
Workshop with Karin Franzen!!!!

When I saw the above wall hanging by Karin Franzen at the La Conner Quilt and Textile Museum, I nearly swooned! My reaction was partly because of the subject matter, fire weed and cranes, so realistically, yet so compellingly portrayed and partly because the transparent quality of the layers of silk organza used in her hangings gives a sense of ephemeral spirituality to her work.
It's a whole day trip at a cost of about $100 to go to the Museum from our island, yet I managed to go three times to see Karin's work during her exhibition there. No wonder, when she emailed that she was teaching a three-day workshop, I HAD to do it. What follows is a little about her techniques and a little about my experiences in the workshop.
Above is one of her current pieces. Her work has evolved, as you can see if you take a good look at her gallery (here), from being quilts (layers stitched together) with borders to her current pieces which are layers of hand-dyed silk organza joined at the top with the subject and background sewn partly on the front and partly on the back sides of the organza... no batting, no borders, no quilting...
Here she has flipped up the top (subject) layer of the piece to reveal one of the hand-dyed layers of silk organza.
Here you can see the same piece back-lit by sunlight. Her pieces change entirely depending on the lighting. Wouldn't this be lovely hung as a room divider where it would get front-lit part of the day, back-lit the rest of the day and entirely different lighting at night?
While we're on the subject of this piece, above you can see a detail of the egret, the many little pieces of fabric that she uses to reveal her subject and the stitches that further bring out the details.
And here is the eye. Sometimes Karin uses fabric paints or dyes to create detail, texture, or alter the color of her fabrics. In this case, I think she may have painted the egret's eye.
Below are some pictures showing the steps Karin takes in developing her subjects.
She starts with a good-quality print of a picture, most often one she has taken, of her subject bird or flower. She then takes the image in Photoshop Elements and applies a filter called poster edges to the image. Then using a sheet of transparent acetate, she traces around the edges to create a cutting pattern. In the picture below, she has outlined the edges right on the image, but that's not how we did it in class.
The next step is to reproduce the acetate tracing on plain paper using a copy machine to get the desired size. This will become the cutting pattern for the fabrics.
Karin's method for creating the subject is to fuse bits of fabric to a very thin piece of non-fusible interfacing. She uses Pellon 805 Wonder Under (nothing else will do!) to fuse fabric to the interfacing. Below you can see the bird outline traced from the cutting pattern onto non-fusible interfacing. Now we're ready to begin fusing!
Starting with the medium value colors, select appropriate fabric. Take a small piece of Wonder Under and place it paper side down over the subject cutting pattern. Use a fine point marker to trace the shape on the glue side of the fusible. Cut around the shape, leaving a 1/4" edge. Iron to wrong side of fabric. When cool, peel off the paper backing. You will be able to see the traced outline on the glue side. Cut out the shape. Place your non-fusible tracing over the cutting pattern and align the cut piece. Iron to fuse it to the interfacing.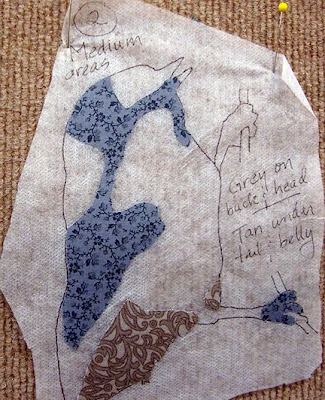
Following the same steps, trace, fuse, cut and fuse the fabrics of lighter value next.
Next do the dark fabrics. I didn't say this above, because there was already a lot of information, but the first fabrics applied, generally the medium value fabrics, should be cut about 1/8" larger than the actual area. These pieces will be overlapped by the more precisely cut darker or lighter fabrics in the next steps. Below the little chickadee is now recognizable.
Last, cut and fuse the small detail pieces to complete the subject.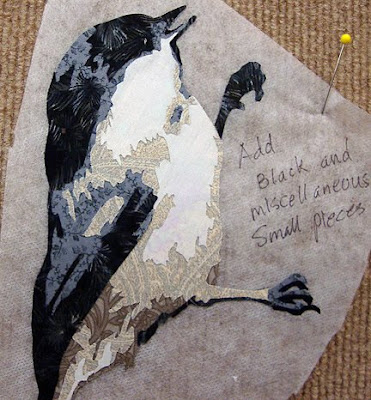
When all the details are in place, the next step is to stitch around all the fabrics using a free-motion foot on your sewing machine. The stitching is used to keep all the bits of fabric in place and to enhance the detail. You can see this stitching in the picture above of the egret's eye.
After the stitching is complete, Karin cuts around the outside edge of the subject, cutting away all of the interfacing that isn't covered with fabric and stitching.
She then places her subject on a piece of silk organza and stitches it in place. Finally, she hand-dyes other layers of organza, fusing background fabric pieces directly to the organza and hand stitching on them to enhance design elements, and combines layers with her subject layer to achieve the look she wants. She then stitches the layers across the top and mounts them on a hanging rod.
Obviously, I've simplified her methods greatly here, as I do not intend this as any kind of tutorial. Indeed, in three long days of class, we only touched the surface of how she creates her pieces.
The first day of class we did some sketching and used our sketch to create a background for our subjects. Her suggestion was that we sketch a dream, a childhood memory, or a childhood fantasy. And then, using the same methods outlined above, cutting and fusing fabrics to an interface backing, we were to make a piece from the sketch. Below you can see mine, from a sketch of a childhood fantasy about being a ballet dancer.
Here it is again showing a layer of dyed organza over the background and the picture of a northern flicker, which is my chosen subject for my class piece.
Not having a good idea of the whole when I started, my background did not seem to relate very well with my subject.
The second day, we spent a lot of time evaluating the backgrounds we had made, trying to find a way to make them work with our subject, deciding on which organza to use and how big to make our subject. At the end of day two and for all of day three, we worked on our subjects. I learned several things right away:
- It's so easy to iron the wrong side of fusible, making a terrible mess on the iron.
- It's so easy to trace on the wrong side of the fusible, making a mirror image piece.
- It's so easy to iron the fusible to the right side of the fabric, making a mirror image piece.
- Cutting out intricate little pieces is not very easy.
- Knowing which piece to cut bigger so they can be overlapped later isn't easy.
- Keeping track of which pieces you've already applied isn't easy.
- It takes concentration, concentration, concentration to get it right, and at the same time, it's a bit like paint-by-number, something I never enjoyed much.
Perhaps this type of work is all about me deriving great pleasure from looking at Karin's pieces and not at all about me doing it. At the end of a whole day, I didn't have much to show for my efforts. Below you can see that my flicker still needs spots, two feet, a wing, a tail and lots of TLC stitching.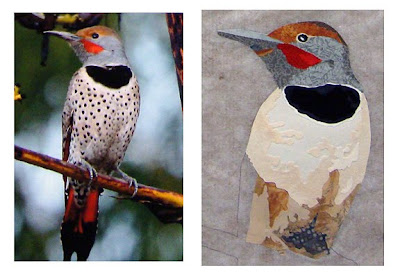
My plan is to make the background a separate piece, to make the subject for it a rabbit which will be placed on the organza so that it covers the white bunny on the background and be much more realistic. The white bunny will be its spirit or totem energy.
For the flicker, I plan to make a new background of madrona trees in berry phase. The flickers come to our property every year to feed on the abundant madrona berries. The subject layer will include a madrona branch, some leaves and berries as well as the bird.
We'll have to see if I actually do these two pieces. For me they are character building. Also, if you know my work, you know that it's quite abstract. Even the few somewhat representational pieces I've done are not very realistic. I'm fairly certain that my primary role here is to be a huge fan of Karin's, to swoon at each new piece...
In case you're still interested, I thought I'd end with a few photos of other student's work. (My apologies, I only took my little camera and had to contend with the affects of indoor lighting sources.)
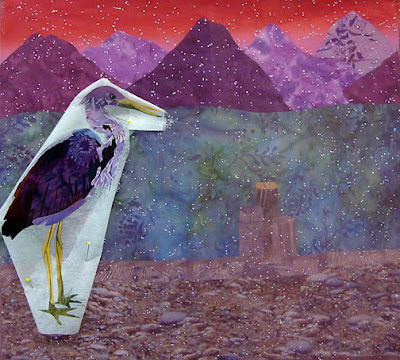
The first photo is Lunnette Higdon-Hertel's swan. She's the only one in class to finish fusing her subject. Like mine, her background story didn't quite match her subject. In the background review, it was suggested she turn her background upside down, which is how it's shown below. However, she plans to make a new and more appropriate background.



Useful TIP for Beaders
In order to stabilize the silk organza so that you can sew on it, Karin taught a very useful method using Solvy.
She tore off small pieces (4" x width of roll) of Solvy and one by one dissolved them in about a cup of warm water, stiring all the while. When the mixture was slightly thickened, like pancake syrup, she poured it into a spray bottle. She pinned the organza on a piece of insulation foam covered with plastic and then sprayed it with the Solvy mixture. When it dried (2-3 hours later), the organza was impregnated with Solvy, giving it a stable hand for stitching. After the stitching is complete, she simply puts the piece in a tub of water to rinse the Solvy away.
I believe this method might work well to stabilize cotton or silk fabrics for bead embroidery! I now use acid-free interleaving paper under the fabric as a stabilizer, which works fine. However, I'm going to try the Solvy method as soon as I get off-island to buy some. I'll let you know!


