Monday, March 19, 2012

BJP ~ Finished November ~ Celebrate BFF!

Yep, I'm still working on my Bead Journal Project for last year, one month to go! This is my finished piece for November.

Lunnette & Me, November BJP
 Like the others for 2011, it is intended to be a visual description of the intersection between me and some important person or force in my life. This one tells of my friendship with Lunnette. She, Christy and I have been getting together on Tuesday afternoons for several years to share lunch and do handwork together, quilting and beading mostly.

Turtle in the center representing a slow-growing friendship
Whereas Christy and I dove into a relationship of trust and easy companionship right off the bat, the development of mutual trust and respect grew more slowly between Lunnette and me. That's probably why I put a turtle in the center of this piece.

Pinks and turquoise colors are mingled
Turquoise isn't a comfort color for me. Lunnette is totally at ease with it, frequently wearing it and using it in her work. However, rather than make the arm representing her all turquoise and the arm representing me all pink, I mingled the colors. Lunnette and I seem  to influence each other quite a lot. When faced with technical or artistic decisions regarding our work, we bounce ideas off each other, frequently finding a solution that is a combination of our ideas. The mingled colors must represent this aspect of our friendship.

The arm representing Lunnette is the one with the little, square, vintage, glass buttons (less than 1/4 inch in diameter). I puzzle a little bit about the differences between us, as shown by the two arms. For reasons I don't understand, I see more circles and flow in the arm representing me; more attention to little details, and a steady marching progression through life in hers. Since I bead improvisationally, without much thought, things show up in my work that elude my analytical skills. This is one of them.  Yet still, I like it and think she does too.

Finished quilt block.
Here is the finished square, shown on point as it will appear in the quilt I plan to make with my 12 pieces for the year. I'm excited to get going on it... Well, OK, first I have to bead December's piece. I know the subject and have the fabric ready to go. Time to get back to beading!

Thursday, March 15, 2012

Books - Write! Publish? Self-Publish? Rewards! - Part 5


Let’s talk about tips for writing beading (or other craft/art) books or magazine articles. Yes, I imagine there are some similarities to writing fiction or history or personal memoirs, enough so that those giving thought to writing any type of book may find useful points in this post. However, most of my experience is writing how-to books about beading, books giving instructions and inspiration to readers who want to do some type of beading themselves.
Finished manuscript! Ready to ship to publisher!

Writing is Teaching

I think there’s quite a difference between books designed to instruct and those designed to entertain. To write an instructional book, one must be a teacher. The very most important key to the success of my books is my teaching experience. Remember, I’d been teaching the methods and process of improvisational bead embroidery for 10 years before writing One Bead at a Time.

During those 10 years, I learned how to convey the techniques to students in ways they could grasp easily. I learned, by trial and error, how to draw the steps on a white board, and the exact words that work best to enable my students to learn the stitches easily. It didn’t come all at once. When students were confused or stuck, I’d try different words, different drawings, until finally something clicked.

By the time I wrote One Bead at a Time, most of my students “got it” pretty easily. I learned how to inspire them as well, how to enable them to delve into their inner creativity and let it come out, again learned by trial and error through working with hundreds of students. Ten years later, the book almost “wrote itself,” as I tapped into the drawings and words I used when teaching.

Photography Required

This is my lighting system, although I still like overcast, natural light best.
For this type of book, good photographs are necessary. As many of you know, photographing beadwork is NOT easy. Shiny, little beads, reflecting light! Depth of field issues, especially with textural and sculptural work! Here's a post I wrote previously on photographing beadwork. Even professionals are challenged by beadwork. A prospective author must decide whether they have the motivation to learn how to photograph their work. If not, they must either find a publisher with a photography department and budget, or they must have the means to hire it done.


Design Skills Helpful

A book must be “designed.” Everything about the first impression a book gives to a potential buyer is important - from the title, to the cover design, to the size of the book and type of binding, to the layout of the pages, even to the details like the fonts and paper quality. To design a book requires both technical skills and artistic sensibilities.

Prototypes (or mockups) of my books, ink-jet printer, for final proofing.
When self-publishing a book, taking on its design is quite a challenge. For me, it was exciting and fun! When working with a publisher, which employs professional designers, I miss being involved in the design process. However, I’ve also learned the hard way that it’s easy to make mistakes when doing it myself. Both of my major mistakes (not coating the cover of Nautical Highways and using dolls on the cover of Heart to Hands Bead Embroidery) have cost me many readers/buyers.

Market research, in a limited way, might be helpful. For example, I might have put several cover images on my blog and taken a popularity poll, or put the doll image up and asked what is this book about? If 7 out of 10 people had responded, “How to make a beaded doll,” I might not have used it on the cover, because doll-making is not the subject of the book.

Printing Your Book

There are numerous printers around the country that operate presses capable of printing books, fewer with the capability of printing in full color (CMYK on a four-color press). Some have in-house binding; some send the printed parts to a bindery. Publishers nowadays tend to contract with mega-printers located overseas to print their books. These are not available to or interested in the relatively small print runs of the self-publishing author.

To get my books printed, I researched printers on the internet. After talking with their sales reps, getting an idea of costs and determining my approximate budget, I asked several printers to give me a bid. Generally I asked for a bid on each of three different quantities. On thing I did not do (but should have) was to ask to talk with a professional on their staff who would coach me through the process, helping me to save money while still producing a high-quality book.

One of the sweetest things about working with a professional publisher is not having to deal with printing and binding your book.

Several fiction writers I know have turned to POD, print on demand, paying for their books only as needed. The cost per book is higher, but there’s no huge front-end payment required and no need to correctly estimate sales. However, most of PODs print electronically rather than with a press. And most of them do not deal with color, or if they do it’s very expensive. If I were to decide to self-publish another book, I would research PODs. However, I’m guessing I’d stick with an old-fashioned, 4-color press.

And don’t forget printers like Kinko’s. They’ve been a great solution for printing small runs of small, pamphlet-type books, such as Rosie, the Uncaged Hen. I can print 100 or more copies at a fairly reasonable cost per book.  This solution works well for books that have less than 20 pages. The quality? It’s not as high as books printed on a 4-color press, but not bad either.

Between Printing and the Customer

In addition to marketing, which I’ll discuss next, there’s binding, shipping and storage. The pages are printed on large sheets, 8-up, 16-up, or some other quantity of pages per sheet. These sheets are cut apart and collated by the printer or bindery. The pages and cover are then bound together. There are many binding options, the most common of which are: perfect, case and spiral. The number of pages in the book, your budget, the desired longevity of the book, and the reader’s preference should be taken into account when making a decision about the type of binding.

Once the books are bound, they are boxed and sent to your desired location. For me, it was our house. When the first printing of my first book arrived, I was shocked! So many boxes! Where to put them? Ah yes, storage. I thought about renting a climate-controlled storage unit, but didn’t want to have to go there every time I needed to ship books to customers.

At first I stored them in my studio. Every nook, every closet, under every table… boxes of books everywhere. Finally, by the time I had six of my self-published books in active distribution and the 7th on its way, I knew we couldn’t live among the boxes any more. So we built a climate-controlled book shed, a small storage unit attached to our studio building, where the boxes are now out of our way, yet still accessible.

Marketing, Everybody’s Bugaboo

With self-publishing, much more than as an author on contract with a professional publisher, marketing is a challenge that’s easy to overlook in the excitement of writing, photographing, designing and printing a book. There’s nothing satisfying about storing hundreds of boxes of books for years and years; nothing at all satisfying about not selling enough books to pay even the expenses of printing and binding them, let alone your other expenses or earning a little profit from your labors.

For me, marketing is always the most difficult and least fun part of being an author. I’ve never enjoyed selling, which is why I never really wanted to sell my beadwork, even to become a gallery artist. Selling my books is no different. I do what I can: take them with me when I teach, make them available through my website, and offer them at a ridiculously low price to the nation-wide wholesale distributor for bead shops.

Some authors, such as Margie Deeb, are lots more active in the sales process. One of the best is Cat Bordi, who writes knitting books. It’s just not me. Therefore, I sell less books than would probably be possible if I were more pro-active.

Selling on Amazon.com

Selling self-published books on Amazon is not as easy as you might think. I’ve not tried it with my beading books. I probably should, because it’s so convenient and such a common way for people all over the world to buy books. We did try it with Nautical Highways, the book my husband and I produced.

There are several ways to sell books through Amazon. One is to list books, pay a commission and take care of the fulfillment, shipping the books yourself. We wanted to set it up so the books appeared like any other new book on Amazon and the orders would be shipped from and by Amazon. This requires joining Amazon’s “Advantage Program.”  Our experience with it wasn't very good; in fact, it cost us more to make the book available through Amazon than we earned in book sales. Not a good bottom line; so we quit. Maybe I’d do better with my beading books; maybe I should try.

Passion, passion, passion!

Who should write a book?  Well, if you’re passionate about something and want to share your passion, it’s very satisfying to put it into book form. It feels good doing it whether you’re self-publishing or not. To see and hold your passion in your hands, in the form of a freshly printed book, is like giving birth to a beautiful baby!

Can you do it on passion alone? That would be rare. If you don’t have sub-passions for teaching, photography, book design, learning about printing and/or marketing, it’s probably wise to find a traditional publisher with interest in your ideas. Perhaps begin by writing magazine articles. Practice by writing tutorials on a blog. A publisher will be far more interested in you and your book idea if you can demonstrate that you have experience writing this type of material. Contact authors in your field and ask them for assistance, perhaps for a referral to their editor/publisher.

The Money Part – Costs

When an author works with a traditional publisher, there are only minor out-of-pocket expenses. Self-publishing is a different story. Depending on how much of the work is hired out, it could cost many thousands of dollars.

Printing will be the biggest expense. Color printing a book such as Beaded Treasures will cost $5-7 per book, depending on the quantity, size and number of pages. Thus, printing 2,000 copies will cost you upwards of $12,000. If you also hire a designer, consultant, photographer, and/or editor, their services might add another $500- $5,000 to your budget. Each of the printings for my books used up all my available savings. It took a year or more of sales to build my savings back up again.

The Money Part – Earnings

Whoooeee, this is a big topic with many, many variables. To put it in its most simple terms, I’ll just tell you that writing each of my books required a concentrated chunk of time: 1-8 months, working 6-14 hours per day, 7 days a week to produce the book, get it print-ready. After that, there’s additional marketing time, of course.

In direct sales (retail and wholesale) of my self-published books, I’ve probably sold about 10,000 books, making an average profit of $2 per book after all expenses are paid. So, in about 11 years, my profit is roughly $20,000.  I’m estimating an average of 700 hours of work for each of my 7 books, or a total of 4,900 hours, which makes my earnings about $4.00 per hour. Ha! I never worked that out before. Interesting! Not much of a wage, is it? But for a labor of passion, I consider myself relatively well rewarded financially.

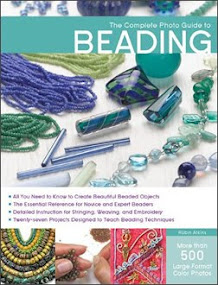
In traditional publishing, the author is either paid in royalties (a percentage of each book sold) or by flat fee. I estimate spending 2,000 – 2,200 hours writing, making samples, photographing, photo-editing, and copy-editing my current book, The Complete Photo Guide to Beading. Oddly enough, my “hourly wage” will be the same as for my self-published book, about $4 per hour.

I guess we can safely say that artists who write books about beading won’t be getting rich quick.

Other Rewards

Oh well, money isn’t everything. The greatest, absolutely the best, reward for me is/was the process of doing it. Exciting and fun, it’s a highly creative, stimulating, challenging way to spend my time! I love the whole process, from the conception of the idea to holding the book in my hands. Even the dreaded marketing can sometimes be interesting.

Another reward is knowing that I’ve been able to share my passions with many more people than I possibly could by teaching. Readers often tell me that working with one of my books is like taking a workshop from me, like I’m there in the room with them, helping them. That’s so gratifying to hear… a fabulous reward!

And finally, there’s the notion of legacy, of leaving something of me in the world after I’m gone. I didn’t have that thought in the year 2000, when I self-published my first book, One Bead at a Time. But now that I’m almost 70, the happy thought enters my mind that some of the books I’ve written will survive me to teach and inspire people when I'm not here anymore.

Conclusion

Maybe this series of posts will help you to decide if you want to write a book or not; maybe it will give you a few ideas about how to do it. There are some great how-to books that might help too. One that I used is Dan Poynter’s Self-Publishing Manual.

Read, ask other authors, talk it over with important people in your life… for a little while! Then get busy and start writing! All starting points are equally valid. Start with what you know best, no matter where it will eventually be placed in the book. Start with your greatest area of passion. Just do it!

Wishing you a lovely journey….


Tuesday, March 13, 2012

Grandma's Flower Garden Quilt ~ I'm Doin' It!!!


I always admire hand-pieced, hand-quilted Grandmother's Flower Garden quilts when I see them in museums. They make me happy... VERY happy!!! Circles of hexagons, flowers, bright pastel colors, sweet/cute little prints with animals, children and posies... what's not to like?!

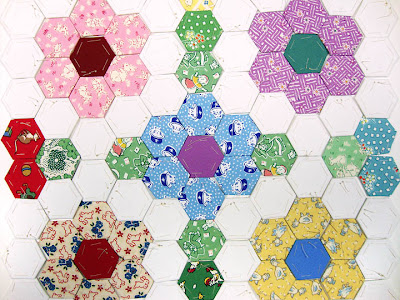
My quilting friend, Christy, who has a stash of 1930's reproduction fabrics, recently began basting scraps of fabric onto paper pieces, 3/4 inch hexagons. Her plan is to make a small, wall-hanging quilt. As I've watched her stitch, so portable, so satisfyingly mindless, I've begun to develop project envy.


These fabrics are new... reproductions of designs/colors from the 1930's

I started a 30's reproduction quilt more than a year ago, one based on a historic quilt with 25-patch blocks. Oddly, I've never taken any pictures of it... Or if I have, I can't find them. But a few of the fabrics are shown above. I'm hand quilting it, slooooooowly making progress. However, it's NOT portable. A large quilt, it needs a lot of table space to work on it. It also requires really good lighting, because I'm quilting an intricate design with white thread on white fabric for the sashing and borders.

My husband likes to watch TV... and likes me to join him in that pastime for several hours each day. Watching TV, even good movies, is waaaay down, near the bottom, on the list of things I like to do. So the only way I can comfortably sit with him is when I can do handwork at the same time. Knitting works pretty well; I can do simple patterns with only dim lighting. But, having gone through a 2-year knitting spree, I'm knitted-out. What to do???

You guessed it! Grandma's flower garden quilt, here we go! Perfectly portable. Works for TV, waiting in line for the ferry, ferry rides, and quilt gatherings. And... I get to use the scraps from my other 30's reproduction quilt! Whooo-hoooo!


Step 1: Go to Paper Pieces, and buy die-cut, 3/4" hexagon paper pieces. I'm starting with a bag of 1,500 pieces, although I'll need at least one more bag to make a bed-sized quilt. The cost is $20/750 pcs. or $35/1,500 pcs.

Step 2: Get out fabric stash and cut 2" strips. Cut these into 2" squares. Using one of the paper pieces as a guide, snip the corners off the squares to make roughly hexagon-shaped fabric pieces. For my arrangement, it takes 6 pieces of print fabric and 1 piece of solid fabric to make one flower.


Step 3: Pin a fabric hex to a paper hex.


Step 4: Turn the fabric seam allowance around the edges of the paper piece and baste in place. Knots should be on the right side.


Step 5: Repeat steps 1-4 to make a bunch of fabric hexagons. Play with the arrangement of them to make a pleasing design. This is my plan, so far. There will be a white pathway around some of the flowers, other will have green print "leaves." What do you think of this arrangement? It's not the most familiar style. But it would not require quite so many boring white hexagons.

Step 6: Whip stitch the hexagons together by hand.

Step 7: Remove the basting stitches and paper pieces.

Step 8: Figure out how to deal with the uneven (hex shaped) edges. Layer the top, batting and backing.

Step 9: Hand quilt.

Obviously, I haven't given much thought to steps 6-9 yet. I have much TV to watch while making more than 3,000 fabric hexies before contemplating the finishing steps, although I will start whip-stitching the flowers together to give a little variety to my handwork.

Help... I NEED MORE VARIETY OF FABRICS!

Do you have scraps of 30's reproduction fabrics in your stash? I need pieces that are at least 2x12" or 4x6 inches... except for the green background fabrics... for greens I only need 2x8 or 4x4 inches. I'd be happy to trade a few bags of glass rings for some scraps! Email me at robin[at]robinatkins[dot]com.

Want to see more examples of Grandma's Flower Garden quilts? Check out this link to Google images!

Monday, March 05, 2012

Writing & Publishing Beading Books, Part 4


Preparing a Book for Traditional Publishing

If you’ve been reading Parts 1-3, you know that my first book was self-published. Book #2 was published by Interweave Press, with some dissatisfaction on both sides, leading me to stick with self-publishing for books #3-7, the last of which was released in 2008.

Bead Embroidery - Beading on Stiffened Felt
After that, my focus shifted from books to family, as my parents’ health declined. First I lost my dad, and last March, my mom. Those were some tough years. I didn’t have extra energy to produce books. Yes, there were a couple on the back burner (still there), but nothing happened. In fact, I thought about retiring, not from doing beadwork, but from teaching and authoring beading books.

Three months into the grieving process for Mom, a brief message arrived via email. I almost chucked it out. It said, “I am an acquisition editor for Creative Publishing international. Looking for an author for The Complete Photo Guide to Beadwork. Please contact me if you might be interested."

“Yeah right,” I thought, “sounds like one of those typical, run-of-the-mill, blah-formula project books that totally don’t interest me.” To this day, I’m not sure why I replied, cautiously asking for more information.

Bead Weaving - Sculptural Peyote
Good thing I did, because it has given me the opportunity of a lifetime! Turns out CPI is the American branch of Quayside Publishing in London. Once I started researching their line of Complete Photo Guide books (to Jewelry Making, Textile Art, Knitting, Creative Painting, and more), I am totally impressed. All of them emphasize techniques and feature lots of stunning photography. Plus, they are comprehensive, large-format, 250+ pages, and beautifully printed on high-quality paper. To be part of this series would put me in very good company! If you’re not familiar with this series of books, take a look on Amazon, or better yet, check out your local Michael’s, which carries many of them in their book department.

Bead Stringing - Hand Knotting
After seeing the books, I knew THIS would be a chance to write the book I’ve wanted to own ever since I began beading in 1985, a book that could teach me all types of beading, give me information about beads and in-depth methods for designing and finishing my bead projects. It would need to include the following main sections:

About Beads - Trade Beads
1. All about beads ~ giving important tips and information that would help me choose beads for my projects, for example, how to tell the difference between stone, glass and plastic beads, or the difference between fake and real pearls.
2. Bead stringing ~ with “teaching-projects” designed to build skills from one to the next, including Japanese pearl hand-knotting methods and beginning-to-advanced wire working.
3. Bead weaving ~ again with progressive skill-building projects, including chapters on peyote, brick, right angle weave, netting, crochet and knitting with beads.
4. Bead embroidery ~ starting with making a stitch sampler of all the basic, fancy, edge and fringe stitches, and progressing to projects that emphasize various design approaches and base materials, including fabric, stiffened felt, fiber-collage and paper.

Bead Embroidery - Beads & Fiber Arts
Wouldn’t that just be the cat’s meow? My students and customers have been asking for such a book FOREVER. I don’t know why it’s not been done before. But I can assure you, it’s being done now!

I’m getting ahead of myself. So, with excitement and a lot of trepidation about whether I could pull it off successfully, I signed another book-length contract and got to work. A word about contracts. They’re written with the publisher’s best interests at heart, of course, and prevent them from liability. Plus this one essentially gave the publisher the right to re-publish “my book” or any part of it in any country, in any language, in any form without compensation to me. It’s also an unusual contract in that they pay me a flat fee for preparing the book. There are no royalties. I guess this would be good for me if the book were a flop. But I honestly expect sales will exceed their wildest dreams.

Bead Weaving - Netting
For about 2 minutes, I wondered at my sanity. I knew it would require untold hours of work and energy, probably amounting to a wage of about $1 or $2 per hour. But I didn’t care. I wanted to write this book. I wanted to give back to the beading community some of what it has given me in the past 28 years. I wanted to do it for the love of beads and beading. So I signed.

Different publishers work differently with authors. CPi seems very trusting, allowing me to build the book the way I think best, as long as I stay within the general style of the series. They also gave me permission to recruit guest artists to contribute teaching projects in areas where I lack expertise.

Bead Embroidery - Improvisational Design

My first step was to produce a rough outline of the topics and projects that needed to be included. Then, taking a hard look at my own beading skills, I noted those areas where I was lacking and set about finding guest artists. Fortunately I have a great network through the Bead Journal Project, teaching, and blogging. I soon found 9 artists who were willing to help me. They would design a project, write the instructions, take step-out photographs and send everything to me. I would make their project, following their steps, and then edit everything to be consistent in style with my own instructions.

I am much indebted to these wonderful, talented artists! Their contributions round out the book, making it truly comprehensive in a way I couldn’t have done on my own!

Bead Stringing - Complex Wire Working
The deal with CPi is this: their professional photographers take the beauty shots, exquisite pictures of the finished projects and variations. I’m responsible for the step-out pictures. Since I took all the photographs for my previously self-published books, I figured this would be manageable. Well, it was, but not without countless hours of working on the images in Photoshop and frequent re-shoots. It was the most difficult challenge of all to get images that would be up to the high standards set by this series of books.

I had three submission deadlines: Sept. 1, Nov. 30, and Feb. 27, with approximately 1/3 of the text, images and beaded objects due each time. Somehow, thanks to my husband, guest artists, the universe, and internal strength; I met each of the deadlines.

Bead Embroidery - Sampler of Stitches
The art log… Oh boy, that was another challenge. I gave every one of the 597 images and 80 beaded objects sent to CPi a unique number, recording it in the art log (an Excel document). Then I inserted these numbers into the manuscript, indicating placement of each picture within the text. In the end, the printed proof-sheet with each numbered image, the numbered objects, the art log and the manuscripts all have to match… exactly… no missing images, no images without a corresponding placement in the text. Yikes. Let me say, even for a fairly well-organized person, keeping track of everything was another huge challenge.

The final challenge was budget. Apparently the world economic situation is affecting book publishing too. In January, the editor informed me of cuts. Some titles were cut entirely. Thank goodness, mine was only cut in length. Although a few non-essentials had to go, the book remains true to my original concept and fully comprehensive.

Bead Weaving - Knitting with Beads
It’s complete! After 8 months of non-stop work, the final submission went to CPi by FedEx on time. Now it’s in their hands. Their book designers, editors, and photographers will build the layout of the book, edit my manuscript, design the cover, and make it all come true. According to the editor, I will have an opportunity to go over it again before they go to press. Then it will be printed, somewhere in Asia, bound and released late this year. My baby, my dream, my gift of bead love, will be on the shelves at last! Look for the this title: The Complete Photo Guide to Beading by Robin Atkins!

The pictures in this post are little sneak-peeks, parts of photos that will be in the book. I'll show you more later when the layout process is complete.

Bead Embroidery - Quilting with Beads
Are you wondering how it happened that the acquisition editor contacted me in the first place? I did, and so I asked her. She said she searched the internet for bead artists. One of the first things that came up was this blog, Beadlust. She scanned through it, noted my writing skills, noted that I take decent pictures, and noted on the side bar that I’ve written bead books previously. Then she went on to look at other search results, but said she kept thinking about what she’d seen on Beadlust and my website. In the end, I was at the top of her list. And since I said yes, the rest is history.

In this case, as in co-authoring with Amy Clarke (see Part 2, here), I got lucky. I didn’t seek a publisher; they came to me. Luck means being in the right place at the right time; it also means being true to your passion and being public with it in every way possible… teaching, networking, and the internet.

In the final installment (Part 5) of this series, I’ll list a few tips and conclusions about writing and publishing books. If you’ve considered writing a book, I hope these words will help you to give it a try!

Sunday, March 04, 2012

Writing & Publishing Books - Part 3

Return to Self-Publishing

Five more self-published books followed my experience with Interweave Press (Beaded Embellishment, see Part 2, here), with varying degrees of success.

The first of these, the only non-beading book of the 8 books I’ve written so far, was a lesson learned the hard way. Feeling cocky with the continuing success of One Bead at a Time, now in its third professional printing, and sure that traditional publishing was not for me, I collaborated with my husband on a picture book about the Washington State Ferries in the San Juan Islands. I wrote and designed the text; he took the pictures. We were certain every resident of the islands would buy several copies, one for themselves and (we hoped) some for gifts. So we scraped together all the cash we could and went big, ordering 3,000 copies.


Immediately on receipt of our payload, we noticed an alarming problem. The covers of the books, mostly black ink, as you can see, grabbed fingerprints in a way that would make a forensic scientist ecstatic. Grim!

That, right there, is one big problem of self-publishing. The printer you hire does exactly what you tell them to do. If you don’t tell them to print a coat of varnish on the covers before assembling and binding the books, they won’t. And if you don’t KNOW to tell them to varnish the covers? Well, then you get ugly fingerprints. Imagine the book on the shelf in a book store. Two customers pick it up to take a look. If neither of them buys it, the thing looks shop-worn, totally unattractive already.

Not knowing what else to do about it, we bought cans of Krylon matte spray fixative (used, for example on pastels and pencil drawings), and painstakingly sprayed each cover. Although it looks better than fingerprints, it made the covers a bit dull and some got tiny bubbles, pock marks. Some were ruined because we touched them too soon.  I guess the alternative would have been to get the covers reprinted and the book re-bound, but we’d already spent all our available cash getting the books printed.

That wasn’t the only card stacked against us with this book. The ferries had just undergone a big change, increasing their fares dramatically and cutting back the service and number of runs. Maintenance budgets were also cut, resulting in rust and dirt accumulation. Our lovely ferry service was a thing of the past, and people were grumpy about it. We had counted on a favorable attitude, reverence and nostalgia, to sell our book. Instead, we found that grumpy people weren’t very interested. We have yet to sell enough copies of the book to pay ourselves back for even half our printing expenses, and of course have earned nothing for our time.

What did we learn?
1. Print a test run; or at least keep the first printing to a minimum.
2. Hire a printing consultant to advise on things like the need for varnish on the covers.
3. Maybe for such a book, in this day and age, print on demand would be the way to go.
 
Our experience with Nautical Highways certainly made me more cautious. For the next three books, Rosie, Finishing Techniques, and Spirit Dolls, I went back to self-printing and smaller quantities. These are really booklets, having 12 to 20 pages each. As needed, I get 100 or 200 copies of each printed at Kinko’s, collating and stapling them myself. The cost per book is a little higher that professional printers would charge for quantities of 2,000 or more, but start up expense is much more manageable, and so is storage. I sell these books through my website and in my classroom when I teach. Although the total quantity sold is nothing to brag about, I’m satisfied to have made this information available. Later I’ll write a little about selling them on Amazon, something I have chosen not to do.

A word here about the process of writing books. There are many possibilities. One could write the text, but hire a book designer to do the layout and design of the book. One could take their own photographs, adjusting them in a program such as Photoshop, or hire a professional photographer. One could find a source for the ISBN book number and bar code (needed if the book is sold in stores or on Amazon), or hire a book consultant to take care of that detail. One could design their own cover, lay it out, do any needed drawings or photographs for it, or hire it out. Me? Well, I didn’t have the budget to hire anybody, so of necessity, I did it all myself. There are both pros and cons to this. For me, it was challenging and fun. I learned so much more with each book. Even now, I look back at my prototypes, printed on my trusty ink-jet printer, with great fondness because of the lessons they represent.

Beaded Treasures was my next book, released in 2006, and printed professionally. Again it was a completely do-it-yourself deal. This time, I leaned Quark, the publishing software used by most printers, which allowed me to prepare print-ready pages saved as PDF files. I printed 2,750 for the first run, because the savings per book was ridiculous going from 2,000 to 2,750. That was a good decision because I sold out in just over a year and did a second printing of 2,500. Wouldn’t it be great if one could accurately predict sales? The cost per book for 5,000 would have been much lower than I paid each time. However, I would have had to store 625 large cartons of books. I’m satisfied with this book and with the sales from it. My only minor dissatisfaction is with the color in the photographs. To get color matching services from a printer is quite expensive, so I chose not to do it.

Always, after writing One Bead at a Time, I wanted to do a sequel, a book that would present both advanced bead embroidery techniques and give inspiration for developing design skills and artistic confidence. So, in 2008, I wrote, designed and self-published an 80-page book, Heart to Hands Bead Embroidery. It’s my favorite book! I loved writing it and love sharing the techniques and process in this way.

However, I may have made a telling mistake with it, one that a traditional publisher might have avoided. I designed the cover myself; it features six beaded “paper dolls” strung across the front, back and flaps of the cover. I love how it looks! But, I think it gives a wrong impression about the book. The immediate suggestion is that the book is about making dolls. It is not. So if a customer in a bead shop sees the book on the shelf, but isn’t interested in making dolls, it’s not likely they will even consider opening the book to take a look. I think it may hurt sales. Confident that it would sell, I again scraped together all my available funds, and went for a 3,500 print run. Time will tell if that was a mistake.

OK, we’re up to date now. In Part 4 of this series, I’ll tell you about the experience of preparing my latest book, which will be released late fall or early winter, 2012, and is being published by an international publisher. How did it happen that I returned to traditional publishing? You’ll see!


Thursday, March 01, 2012

Writing Books about Beading - Part 2


To Be Published – A Dream Come True!
My second book hitched in an odd way on my first book. Remember (Part 1), I mentioned contacting publishers about re-publishing One Bead at a Time (after the test run of 300 copies)? One of those I wrote to was Interweave Press, publisher of several beading books and the successful Beadwork Magazine. Like the others, they did not respond. And when I called them, I was told they were “doing their own bead embroidery book, in house, no outside author needed, thank you very much!”

About a year after self-publishing One Bead at a Time, I was hired by the Rocky Mountain Bead Society (Denver area) to teach several workshops, including a two-day improv bead embroidery class. One of my students was Amy Clarke, already an awesome bead embroider in her own right. Unknown to me at the time, she was also the editor of one of Interweave’s other magazines, Spin Off, and the chosen author for their intended book about bead embroidery.

Well, Amy and I really hit it off in class. I recall after class going somewhere with her for dinner and talking our heads off… about beads and beading, of course. It was one of the most exhilarating times of my life – to share our methods, inspirations, philosophies and passions around beads… loooong after our dinner plates were cleared away!

The next day she told me about her job at Interweave and her soon to be written book about bead embroidery. She said after taking my class and our bead talk, she wanted me to be her co-author on the book. Picture me jumping out of my shoes with joy! The next step was for her to get the editor’s approval, which entailed a meeting in the big office. Thank goodness Amy did most of the talking, as I was just a wee bit nervous (understatement). Interweave has a mighty impressive spread, located in a stately, historic bank building in Loveland, Colorado.

 I got the job, and was ecstatic about it! I hardly read the contract (some 20 pages of it in small type, as I recall). The bottom line was Amy and I would split the up-front incentive, the mid-way payment, and the royalties equally. I'm thankful to and blessed by Amy for her willingness to share with me half the "glory" and pay for writing this book.

It was our avowed dream to write the bead embroidery bible, the book that would be timely forever, and never be allowed to go out of print, one of the must-have books in every beader’s library. We wanted to share everything we knew about bead embroidery. We loved that our approaches and methods were so different. We couldn’t have been happier.
The best thing about working with an established publisher is their staff resources, such as professional artists who can take a so-so drawing and turn it into a beautiful illustration, a photography department with the highest-hi-tech equipment and lighting, layout designers who know how to make every page look its best! When I self-publish a book, I either have to hire these professionals (completely out of my budget, and how would I even find the right ones?) or do it myself, which is what I’ve done with my books with obviously not-as-slick results.

The other wonderful thing about working with an established publisher is their marketing network. They create a dummy (short and somewhat tentative version) of the book, long before it is released, and take advance orders from the big distributors. They advertize and promote and keep the sales flowing after the initial flush of orders.
If I remember correctly, it took us about 5 months to finish our part of the book. At the end of that time, we still had regard and respect for each other. But not everything was roses. In the publisher’s eyes, Amy was the good, cooperative author; I was the difficult, argumentative author.

Here’s what I think happened. Maybe I was a little cocky with the success of One Bead at a Time. Maybe I thought I knew better than the editor what the title of the book should be and what should be on the cover. Maybe I thought our copy editor, who changed at least one thing in almost EVERY sentence of our book, was all wrong. Maybe I fought too hard to have it my way. So, in the end, the book is really good, but my career as an author for Interweave was over.

Later I submitted two beading book ideas to them. “Not interested.” Yet, in a few years, those two ideas grew into books published by Interweave, but written by other authors.

The dissatisfaction went both ways at the time. I vowed I’d never write another book under the iron fist of a publisher. If I was going to write something, I wanted artistic control over layout, photography, cover design and title!

However, as the years rolled along, I’ve become less cocky and more respectful of publishers and their editors. They know a thing or two. Beaded Embellishment has enjoyed great success. I believe it is currently in its fourth printing, at 10,000 copies per reprint. Amy and I are still receiving royalty checks twice a year… despite the title I didn’t like and the cover (which now I love, but then thought was “lame”).

Somehow, I changed my mind, deciding that if the opportunity to write a traditionally published book ever came my way again, I’d play it differently… be more cooperative, more respectful, less assertive. Although I didn’t expect to get a chance, in June, 2011 it came my way. But that’s the story for the final part of this series of posts.

Between Beaded Embellishment and my new book (release scheduled for winter, 2012), I self-published one book that failed miserably and five reasonably successful ones. Read about them in Part 3.