Showing posts with label paper piecing. Show all posts

Saturday, May 14, 2016

Hexie 2 Report - 733 Hexie Flowers Finished!

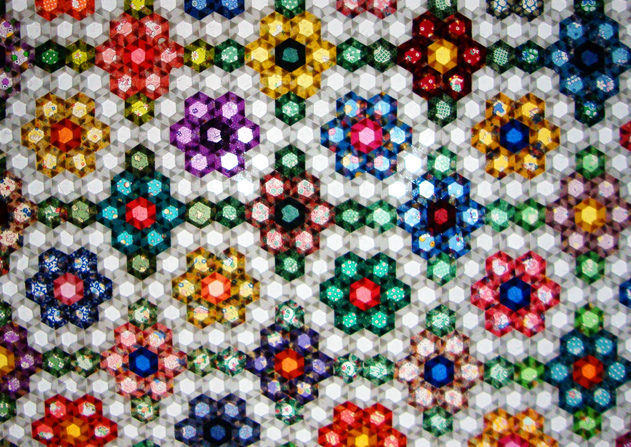
hexie flowers, detail, Robin Atkins

I started cutting scraps of fabric to make hexie flowers on September 1, 2015. After 9 months of labor, I have just finished stitching the 733rd flower!  I'll do the math for you... That's 5,131 hexies. They are small ones, 3/4 inch per side. The finished flowers measure just under 4" in diameter.

44 hexie flowers, Robin Atkins

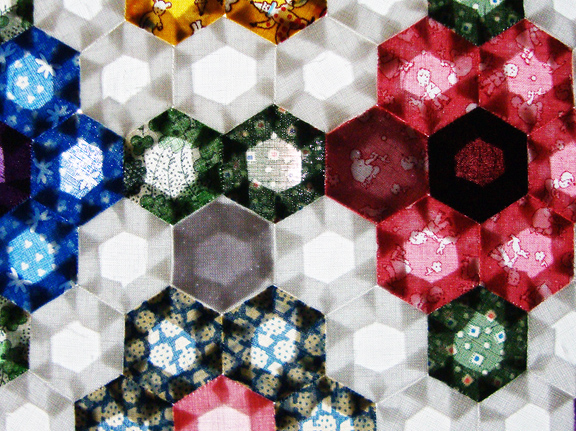
To give you an idea, this is what 44 hexie flowers look like. In case you don't know, for each hexie, the fabric is cut, and then basted over a paper, hexagon-shaped form. The hexies are then hand-stitched together to make the flowers. It takes about 1 hour to make one hexie flower, start-to-finish; thus 44 hours to make the batch above. Click the photo to see better detail of this process, which is called English paper piecing.


733 hexie flowers, Robin Atkins
And here are all 733 hexie flowers! Each flower is a different fabric. Although a few of the flower petal fabrics were also used for flower centers, I'm certain that there are over 1,000 different fabrics used in these flowers.

What's next? Well, I'm going to build a design wall using sound-proofing foam-board covered with a king-sized flannel sheet. I haven't quite figured out how to make it yet.

When the design wall is ready, I'll get out my hexie flowers and start to "paint" with them. Who knows what will emerge? Not me. I only have a vague idea that I might want to try "painting" an abstract view of our island shoreline.

When the "painting" process is finished, I'll stitch the flowers together in small groups, and then stitch the groups together. The result, hopefully in my lifetime, will be a queen-sized, non-traditional style, hexie quilt!

Thanks to everybody who shared scraps of fabric for me to use!

*  *  *  *  *  *  *  *  *  *  *  *  *  *  *  *  *  *  *  *  *  *

For those interested, here is a link to a "time study" and photos of my previous hexie quilt, Mama's Garden!

Monday, September 28, 2015

What! Again? Another Hexie Quilt Started?!


Mama's Garden, Hexie Quilt by Robin Atkins, hand pieced, embroidered, quilted; detail
If you're a Beadlust reader, you know I worked for three years (more than 1,300 hours) to hand piece, hand embroider, and hand quilt Mama's Garden, with 4,700 3/4-inch hexies, a true labor of love. A big push this spring got it finished in time to enter into the International Quilt Festival in La Conner, WA. Hooray, hooray, the judges accepted it into the show!!!!

Mama's Garden, Hexie Quilt by Robin Atkins, hand pieced, embroidered, quilted
This coming weekend, October 2-4, all you quilting enthusiasts will find it rewarding to make the effort and get to La Conner (WA) for the Festival, where you will see an excellent selection of quilts and fiber arts, plus a variety of interesting vendors! Here is the information. Head first for Maple Hall, a huge 2-story building, filled with quilts, at the corner of 1st Street (the main drag) and Douglas Street! Bring your camera, because photos are allowed (at least in the past they were).

Map and directions to La Conner Quilt Festival
What do you think? After all those hours, would it be crazy to even THINK about making another hexie quilt, another one with 3/4-inch hexies? Well, then I guess I'm crazy, because the irresistible call of the hexie hooked me again. And why not re-use the same paper pieces?

This one will not be traditional, and will definitely NOT be hand quilted. It will be hand pieced, using small left-over fabrics (I refuse to call them scraps), cotton prints (but not batiks). I have no idea how I will arrange them, how big it will be, or anything else about how this new project will develop.

The first step was to cut out sets of  2" x 2" squares (6 per set) to make flower petals. So far, I've cut about 130 sets. Here are 80 of them, ready to baste onto the 3/4" paper hexie pieces.

fabrics cut for hexie flower petals, new hexie quilt by Robin Atkins
From very small pieces, I cut single 2"  x 2" squares to make flower centers. These I've already basted to the paper hexie pieces.

basted hexie flower petal centers, new hexie quilt by Robin Atkins
After basting some of the petals and centers, I started choosing centers for the petal sets. This part is fun! I enjoy "auditioning" various centers until one of them seems right. I'm avoiding high value contrast between petals and centers, because I might want to do a color study with them (no borders).

arranged hexie flower petal & centers, new hexie quilt by Robin Atkins
When the urge gets really strong, I allow myself to start stitching the hexies together to make flowers.

finished hexie flowers, new hexie quilt by Robin Atkins
This quilt will probably have about 650 flowers! I've cut 130 so far, each different. I cut flower petals from all of my small pieces, every one. My preference is to have all 650 flowers different.

Sooooooo, if YOU have some small fabric pieces you'd be willing to donate, I'd love to have part of you in my quilt. This is what I need:

For petals - 2" x 12" strip, or 4" x 6" piece
For centers - 2" square (only one per fabric design)

Quilting weight cotton prints only, no batiks.
One petal set per fabric design (no duplicates).
Prefer small to medium scale prints.

Mail to:
Robin Atkins
1785 Douglas Road #4
Friday Harbor  WA  98250

THANK YOU!!!!!

Saturday, May 16, 2015

"Square Dancers" - Shimmer Quilt

Kitty Sorgen, quilter extraordinaire, and Jenny Bowker, the pattern developer, are to blame for this madness! Shimmering Triangles Jenny calls it, and shimmer it does. In fact, it can be over done to the point where it's difficult to look at. But not Kitty's... Kitty, a member of our local guild and the best colorist I know, brought her shimmer quilt to Wednesday night quilting a few months ago, and

WHAMMMO!

I fell in love, bonkers, totally in love with her quilt. This isn't a great photo, but here it is, Kitty's shimmer quilt...

Shimmer quilt by Kitty Sorgen

It's so complex, at first I couldn't even figure out what was a block, squares looking like diamonds, color everywhere, blending in some places, shimmering in others. That day, on the spot, enough of us signed up and paid, filling a one-day class instantly.

Kitty Sorgen teaching shimmer quilt for our local guild


The class was on Feb. 21, 2015. Most of the students got a block finished in class, some even finished two blocks. Each block is 16" square (finished), and has 69 pieces. Below is one block, showing the construction of it.


Robin Atkins, shimmer quilt, block construction

Me? Nope. I didn't sew a stitch. Long after the other students had finished arranging their fabrics on the design wall, I was still struggling with the concept, of how to get shimmer, but not too much shimmer, still arranging my fabrics (photo below).

Robin Atkins, shimmer quilt, tentative layout

It was really difficult to imagine what would shimmer, what might be too contrasty and shimmer too much (for my taste), and what would have too little contrast and thus not shimmer at all.


Robin Atkins, shimmer quilt, final layout
At home, I laid it all out on my work tables again, rearranging and rearranging the fabrics over and over again. The trick, in my opinion, is to work the diagonals. I began with a layout of focal fabrics, in my case "painterly floral prints," leaving space between them for the companion fabrics. Then choose companion "read as solid prints," placing them at the corners of the focals. Like Kitty, I decided to repeat the companions diagonally between two focals. I don't know if this even makes sense, but maybe you can see it in the layout above.


Robin Atkins, shimmer quilt, completed block
Silly me, I thought sewing it, once I got all the fabrics placed, would be a piece of cake. NOT! Well, technically speaking, sewing it is OK. Although it does take some time and attention to detail to get all the half-square triangles square, and the points nice and pointy.


Robin Atkins, shimmer quilt, completed block
But cutting the triangles is another matter. To make the colors and shapes flow, it's important to blur the line of the focal square by blending the design/color outward through the half-square triangles. Above is an example of one that worked pretty well, because you can only barely discern the square of focal fabric in the center of the block.


Robin Atkins, shimmer quilt, cutting fabric for half-square triangles
And here is some fabric I turned into Swiss cheese trying to get triangles that would bring the focal fabric design outward, tricking they eye, making it look like a diamond rather than a square. (Sorry, I didn't take a picture of that particular finished block.)

Robin Atkins, Shimmer quilt, paper piecing

I make the half square triangles using paper piecing, with a free, downloaded template printed on 16 pound copy paper. Paper piecing has a learning curve, yes, but it does make for very accurate piecing, such that I didn't have to trim any of the finished blocks at all!

Robin Atkins, shimmer quilt, four completed blocks

Here is a picture of four finished blocks. You can see the way the companion fabrics repeat diagonally to form a 4-patch block between the focal fabrics. These two fabrics need to be close in value and color. If there is too much contrast, it draws the eye away from the focal fabrics and shimmering triangles. In the case above, I think the orange and pink contrast a little too much. Also on the left the lighter and darker green is also a bit too contrasty.  Fabric choices are difficult and important... Any one companion fabric has to work with two focal fabrics and the adjacent companion fabric, which in turn has to work with it's two adjacent focal fabrics. Sound complicated and challenging? It is!

Robin Atkins, shimmer quilt, ten completed blocks

It took many days (lost count) to finish the first half of the blocks (10 of 20)... and many more to finish the last 10 blocks... a bit character building. Many times, I told promised myself I would never do paper piecing or make another shimmer quilt again in my whole life!

Robin Atkins, Shimmer quilt, auditioning border fabrics

Here I've finished all 20 blocks. I've moved all the furniture out of the studio, and put it on the floor to "audition" border fabrics. Most of the shimmer quilts I've seen do not have borders, but I wanted to make it a bit bigger so it could be used for a bed quilt.


Robin Atkins, Shimmer quilt, before quilting
This is how it looks all finished, before quilting it, 90 x 74 inches.

Since the throat of my old machine is much too narrow to free-motion quilt a piece this size, I decided to get a professional to quilt it. But first I agonized some about how to do it. At first I thought it would be good to fussy quilt, making flowers in the companion fabric areas and vertical vines with leaves over the focal fabrics. This was my sketch for the idea.

Robin Atkins, Shimmer quilt, tentative quilting design

But then I saw a few quilts done like that, and the fussy quilting looked too busy, competing too much with the shimmer. So finally, I decided on using a double-leaf, free-motion edge-to-edge design. I named my quilt Square Dancers, because of the colorful costumes, movement, and squares.

Now that it's finished, guess what?  I started gathering fabrics for my second shimmer quilt. I want a spring-summer quilt for my bed in softer, lighter colors. It needs to be bigger than the first one, at least 36 blocks, to work on a queen size bed. Here are some of the fabrics I've found so far:

Robin Atkins, focal fabrics for next shimmer quilt

Robin Atkins, focal fabrics for next shimmer quilt

Robin Atkins, focal fabrics for next shimmer quilt

Robin Atkins, focal fabrics for next shimmer quilt

These are mostly designs by Philip Jacobs, one of the Kaffe Fassett Collective designers. I love his colors and designs! I will use other fabrics in my stash, but more than half of the 36 focals will be like these.

It will be fun to try this again, to apply what I've learned on the first one, to try to improve my fabric choices, always with the goal of some shimmer (but not too much) and good flow throughout the quilt. I'll also try to pick up my speed a bit, without sacrificing accuracy in the piecing.

Expect a post about #2 shimmer quilt in a couple of months. Right now, I'm still gathering fabrics.


Sunday, June 30, 2013

Hexie Quilt - Paper Pieces are GONE +Tips

I don't really know how I can spend so many hours working on this quilt, enjoyable hours, inexplicably engaging and not boring hours, time I crave almost like an addict craves a fix. It must be what I need right now, meditative, quiet time.

During the past two weeks, I starched and pressed the back, removed all of the basting stitches and paper pieces, sandwiched the quilt, and began the long hand-quilting process. Pressing and starching (with Best Press, the scent-free variety) helps the hexies to keep their proper shape while and after removing the paper pieces.


Snipping the basting threads and lifting the stitches back to the knots on each end was fairly easy with these fabulous seam-ripping scissors, which I believe are actually suture removal scissors. I highly recommend them! Even with this great tool, it took about 25 hours to get all the stitches removed and another 4 to remove all the papers.


After working for a few hours on it, I started saving the threads. Quite a pile, don't you think? I might try to make an art project with them, spreading them out on a heavy plastic sheet covered with a PVA glue/water mix, arranging them into some sort of picture and then, when dry, appliqueing them onto a background.

Back to the quilt, the next step was to remove the paper pieces. Checking the quilt carefully after finishing, I found 5 or 6 I had missed. Thinking they were all out, I again pressed the wrong side, finding 4 more un-removed paper pieces. Now I had them all... right? Wrong.

I certainly did not want to get the quilt all basted together, start hand quilting and find paper pieces still inside some of the hexies. So I got the idea to hang the quilt top over the edge of my work table in a darkened room with a couple of lights under the table.


As you can see above, the effect was stunning, like a stained glass window in a cathedral (click on picture to see it bigger)!


Did I find more paper pieces hiding? Yes, three more showed quite clearly. In the photo above, you can see two of them, one in the white pathway of hexies, the other is one of the pink flower petals. The center of that same flower looks suspicious as well, but it was just the dark red fabric.


Now I'm willing to bet all the paper pieces are out. Of course I saved them to re-use on the next hexie quilt... Did I really say that? Eeeeeeek!

*    *    *    *    *    *    *

Basting Tip


I started basting the fabric around the paper hexie pieces using "junk thread," old cotton and polyester thread, bits and remains on nearly empty spools. I wasted a lot of time because the threads tangled and knotted, especially when I tried to use a longer thread. Using a shorter length (about 2 feet) helped a little with the tangles, but took longer to repeatedly have to thread the needle. I was using a regular sewing needle, one that was a little difficult to push through the card stock of the paper pieces.

Finally, I hit on the perfect thread/needle combination! Here it is, worth every penny of extra cost, and pennies sums it up, not dollars:


Basting thread - YLI glazed, 100% cotton quilting thread - I basted with lengths up to 48" long, and it never tangled or knotted, speeding up the basting process by at least 50%.


Basting needle - Foxglove Cottage straw needle, size 9 - Fabulous, strong, just the right length needle! It even kept its sharp point after basting through 100s of paper pieces. I used only three to baste over 4,000 hexies! Also, straw needles in size 10 were perfect for whip stitching the hexies together. I'll probably try them for hand quilting as well. Most quilting shops carry at least one of two brands, sometimes Foxglove Cottage, sometimes John James, both seeming equally good.

Wednesday, November 14, 2012

If At First You Don't Succeed.... BJP & Quilt Camp Disaster

Last weekend was Quilt Camp! Four  days to stitch, uninterrupted, meals provided, no chores... oh joy!

For the first couple of hours I worked on making hexie blocks for my Grandmother's Flower Garden quilt... fun, easy, known territory.


Charged, I got out my quilt top, the one pieced together with the 12 blocks I beaded for the Bead Journal Project in 2011. Each of the beaded Xs represents a relationship, a crossing of my pathway with the pathway of some other person or thing, especially one that was important to me during the month when I made the block.  Here's how it looks. For now, just note the blocks and the way they are assembled on the quilt top.


I had this idea of hand-quilting in diamond (or square-on-point) shapes to match the blocks. It wasn't easy. I worked for about 30 hours (2 whole days and into the wee hours of three nights) to do this quilting. The more I did, the less I liked it.


The idea of it is OK, I think... it ties all the blocks together, suggesting the interconnected pathways of my life. The whole quilt and the blocks look OK from a distance. But I'm pretty sure viewers would want to get close to see the beading. Looking at it closely, the hand-quilting starts to compete with the beading. Which to view? Which is important? Obviously, I wanted the beading to show, because that's the point (and the visual journey) of the quilt.

It didn't look too bad on the lighter colored blocks.


But on the darker colored blocks, the quilting stitches were really distracting.


Sad to say, I didn't realize how bad it was until I was nearly complete (with only one block to go). When the light bulb finally came on, I realized I had to take it all out. All 30 hours of work.  OK, so what to do? How to quilt this thing?

Well, my quilt/beading buddy, Lunnette, happened to bring a HUGE stash of thread with her. Stitch-in-the-ditch with a matching color of thread! Still hand-quilted, but not something that shows much at all.  Now you can see the beading!


In the picture below, you can see I've re-quilted the top and right-hand blocks. Is this better?  Is it worth the time to re-do it?  I think so! (Only 10 blocks to go...)


Lessons learned:
  1. Pay more attention to gut feelings that something isn't working.
  2. Be ready to abandon a plan that isn't working.
  3. Trust that a better solution will come along.
  4. It's only time.
By the way, if you're interested in joining the 2013 Bead Journal Project, here's a link to information and registration!

Monday, November 05, 2012

Please Don't Miss This 5-Star Show!


From political to folk,
from traditional to way outside the box,
from peaceful to wild,
from beads to bicycle chain,
from whimsy to satire,
the current show at the La Conner Quilt Museum
has it all...
and
they're all created by men!

Forty-one incredible quilts, created by 15 highly-creative men from the USA, Holland, and Japan. I tell you, their quilts make me swoon, give me heart palpitations. The show runs until December 30. Please, don't miss it! The What-Where-When details are at the end of this post. Let's get to the quilts!

At the most out-of-the-box end of the scale is John Lefelhocz of Athens, OH, who uses the oddest materials to make quilts: sugar wrappers, match sticks, roof flashing, breakfast cereal, plastic bugs, and other assorted materials. If your mind says, "Impossible," take a look below.

Ms. Ing Links by John Lefelhocz, 59" x 35"
The pattern/design on this quilt is created by hundreds of painted bicycle-chain links sewn to the quilt top with beads. Do you get the humor of the title? (Hint: run the Ms. and Ing together.) All 5 of his exhibited quilts are examples of how much fun an artist can have mixing word-play and imagery. Each is a puzzle of wit, challenging the viewer to find all the jokes and meaning it contains.

Near the other end of the scale is David Taylor, of Steamboat Springs, CO, whose meticulously pieced and machine-quilted works are realistic without being "like a photograph." They are fiber and thread, yet somehow give us a good whiff of movement, dimensionality, and emotions found in real life.

Marmalade's First Snow by David Taylor, 47" x 35"

Marmalade's First Snow by David Taylor, detail

Up Up and Away by David Taylor, 42" x 52"

See what I mean by realistic, but not photographic? Can you feel the magic of looking up at a hot air balloon rising in the early morning air, and sense Marmalade's hesitation and intense curiosity about the snow? Wonderful!

Quilts by Shawn Quinlan, of Pittsburgh, PA, tell stories, calling attention to things that aren't quite right in the world around us, adding layers of humor and satire to the expected warmth of a fabric quilt. Being a tree-lover and a person who is a little ill-at-ease with Christmas, the quilt below really hits the mark with me. See the circular and carpenter's saws?

Homage to the Discarded Christmas Trees by Shawn Quinlan, 46" x 33"

Homage to the Discarded Christmas Trees by Shawn Quinlan, detail

Homage to the Discarded Christmas Trees by Shawn Quinlan, detail

Here's another of Shawn's quilts (4 in the show), one that expresses a number of complex thoughts about the political scene in our country's capitol. Check Shawn's website for revealing detail shots.

As My Daddy Always Told Me, "At Least the Democrats Will Throw You a Bone" by Shawn Quinlan, 48" x 29"

Next, let's look at two amazing works by Leslie Gabrielse, of the Netherlands, quilts that show just how expressive and painterly applique and hand stitched embellishments can be! Having spent 10 years of my life folk dancing, I am particularly drawn to the one below, the largest quilt in the show.

Portuguese Folkloric Dancers by Leslie Gabrielse, 118" x 92"

Portuguese Folkloric Dancers by Leslie Gabrielse, detail

Portuguese Folkloric Dancers by Leslie Gabrielse, detail
I am fascinated by the way his work reminds me of collage art, of layering papers, stamps, and paints. Of the four quilts by Leslie in the show, my second favorite is a portrait he did as a commission.

Karlee Abbott, by Leslie Gabrielse
While we're on the subject of portraits, how do you like this portrait of President Obama by Michael Cummings of New York, NY?

President Obama by Michael Cummings, 50" x 72"
Of this quilt, Michael says, "I wanted to play with his racial makeup....his father was black and mother white...that dictated my choice of colors in construction of the quilt. After that choice, I wanted to have some thought-provoking statements by famous people...statements that addressed issues in our society related to both democracy and racism. Issues that are alive and well today and that President Obama has to encounter as leader of our country." Of course, because of Micheal's excellent visual-communication skills, I knew all that, just from looking at the quilt.

Here's another one by Michael, this time a portrait of a place, obviously one familiar to him.

Mecklenburg County, NC by Michael Cummings, 72" x 96"

Mecklenburg County, NC by Michael Cummings, detail

My brother, Thom Atkins, found himself in very good company in this show, and his four beaded quilts add a wonderful contrasting element, a sparkle, to the mix. The two quilts below are my favorites among the four of his pieces included in the show.

The Man in the Window by Thom Atkins, 30" x 34"

The Ravens of Angel's Crest by Thom Atkins, 35" x 51"

Eight other quilt artists, who happen to be men, join those mentioned above, adding their own unique process and style to the mix. The whole, to my mind, is a luscious salad, its flavors delightfully complex and memorable.

But before I get to the show info, remember the teaser photo at the beginning of the post? That picture is a detail from the most jaw-dropping quilt I have ever seen. I mean EVER. And that includes all the thousands of quilts I've seen while teaching at various quilt festivals. It is THE most incredible quilt I've seen in my whole life. This isn't the greatest picture, but please click on it to see it full-sized.

Flow of the Seasons by Shingo Nakano, 87" x 80"


Shingo Nakano, of Japan, cut out over 16,000 little hexagon shapes from hundreds of different fabrics and hand-stitched them together to make double-ringed flower shapes. Arranging the pieced flowers so their colors suggested the flow of the seasons, he then hand-stitched them all together. Each hexagon is about as big as your thumbnail. Hand-quilting around each petal, completes this masterpiece of hand work.

Flow of the Seasons by Shingo Nakano, Summer-Fall

Flow of the Seasons by Shingo Nakano, Winter-Spring
If you follow my blog, you know I've been working on a hexie quilt (see here). Having already spent hundreds of hours on it, I can almost imagine the time, measured in years, it took to make this quilt. But the beautiful hand-work is not its only virtue. The fabrics and arrangement of colors send me into a place of inner calm, of beauty, of spiritual fulfillment. Thank you, Shingo Nakano for allowing us this glimpse into your inner world. If you like this quilt, wait until you go to La Conner. There are two hexie quilts by Nakano in the show! The second is even larger, with about 18,000 hexies. While you are there, take your time to study these two quilts; you won't see anything to compare for a long, long time.

What: Material Men: Innovation and the Art of Quilt Making
When: October 11 - December 30, 2012
Where: La Conner Quilt and Textile Museum in La Conner, WA
Hours: Wednesday - Sunday, 11 am to 5 pm; Monday & Tuesday by appointment
Exhibit Curators: Geoff Hamada and Kathleen Kok

Link to further exhibit information
Link to museum website

Have I been clear enough? Go see this show! Make time; find the moola; just do it!