Friday, February 28, 2014

Southern California in February!

My sister, who is 16 years younger than I (we being the eldest and youngest of 5), currently lives in the foothills of the Transverse Mountain Ranges in southern California, about 60 miles east of LA. As her childhood caretaker when Mom worked, we developed a close relationship, despite our age difference. Later, she lived with me for a couple of years, and after starting my bead business, she regularly helped me sort, weigh, and bag beads at night. At times I noticed her beadlust was almost as great as mine.

Last week, I flew to CA, rented a car, and spent a wonderful week with her! These are my 15 favorite things (not necessarily in order, except for number 1) about the trip...

Being with my sister is at the TOP of the list!

bougainvillea on Dynasty Suites in Redland CA
I love the way the sunshine brought out the beautiful rose-red color of Bougainvillea.
This vine was all over the courtyard of the Dynasty Suites, where I stayed in Redlands, CA.

hollyhocks
 Hollyhocks!
So many memories... They grew all along the side of my grandparent's home in Sutter Creek, CA. My brother and I decorated mud cakes and made ballerinas out of them!

 warthog sculpture at theLiving Desert Zoo
 It was way fun to be around my 12 year old nephew, Jackson!

Italian Cypress trees
New to me, I think these ubiquitous trees are called Italian Cypress.
 While the spires reach 60' high, the trees are only about 5' in diameter.

Coulter pine with pineapple-sized cones
 On a road trip into the Transverse Ranges, we saw trees with cones as big as pineapples!
I think they are Coulter pines.

desert fan palm, petticoat palm, at the entrance to the Living Desert Zoo
 I didn't expect to fall in love with trees in the desert, but here's another one
that caught my fancy... The desert fan palm is also called
petticoat palm, for reasons you can see.

Lion sculpture by Bill Secunda at theLiving Desert Zoo, Palm Desert, CA
 This incredible lion sculpture (click to see details!) is one of a whole lion family
located at the Living Desert, a zoo (a 5-star zoo in my opinion) in Palm Desert, CA. The "Dancing with Lions" sculptures were created by an artist named Bill Secunda from Pennsylvania.

bird feeding Australian Outback exhibit at Living Desert Zoo, Palm Desert, CA
The Living Desert currently features an interactive exhibit of Australian Outback birds.
For $2 a person, you can go inside the exhibit with all these pretty birds.
For $1 each, you can buy Popsicle sticks with bird seed on it to feed the birds.
After they get used to you, they land on your purse, your head, your shoulder... anywhere...
This one worked a long time trying to get nourishment from my earring. 

rocks along CA Hwy 38 between Yucaipa and Big Bear Lake
We drove out Hwy 38 from Yucaipa to Big Bear Lake.
Entranced by the rocks & rock formations, we stopped many times to take pictures.

rock formation along CA Hwy 38 between Yucaipa and Big Bear Lake
This was one of our favorite rock formations....
Can you imagine the various events and forces that caused this!

rock formation along CA Hwy 38 between Yucaipa and Big Bear Lake
This is another favorite rock formation. Behind it is a steep drop-off
into a deep canyon. I wonder how long before it topples?

succulents in the crevice of rock formations along CA Hwy 38 between Yucaipa and Big Bear Lake
Not only are the rock formations beautiful from afar,
but up close, they reveal lovely succulents like these!

Big Bear Solar Observatory on Big Bear Lake, CA
Big Bear Solar Observatory is one the world's larger solar observatories.
Click the link to learn interesting things about it.

Mazda 6, a good rental car!
 By chance, my rental car was a Mazda 6.
Spunky and nimble, I give it a rating of 4.5 stars!

There y' go... 15 favorite things, although, I'll probably look at all my pictures again tomorrow, and pick 15 more faves. It was a great trip! I took beading and knitting projects with me, but do you think I had any time to work on either? Nope... just didn't happen.

Oh, and more good news! While I was gone, this is what it was like back on San Juan island...

February snow storm on San Juan Island
 There's still snow in the ravines and on the tops of the hills (500' elevation), but I happily missed having to drive on roads like this. California sunshine was mighty nice!


Thursday, February 13, 2014

"Just Do It!" - Proof It Works

Last night, too excited to sleep, I tossed and turned for hours, my mind racing around the most amazing "just do it" story I've ever encountered.

Here's a little peek.


But first, if you read my blog or my books, you are well aware of my favorite motto: "Just do it!" I say it all the time when I teach and believe from many examples, including my own shy journey into art, book writing, and teaching, that it works like a charm. You can do anything, if you just do it.

Are you ready for this? Be sure to click on the picture so you can see the details!


This amazing basket, inspired by a similar 17th Century basket, was made by Rachael Kinnison, a woman who did not know how to bead. Take a closer look at some of the details...


Rachael says:   I have collected antique beads since I was in early grade school. I was always drawn to them, but never made anything with them.  The second I read about the beaded baskets ..., I knew why I had collected them for so long.  I saw the Corning Museum basket, and that was it, my mind was made up in a nano second, I had to make that basket~ I had no idea how~so I just looked at the pictures and did it. 

She just did it. See? It works!  Just do it, everybody, make up your mind, and do it!

Rachael kept track of her materials, how much silk ribbon it took to wrap the spokes, how many beads she used, and how many hours she worked to complete this museum-quality piece. She wrote about it on her blog, showing many step-by-step photos of the process. If you want to know how she made her basket, go to her blog, Lady's Repository Museum & Diamond K Folk Art, and start scrolling back through recent posts. It's such a gift. Thank you, Rachael!

Rachael entered her basket in a contest sponsored by Dr. Tricia Wilson Nguyen, of Thistle Threads. Go to her blog (The Embroiderer's Story) to see pictures of the runner-up beaded baskets, all definitely worthy of a look-see, if you like beads and beading.

You are looking at pictures from both Rachael's and Dr. Nguyen's blogs, placed in this post with their permission. I am grateful to both of them for posting such excellent photographs. And congratulations to Rachael for this magnificent achievement!

BJP Blog Disappeared

As a blog writer for 6 years now, with words and images forming a journal, mostly of my creative endeavors and process, it would be a major calamity if anything happened to Beadlust. Sadly, I've learned the hard way, the on-line work of countless hours can disappear in a matter of seconds.


That's what happened to the 2013 Bead Journal blog.  Good for a year, with thousands of posts and pictures by a hundred+ participating members, it suddenly disappeared. You try to go there, and you get this message:

Blog has been removed

Sorry, the blog at bjp2013.blogspot.com has been removed. 
This address is not available for new blogs.


I don't know who removed it.... not me, not either one of the other administrators.

Sometimes a blog gets accidentally deleted by the administrator. That's an easy fix. On your dashboard there will be a list of deleted blogs and an opportunity to restore it. Whew!

The first time a member contacted me to say our BJP blog was removed, it was listed under deleted blogs on my dashboard, and with a click of the mouse, it was back on line. But a few days later, it was gone again. This time it is not shown under deleted blogs on my dashboard. It is also not shown on the dashboards of the other administrators.

What happened to it? Somebody (a hacker?) got into it and must have first cancelled us as administrators, and then deleted the blog. I am beyond bummed about this. It makes me crying sad and crying mad.

I posted about it on the Blogger "help" forum, and for a short while was hopeful when a responder posted that the blog is still on the internet and might be accessed again. But then I heard nothing more.

I guess nothing is permanent.

Saturday, February 01, 2014

Bead Embroidery - How to Bead a Circle

A couple of members of the Bead Journal Project have recently commented, asking how to improve their skill at sewing beads in a circle.

The master at this technique is Amy Clarke Moore, former editor of Spin Off magazine and co-author with me of Beaded Embellishment. Here is one of her pieces.

bead embroidery by Amy Clarke Moore

At the time we were writing Beaded Embellishment, I was too busy doing my own style of bead embroidery with lots of surface texture to try Amy's technique. But I admire it greatly. In our book, she explains how she manipulates a photo (or drawing), prints it on paper, puts the paper on top of fabric, and beads directly onto the paper, following the shapes and colors of the print with her beads. She suggests starting the circle somewhere in a highlighted area, a place where she wants the viewer's attention to go. Then she builds circle after circle, selecting uniformly shaped beads (all size 15) in a color and finish that compliment the picture she is beading. Watching her work several times, I marveled at how many different size 15 beads she has and how carefully she selects each bead, especially mindful of the finish of the bead (shiny, matte, opaque, transparent, color lined) and the affect it will have on her "bead painting."

Here's a link to Amy's blog post where she tells how to get started, to make the design for an ornament such as "Little Star" shown below.

bead embroidery by Amy Clarke Moore

If I were going to make an entire bead painting using her method, I would probably try printing the picture on fabric, and beading as usual on the printed fabric with paper on the back as a stabilizer. Truth be known, I've always thought I might get bored beading a pre-printed picture, so I've never tried the technique on a full-sized piece.

However, it is a useful method for making beaded circles, and in my most recent piece, I more-or-less used Amy's method, following the sun-dyed print on the fabric to make the background world to my message. Here is the piece:

Robin Atkins, bead embroidery, save the world
The title is "Message to Citizens of the World", and you can find out more about the meaning of it here. Basically it takes a look at voluntary population control as a means to save the earth and our species. Notice the background? It represents the world. It needed to be concentric circles. Here's how I did it.

Draw circles on back side. Sew along drawn lines to make a stitched beading guide.

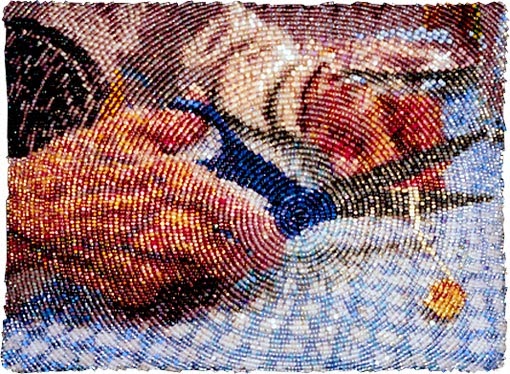
First, I chose a point to be the center. Turning to the paper backing on my beadwork, and using a compass, I placed the anchor at my chosen center point, and drew concentric circles outward, spaced about 3/8 inches apart. Next, using a fine sewing thread in a color that shows up well on the front (fabric side), I basted a line of stitches along each circle. These stitches, visible on the front are my guide, the marks that help me keep the circle round. In the picture above, I've already started beading the circle, but you can see the pencil marks and stitches in the unbeaded areas.

Here's how it looks on the right side:

On the right side, you can see the sewn guidelines.

In this case, the circle started as a spiral. But next time, I'll begin with a single bead at the center point, and then start making rounds of circles around that single bead.

I use only back stitch and size 15 beads. When the circles are small (the first 2 - 4 rings out from the center), I stitch 4 beads at a time, back stitching through the last 2 beads. After the circle gets larger, I stitch 5 beads at a time, back stitching through the last 2.


Tip #1 tells how to fill an area, while keeping the circle round.
Tips
  1. When I get to an isolated area, as shown above, I bead along the stitched guide line first, then smooth the line by sewing back through the whole line of beads a couple of times. From there, I bead inward to meet the rough edges of the figure as closely as possible. This method keeps the circle round and the visual lines connected.
  2. When the outside edge of the circle is not visible on the piece, it works best to start in the center and work outward. When the outside edge is visible, it is sometimes better to start at the outside edge and work inward (see below).
  3.  Every 4 or 5 rounds, I stitch back through the entire round of beads to smooth it out.
  4. Although I try to select against beads that are a little larger, fatter, smaller, or skinnier than average, or beads that have an irregular shape, I'm not very patient. Therefore, when you click to enlarge the picture, you can see a few gaps and/or larger beads. On the actual piece, which is only 2.5 inches wide, I don't notice these irregularities (thankfully).
  5. This method will work with larger beads, size 11, and possibly size 10. But the detail will not be as great unless the finished piece is fairly large.
  6. Sometimes a line of beads will seem a bit crowded, some of the beads popping up a bit, or slipping under other beads. When this happens, if it bothers me, I take out the lines of beads back to the problem, and re-stitch the line allowing more space for the beads. I've tried going back to couch down the beads which are popping up. Unfortunately, forcing beads down on the surface in one area, generally makes other beads pop up somewhere else. So my rule of thumb is to always be vigilant about not crowding the beads, allowing a little of the under fabric to show in places, allowing the sewing thread to show a bit. Nobody ever notices it when the piece is finished.
beading in a circle, by Robin Atkins

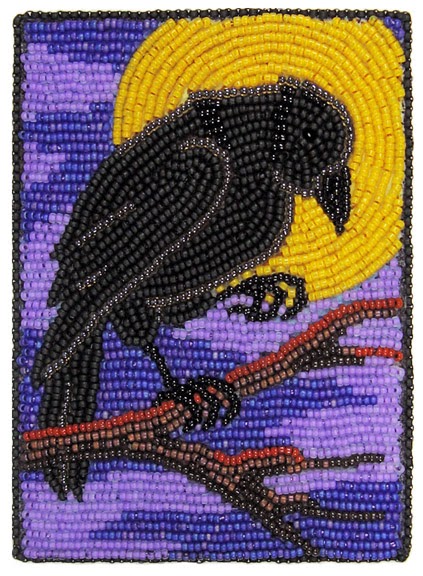
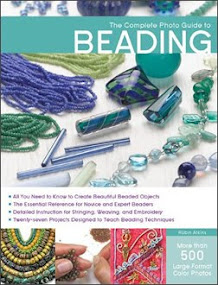
Here is a picture from my recently published book, The Complete Photo Guide to Beading. "Raven Moon" is one of the projects in the book (pages 188-191). In this case, I beaded the moon after finishing the raven, in order to make it appear that the raven is in front of the moon. Because I wanted the outside edge of the moon to be a sharp and accurate circle, I beaded the moon from the outside inward. Working in back stitch, trying to weed out oddly shaped beads, I first beaded the outside ring of beads in the places where it is visible. I stitched back through these beads several times, until the circle was smooth. Then I worked inward, ring by ring until the lines met and the moon was complete. If the inside rings aren't quite round, or don't quite match up from section to section, it doesn't matter, because the viewer's eye will always perceive the round shape as defined by the outside ring of beads.