Showing posts with label Amy Clarke Moore. Show all posts

Saturday, February 01, 2014

Bead Embroidery - How to Bead a Circle

A couple of members of the Bead Journal Project have recently commented, asking how to improve their skill at sewing beads in a circle.

The master at this technique is Amy Clarke Moore, former editor of Spin Off magazine and co-author with me of Beaded Embellishment. Here is one of her pieces.
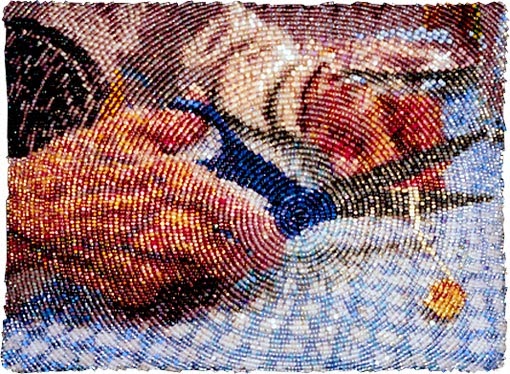
bead embroidery by Amy Clarke Moore

At the time we were writing Beaded Embellishment, I was too busy doing my own style of bead embroidery with lots of surface texture to try Amy's technique. But I admire it greatly. In our book, she explains how she manipulates a photo (or drawing), prints it on paper, puts the paper on top of fabric, and beads directly onto the paper, following the shapes and colors of the print with her beads. She suggests starting the circle somewhere in a highlighted area, a place where she wants the viewer's attention to go. Then she builds circle after circle, selecting uniformly shaped beads (all size 15) in a color and finish that compliment the picture she is beading. Watching her work several times, I marveled at how many different size 15 beads she has and how carefully she selects each bead, especially mindful of the finish of the bead (shiny, matte, opaque, transparent, color lined) and the affect it will have on her "bead painting."

Here's a link to Amy's blog post where she tells how to get started, to make the design for an ornament such as "Little Star" shown below.

bead embroidery by Amy Clarke Moore

If I were going to make an entire bead painting using her method, I would probably try printing the picture on fabric, and beading as usual on the printed fabric with paper on the back as a stabilizer. Truth be known, I've always thought I might get bored beading a pre-printed picture, so I've never tried the technique on a full-sized piece.

However, it is a useful method for making beaded circles, and in my most recent piece, I more-or-less used Amy's method, following the sun-dyed print on the fabric to make the background world to my message. Here is the piece:

Robin Atkins, bead embroidery, save the world
The title is "Message to Citizens of the World", and you can find out more about the meaning of it here. Basically it takes a look at voluntary population control as a means to save the earth and our species. Notice the background? It represents the world. It needed to be concentric circles. Here's how I did it.

Draw circles on back side. Sew along drawn lines to make a stitched beading guide.

First, I chose a point to be the center. Turning to the paper backing on my beadwork, and using a compass, I placed the anchor at my chosen center point, and drew concentric circles outward, spaced about 3/8 inches apart. Next, using a fine sewing thread in a color that shows up well on the front (fabric side), I basted a line of stitches along each circle. These stitches, visible on the front are my guide, the marks that help me keep the circle round. In the picture above, I've already started beading the circle, but you can see the pencil marks and stitches in the unbeaded areas.

Here's how it looks on the right side:

On the right side, you can see the sewn guidelines.

In this case, the circle started as a spiral. But next time, I'll begin with a single bead at the center point, and then start making rounds of circles around that single bead.

I use only back stitch and size 15 beads. When the circles are small (the first 2 - 4 rings out from the center), I stitch 4 beads at a time, back stitching through the last 2 beads. After the circle gets larger, I stitch 5 beads at a time, back stitching through the last 2.


Tip #1 tells how to fill an area, while keeping the circle round.
Tips
  1. When I get to an isolated area, as shown above, I bead along the stitched guide line first, then smooth the line by sewing back through the whole line of beads a couple of times. From there, I bead inward to meet the rough edges of the figure as closely as possible. This method keeps the circle round and the visual lines connected.
  2. When the outside edge of the circle is not visible on the piece, it works best to start in the center and work outward. When the outside edge is visible, it is sometimes better to start at the outside edge and work inward (see below).
  3.  Every 4 or 5 rounds, I stitch back through the entire round of beads to smooth it out.
  4. Although I try to select against beads that are a little larger, fatter, smaller, or skinnier than average, or beads that have an irregular shape, I'm not very patient. Therefore, when you click to enlarge the picture, you can see a few gaps and/or larger beads. On the actual piece, which is only 2.5 inches wide, I don't notice these irregularities (thankfully).
  5. This method will work with larger beads, size 11, and possibly size 10. But the detail will not be as great unless the finished piece is fairly large.
  6. Sometimes a line of beads will seem a bit crowded, some of the beads popping up a bit, or slipping under other beads. When this happens, if it bothers me, I take out the lines of beads back to the problem, and re-stitch the line allowing more space for the beads. I've tried going back to couch down the beads which are popping up. Unfortunately, forcing beads down on the surface in one area, generally makes other beads pop up somewhere else. So my rule of thumb is to always be vigilant about not crowding the beads, allowing a little of the under fabric to show in places, allowing the sewing thread to show a bit. Nobody ever notices it when the piece is finished.
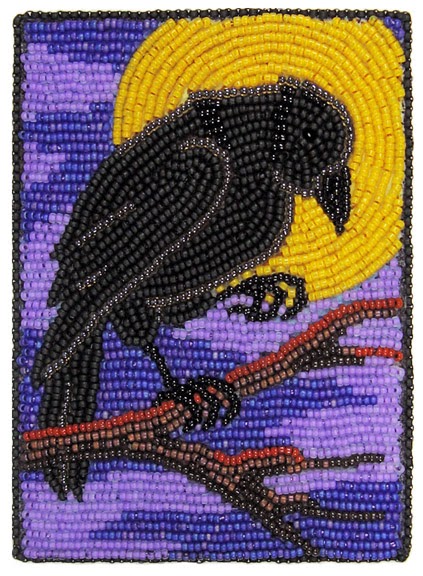
beading in a circle, by Robin Atkins

Here is a picture from my recently published book, The Complete Photo Guide to Beading. "Raven Moon" is one of the projects in the book (pages 188-191). In this case, I beaded the moon after finishing the raven, in order to make it appear that the raven is in front of the moon. Because I wanted the outside edge of the moon to be a sharp and accurate circle, I beaded the moon from the outside inward. Working in back stitch, trying to weed out oddly shaped beads, I first beaded the outside ring of beads in the places where it is visible. I stitched back through these beads several times, until the circle was smooth. Then I worked inward, ring by ring until the lines met and the moon was complete. If the inside rings aren't quite round, or don't quite match up from section to section, it doesn't matter, because the viewer's eye will always perceive the round shape as defined by the outside ring of beads.


Thursday, March 01, 2012

Writing Books about Beading - Part 2


To Be Published – A Dream Come True!
My second book hitched in an odd way on my first book. Remember (Part 1), I mentioned contacting publishers about re-publishing One Bead at a Time (after the test run of 300 copies)? One of those I wrote to was Interweave Press, publisher of several beading books and the successful Beadwork Magazine. Like the others, they did not respond. And when I called them, I was told they were “doing their own bead embroidery book, in house, no outside author needed, thank you very much!”

About a year after self-publishing One Bead at a Time, I was hired by the Rocky Mountain Bead Society (Denver area) to teach several workshops, including a two-day improv bead embroidery class. One of my students was Amy Clarke, already an awesome bead embroider in her own right. Unknown to me at the time, she was also the editor of one of Interweave’s other magazines, Spin Off, and the chosen author for their intended book about bead embroidery.

Well, Amy and I really hit it off in class. I recall after class going somewhere with her for dinner and talking our heads off… about beads and beading, of course. It was one of the most exhilarating times of my life – to share our methods, inspirations, philosophies and passions around beads… loooong after our dinner plates were cleared away!

The next day she told me about her job at Interweave and her soon to be written book about bead embroidery. She said after taking my class and our bead talk, she wanted me to be her co-author on the book. Picture me jumping out of my shoes with joy! The next step was for her to get the editor’s approval, which entailed a meeting in the big office. Thank goodness Amy did most of the talking, as I was just a wee bit nervous (understatement). Interweave has a mighty impressive spread, located in a stately, historic bank building in Loveland, Colorado.

 I got the job, and was ecstatic about it! I hardly read the contract (some 20 pages of it in small type, as I recall). The bottom line was Amy and I would split the up-front incentive, the mid-way payment, and the royalties equally. I'm thankful to and blessed by Amy for her willingness to share with me half the "glory" and pay for writing this book.

It was our avowed dream to write the bead embroidery bible, the book that would be timely forever, and never be allowed to go out of print, one of the must-have books in every beader’s library. We wanted to share everything we knew about bead embroidery. We loved that our approaches and methods were so different. We couldn’t have been happier.
The best thing about working with an established publisher is their staff resources, such as professional artists who can take a so-so drawing and turn it into a beautiful illustration, a photography department with the highest-hi-tech equipment and lighting, layout designers who know how to make every page look its best! When I self-publish a book, I either have to hire these professionals (completely out of my budget, and how would I even find the right ones?) or do it myself, which is what I’ve done with my books with obviously not-as-slick results.

The other wonderful thing about working with an established publisher is their marketing network. They create a dummy (short and somewhat tentative version) of the book, long before it is released, and take advance orders from the big distributors. They advertize and promote and keep the sales flowing after the initial flush of orders.
If I remember correctly, it took us about 5 months to finish our part of the book. At the end of that time, we still had regard and respect for each other. But not everything was roses. In the publisher’s eyes, Amy was the good, cooperative author; I was the difficult, argumentative author.

Here’s what I think happened. Maybe I was a little cocky with the success of One Bead at a Time. Maybe I thought I knew better than the editor what the title of the book should be and what should be on the cover. Maybe I thought our copy editor, who changed at least one thing in almost EVERY sentence of our book, was all wrong. Maybe I fought too hard to have it my way. So, in the end, the book is really good, but my career as an author for Interweave was over.

Later I submitted two beading book ideas to them. “Not interested.” Yet, in a few years, those two ideas grew into books published by Interweave, but written by other authors.

The dissatisfaction went both ways at the time. I vowed I’d never write another book under the iron fist of a publisher. If I was going to write something, I wanted artistic control over layout, photography, cover design and title!

However, as the years rolled along, I’ve become less cocky and more respectful of publishers and their editors. They know a thing or two. Beaded Embellishment has enjoyed great success. I believe it is currently in its fourth printing, at 10,000 copies per reprint. Amy and I are still receiving royalty checks twice a year… despite the title I didn’t like and the cover (which now I love, but then thought was “lame”).

Somehow, I changed my mind, deciding that if the opportunity to write a traditionally published book ever came my way again, I’d play it differently… be more cooperative, more respectful, less assertive. Although I didn’t expect to get a chance, in June, 2011 it came my way. But that’s the story for the final part of this series of posts.

Between Beaded Embellishment and my new book (release scheduled for winter, 2012), I self-published one book that failed miserably and five reasonably successful ones. Read about them in Part 3.

