Showing posts with label Nature. Show all posts

Thursday, October 25, 2012

Nature - Bead Journal Project for September

Nature (detail) - BJP for September
This year's Bead Journal Project (for me) is all about blessings, the things in life that make it special and worth while, the things that give me great pleasure. Because of writing a soon-to-be-released book (see side bar on right), I didn't get started until June. I decided to skip the first five months for now, do the remaining pieces on a month-to-month schedule, and catch up with the start of the year later. Each piece is 2.5" x 3.5", the size of an Artist Trading Card.

Nature (detail) - BJP for September
For September the blessing is Nature. What a blessing it is to have trees, rocks, birds, leaves, flowers, beaches, and all the miracles of nature to enchant our senses! There's so much to nature that my project box was stuffed, chuck-a-block, with beads and accents that I thought maybe I'd use.

Nature - BJP for September
Turns out it's more simple than I thought it might be, showcasing only a few of the things in my box. Maybe that's as it should be... I don't really know. The tree is a twig from one of our Madrona trees, which I sanded on the back side so it would lie flat on the fabric. The pebble is from our garden. A pair of mother-of-pearl birds, one on a little fragment of driftwood from South Beach and one on the branch, complete the picture. (Click on picture to see more detail.)

batik fabric, ready to bead
For this year's Bead Journal Project, I decided to return to solid beading, rather than allowing the fabric(s) to show as I have for the past few years. So far, that's how it's been. But, this one is different. The fabric is so lush and so right for the theme of the piece, I had to let it show, rather than beading the background sky.

Nature (displayed on stand) - BJP for September
I display my BJP pieces on miniature, wooden easels. The back of each piece is "lined" with Ultrasuede Light, which is attached to the fabric with a single-bead edge-stitch.

Home (in progress) - BJP for October
October will be about the blessing of Home.  This is what I've done so far. I hope to get it finished in the next week, to be on schedule for November.

Monday, June 11, 2012

Eyes and BJP update - back to beading!


Thanks everybody for your supportive and helpful comments here and on FB regarding my two eye surgeries. Sometimes I think I'm a big baby... I don't cruise through medical stuff easily the way it seems many others do. For me it was a difficult 6 weeks.

good news
  • my perception of colors and color saturation is dramatically improved
  • I can drive legally without glasses
  • it's my last week of the eye drops routine
  • I can thread needles and bead when wearing highest power reading glasses
not so good news
  • vision in right eye is still a bit blurry
  • still have loss of peripheral vision in left eye
I look forward to seeing the optometrist on Thursday. Hoping that he'll be able to give me a prescription for glasses; that I won't have to have another surgery in right eye; wanting it to be over, to have clear vision at all distances with glasses that I put on in the morning and leave on all day!

OK, enough said about the eyes...  And what was that beadwork above? Well, here's the really good news of this post... Are you ready?  Taaadaaaah....... I've finally started my Bead Journal Project pieces for 2012!!!  I'm 6 months behind, a bit bewildered at the starting gate, yet excited to get moving!


I'm visually journaling about blessings this year in ATC (artist trading card) size. This one is obviously about the blessing of vision. It probably will be solidly beaded, something I haven't done in previous years with my BJP pieces.

More good news! Here's a peek...


My 2011 BJP pieces visually explore my relationship with various people, places, and events in my life. December's BJP is Me and Mountains.  I've always loved the mountains. I recall driving in the hills around Sutter Creek, CA and over the range between San Jose and Santa Cruz as a child - glued to the car window, enthralled!


We moved to Minnesota, where rolling hills and river banks are the mainstays of elevation changes, when I was 7. Returning to the west coast after college, looking for a job and a place to settle, I wandered toward the NW. I'll never forget driving north on I-5 and seeing Mt. Rainier for the first time, one of the greatest thrills of my life! Instantly I knew it was the place I'd been seeking, the place for me.

I've hiked the Wonderland Trail, up and down ridges for 100 or so miles, all the way around Mt. Rainier. For countless happy and peaceful hours, I've hiked trails in the Cascade and Olympic mountain ranges. And countless times, I've rounded a corner to catch an unexpected glimpse of glacier-topped Mt. Rainier or Mt. Baker, gasping aloud at the beauty.


In this piece, the top-left to bottom-right diagonal represents mountains; the other diagonal represents me. Where our paths cross, there is a beautiful trillium, an extraordinarily beautiful, mountain wild-flower! Says it all, don't you think?

I've now completed all of my pieces for the 2011 BJP! Next step is to embroider the subject on each one, stitch them together, and then quilt them into a wall hanging. More on that soon.

Thursday, February 03, 2011

Workshop with Karin Franzen!!!!

A Time to Dance, July by Karin Franzen
When I saw the above wall hanging by Karin Franzen at the La Conner Quilt and Textile Museum, I nearly swooned! My reaction was partly because of the subject matter, fire weed and cranes, so realistically, yet so compellingly portrayed and partly because the transparent quality of the layers of silk organza used in her hangings gives a sense of ephemeral spirituality to her work.

It's a whole day trip at a cost of about $100 to go to the Museum from our island, yet I managed to go three times to see Karin's work during her exhibition there. No wonder, when she emailed that she was teaching a three-day workshop, I HAD to do it. What follows is a little about her techniques and a little about my experiences in the workshop.

Karin Franzen, Egret
Above is one of her current pieces. Her work has evolved, as you can see if you take a good look at her gallery (here), from being quilts (layers stitched together) with borders to her current pieces which are layers of hand-dyed silk organza joined at the top with the subject and background sewn partly on the front and partly on the back sides of the organza... no batting, no borders, no quilting...

Karin Franzen, Egret, layers of organza under top (subject) layer
Here she has flipped up the top (subject) layer of the piece to reveal one of the hand-dyed layers of silk organza.

Karin Franzen, Egret, back-lit
Here you can see the same piece back-lit by sunlight. Her pieces change entirely depending on the lighting. Wouldn't this be lovely hung as a room divider where it would get front-lit part of the day, back-lit the rest of the day and entirely different lighting at night?

Karin Franzen, Egret, head detail
While we're on the subject of this piece, above you can see a detail of the egret, the many little pieces of fabric that she uses to reveal her subject and the stitches that further bring out the details.

Karin Franzen, Egret, eye detail
And here is the eye. Sometimes Karin uses fabric paints or dyes to create detail, texture, or alter the color of her fabrics. In this case, I think she may have painted the egret's eye.

Below are some pictures showing the steps Karin takes in developing her subjects.

She starts with a good-quality print of a picture, most often one she has taken, of her subject bird or flower. She then takes the image in Photoshop Elements and applies a filter called poster edges to the image. Then using a sheet of transparent acetate, she traces around the edges to create a cutting pattern. In the picture below, she has outlined the edges right on the image, but that's not how we did it in class.

Karin Franzen workshop, step 1,trace photo to make value map
The next step is to reproduce the acetate tracing on plain paper using a copy machine to get the desired size. This will become the cutting pattern for the fabrics.

Karin Franzen workshop, step 2, cutting pattern
Karin's method for creating the subject is to fuse bits of fabric to a very thin piece of non-fusible interfacing. She uses Pellon 805 Wonder Under (nothing else will do!) to fuse fabric to the interfacing. Below you can see the bird outline traced from the cutting pattern onto non-fusible interfacing. Now we're ready to begin fusing!

Karin Franzen workshop, step 3,trace subject on interfacing
Starting with the medium value colors, select appropriate fabric. Take a small piece of Wonder Under and place it paper side down over the subject cutting pattern. Use a fine point marker to trace the shape on the glue side of the fusible. Cut around the shape, leaving a 1/4" edge. Iron to wrong side of fabric. When cool, peel off the paper backing. You will be able to see the traced outline on the glue side. Cut out the shape. Place your non-fusible tracing over the cutting pattern and align the cut piece. Iron to fuse it to the interfacing.

Karin Franzen workshop, step 4, fuse medium value fabrics
Following the same steps, trace, fuse, cut and fuse the fabrics of lighter value next.

Karin Franzen workshop, step 5, adding light value fabrics
Next do the dark fabrics. I didn't say this above, because there was already a lot of information, but the first fabrics applied, generally the medium value fabrics, should be cut about 1/8" larger than the actual area. These pieces will be overlapped by the more precisely cut darker or lighter fabrics in the next steps. Below the little chickadee is now recognizable.

Karin Franzen workshop, step 6, adding dark value fabrics
Last, cut and fuse the small detail pieces to complete the subject.

Karin Franzen workshop, step 7, adding small detail fabrics
When all the details are in place, the next step is to stitch around all the fabrics using a free-motion foot on your sewing machine. The stitching is used to keep all the bits of fabric in place and to enhance the detail. You can see this stitching in the picture above of the egret's eye.

After the stitching is complete, Karin cuts around the outside edge of the subject, cutting away all of the interfacing that isn't covered with fabric and stitching.

She then places her subject on a piece of silk organza and stitches it in place. Finally, she hand-dyes other layers of organza, fusing background fabric pieces directly to the organza and hand stitching on them to enhance design elements, and combines layers with her subject layer to achieve the look she wants. She then stitches the layers across the top and mounts them on a hanging rod.

Obviously, I've simplified her methods greatly here, as I do not intend this as any kind of tutorial. Indeed, in three long days of class, we only touched the surface of how she creates her pieces.

The first day of class we did some sketching and used our sketch to create a background for our subjects. Her suggestion was that we sketch a dream, a childhood memory, or a childhood fantasy. And then, using the same methods outlined above, cutting and fusing fabrics to an interface backing, we were to make a piece from the sketch. Below you can see mine, from a sketch of a childhood fantasy about being a ballet dancer.

fused picture from sketch by Robin Atkins
Here it is again showing a layer of dyed organza over the background and the picture of a northern flicker, which is my chosen subject for my class piece.

fused fabric background made by Robin Atkins in Karin Franzen workshop
Not having a good idea of the whole when I started, my background did not seem to relate very well with my subject.

The second day, we spent a lot of time evaluating the backgrounds we had made, trying to find a way to make them work with our subject, deciding on which organza to use and how big to make our subject. At the end of day two and for all of day three, we worked on our subjects. I learned several things right away:

- It's so easy to iron the wrong side of fusible, making a terrible mess on the iron.
- It's so easy to trace on the wrong side of the fusible, making a mirror image piece.
- It's so easy to iron the fusible to the right side of the fabric, making a mirror image piece.
- Cutting out intricate little pieces is not very easy.
- Knowing which piece to cut bigger so they can be overlapped later isn't easy.
- Keeping track of which pieces you've already applied isn't easy.
- It takes concentration, concentration, concentration to get it right, and at the same time, it's a bit like paint-by-number, something I never enjoyed much.

Perhaps this type of work is all about me deriving great pleasure from looking at Karin's pieces and not at all about me doing it. At the end of a whole day, I didn't have much to show for my efforts. Below you can see that my flicker still needs spots, two feet, a wing, a tail and lots of TLC stitching.

photo of flicker next to in-process fused fabric version by Robin Atkins
My plan is to make the background a separate piece, to make the subject for it a rabbit which will be placed on the organza so that it covers the white bunny on the background and be much more realistic. The white bunny will be its spirit or totem energy.

For the flicker, I plan to make a new background of madrona trees in berry phase. The flickers come to our property every year to feed on the abundant madrona berries. The subject layer will include a madrona branch, some leaves and berries as well as the bird.

We'll have to see if I actually do these two pieces. For me they are character building. Also, if you know my work, you know that it's quite abstract. Even the few somewhat representational pieces I've done are not very realistic. I'm fairly certain that my primary role here is to be a huge fan of Karin's, to swoon at each new piece...

In case you're still interested, I thought I'd end with a few photos of other student's work. (My apologies, I only took my little camera and had to contend with the affects of indoor lighting sources.)

The first photo is Lunnette Higdon-Hertel's swan. She's the only one in class to finish fusing her subject. Like mine, her background story didn't quite match her subject. In the background review, it was suggested she turn her background upside down, which is how it's shown below. However, she plans to make a new and more appropriate background.

Karin Franzen workshop, swan by student
Karin Franzen workshop, loon by student
Karin Franzen workshop, heron by student
Karin Franzen workshop, row boat by student
Karin Franzen workshop, lotus by student

Useful TIP for Beaders

In order to stabilize the silk organza so that you can sew on it, Karin taught a very useful method using Solvy.

Karin Franzen workshop, demo, spraying solvy on organza as stabilizer
She tore off small pieces (4" x width of roll) of Solvy and one by one dissolved them in about a cup of warm water, stiring all the while. When the mixture was slightly thickened, like pancake syrup, she poured it into a spray bottle. She pinned the organza on a piece of insulation foam covered with plastic and then sprayed it with the Solvy mixture. When it dried (2-3 hours later), the organza was impregnated with Solvy, giving it a stable hand for stitching. After the stitching is complete, she simply puts the piece in a tub of water to rinse the Solvy away.

I believe this method might work well to stabilize cotton or silk fabrics for bead embroidery! I now use acid-free interleaving paper under the fabric as a stabilizer, which works fine. However, I'm going to try the Solvy method as soon as I get off-island to buy some. I'll let you know!

Friday, March 05, 2010

Building Nests + 6 Words

There's always that one day that marks the end of winter and suddenly you're soaring into spring with all its glorious re-birthing. Today was that day for me!

crocus
The crocus and daffodils are blooming earlier this year after a very mild winter. February was unusually warm... 40s and 50s, no freezing at night. My neighbor, over at Herb Crazed, grows hundreds of daffodils on her triangular property, a joy for all of us! Check out her two recent posts, one about deer resistant plants and one about daffodils. These are hers, by the way.

daffodils
The robins are back, hopping around moss-coated rocks in search of worms. Soon our 5 acres will team with all sorts of woodland birds. And two of them will commandeer our bird houses!

bird house, madrona trees
bird nest, side view
This is the remains of a nest from last year, which my husband cleaned from one of their houses. If you study it, you can see that the little tykes know how to build! The sticks, carefully sized, are placed one west, one south, one east, one north and back to west. It was easier to see this pattern immediately after the nest came out of the bird house. I took this picture a day or so later and the wind had already begun to destroy it.

bird's nest, inside view
This picture is the nest from our other bird house. I love the little feathers woven into the sticks. I think both residents were sparrows... but I could be wrong about that.

Yesterday I spent the whole day with Christi of Sweatpea's Path on Lopez Island. We stitched, talked, ate delicious home-made chicken soup and walked the paths through her neighbor's 80-acre woods... 50+ degrees and sunny! Could it be better? Well, yes, it could. Add to the above that she's tamed a whole flock of chickadees to eat bird seed from her hand. They're so tame, some of them will sit or her dog's head. Wouldn't I love a picture of that!!! I fed them too. Amazing and sweet to feel their little feet on my fingers, look eye-to-eye with them and watch them choose a special seed. Chickadee-dee-dee!

Words for March BJP

March 1, sat outside on our deck, quietly contemplating the sky and madrona trees, then quickly wrote the first six words that came to mind. They are:

Build
Fly
Reflect
Explore
Learn
Dance

Of these, the one which seemed the most compelling at the time was Explore, so that's my "featured" word for this month's BJP. While with Christi yesterday, I started stitching a bunch of different fabrics together, layering them. They may have to be part of it.

Takin' a Leave of Absence for Two Weeks!

My husband and I are taking our first significant vacation in 13 years of being together!!! We're going to Arizona, where we'll see a couple of Mariners spring training games, visit the Phoenix art museum, take a motor cycle ride to the Jerome-Sedona area, spend 2+ days at the Grand Canyon, and photograph blooming cactus (I hope) and wild flowers. We'll be away from our computers and home responsibilities for nearly 2 full weeks. Glorious!

Thursday, October 15, 2009

Fun in Phoenix!

Saguaro cactus, Phoenix, AZ
October 1-8 in Phoenix... What could be more different than where I live? To leave our peaceful little island, now slipping into the wet season, and fly to Phoenix, where I had to dig out the sunscreen and watch for rattle snakes, was certainly a big change for me!

Friday Harbor, WA <> Phoenix, AZ
coastal island <> inland desert
highs in the 50s <> highs in the 90s
kinda soggy <> parched, dry
mostly cloudy <> clear blue skies
hilly <> flat
surrounded by ocean <> ringed by mountains
peaceful rural roads <> energetic city traffic
abundant evergreens <> sparse Saguaro cactus
talented beaders <> talented beaders
fun people <> fun people
alas, not even one bead shop <> Bead Museum AND shops

The last three are the good news for me! Although I missed Robert and our cat, I got to see friends Claudia, Patricia and Roger. And the big plus was my wonderful students, who really seemed to enjoy making beaded buttons and learning/practicing sewing beads on fabric improvisationally!

beaded sneaker by Teri Greeves, Native American bead artist
Beaded sneaker by Native American artist, Teri Greeves.

Bad news... I left my camera on the bed in my hotel the day I taught at the Bead Museum in Glendale (fun area in Phoenix!!!) so I don't have any pictures to show you from there. So please, just write this in BOLD on your mind's hard drive:
If you are ever in Phoenix, do not pass go or collect $200... instead, go directly to the Bead Museum and plan to spend some time being totally awed by the collection, display, library and shop!!!
OMG! I knew it was going to be good... but wasn't prepared for how extensive it is! Their website does not do it justice at all. And take some extra cash, because the museum shop is awesome as well!

bougainvillea blossoms
Good news... I did remember to take my camera to the Farm at South Mountain, where I taught a 2-day Improvisational Bead Embroidery workshop. Now, the Farm itself is a worthy Phoenix destination! Picture a large grove of shady pecan trees, gardens, flowers (like the bougainvillea above and the passion flowers below), three world-class restaurants (lunch being my favorite, because it's served in a picnic basket which you then carry outside to a picnic table under a pecan tree to have your meal), and an artist's studio.

passion flowers
The Farm features a different art program every 6 weeks or so. I was there as part of bead artist, Corinne McAuley's residency. During her time as Artist in Residence, she displayed her own work in the Artist's Cottage at the Farm, taught workshops, brought in a couple of distinguished speakers about beading and organized my teaching gig. My hat is off to Corinne, a most talented and well-organized new bead friend!

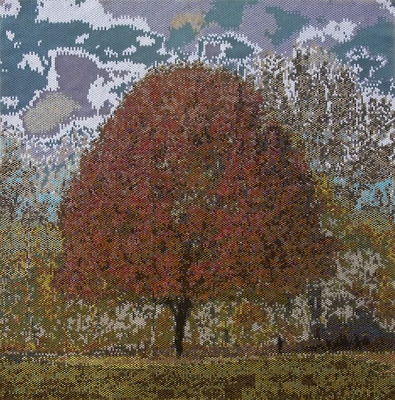
Corinne McAuley, beaded tapestry, peyote stitch, Peonies
Corinne McAuley, beaded tapestry, peyote stitch, Fall Fire
Above are two examples of her work (before taking my workshop - who knows how learning improv bead embroidery might influence it in the future). They are worked in flat peyote stitch with countless thousands of beads in each piece. You can see more of her tapestries on her website, here. And, hooray, Corinne has already joined us for the 2010 Bead Journal Project!!!

students, bead embroidery 2workshop taught by Robin Atkins
This is Joan, Corinne and Lisa (left to right). I hear Joan's got the bead embroidery bug. And Lisa, OMG, she's finished her class piece AND a second piece in less that two weeks. See below! Aren't these fabulous?! How do you like her use of mirrors in both pieces? I'm so proud of her!
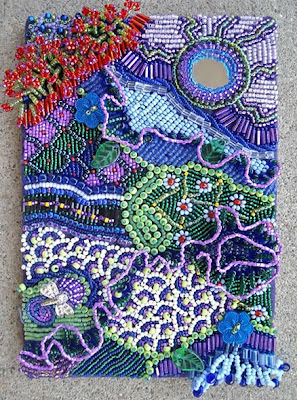
bead embroidery by Lisa Criswell, My Racing Thoughts
Lisa's first piece, started in class, titled "My Racing Thoughts."

bead embroidery by Lisa Criswell, Tranquility
Lisa's second piece, finished two weeks later, titled "Tranquility."

students, bead embroidery 2workshop taught by Robin Atkins
This picture shows the room where we had class. At the first table are Sheila, Ann and Joan! Ann had already done three pieces of improv bead embroidery using my books to learn the stitches and process. You can see her first and second piece below. I'm sure all three of these gals have been stitching with abandon since completing the class!

bead embroidery by Ann Severine
students, bead embroidery class by Robin Atkins
This picture shows my two tablemates, Marty (a crazy quilter, who seems to be gravitating nicely towards more beads and might join the 2010 BJP) and Glenda (who took both of my workshops and is one of those students who makes the teacher feel good because she catches on quickly and does beautiful work right off the bat).
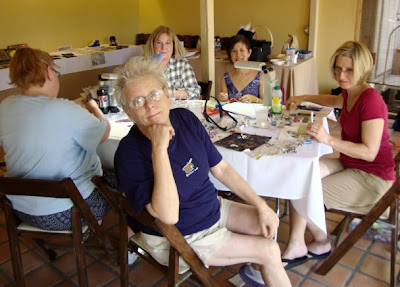
students, bead embroidery 2workshop taught by Robin Atkins
Michelle and Suzanne (front), Diane, Victoria (a current BJP member) and Linda sat at the third table. Victoria brought her BJP butterfly pieces (see them here, scroll down) to share with us and a doll she created and beaded (below)! Diane brought several samples of Native American beadwork for show'n'tell (including the beaded sneaker, shown above, the belt buckle shown below and a beaded bag, detail shown at the bottom of this post)!

beaded doll
Victoria's doll. I love that it's not totally symmetrical and in the African Ndebele style!

Native American barrette
Barrette by Native American artist, Edgar Jackson, brought for show'n'tell.

The workshop ended all too soon. We were having a great time together and much beading progress was being made!

After parting company with my students, I joined my long-time (non-beading) friend, Patricia, and her husband Roger for a couple of days of relaxation in the sun. They have a home in Fountain Hills, a lovely part of Phoenix (NE of down town), and so named because of its hallmark fountain, the tallest in the USA!

Fountain Hills, AZ, fountain and rainbow
Fountain Hills, AZ, fountain and painted wall
This fountain goes off for 15 minutes every hour during daylight and early evening. There's a lovely walk all around the lake. AND, the piece d' resistance of the lake-side promenade is La Scala Creamery, where you can get the most tasty gelato in the world and/or have an ice-cold, refreshing drink of sparkling La Scala tea! This is NOT TO BE MISSED!

One day we took a drive out Hwy 87 to Payson, and then NE on Hwy 260 to SR 300, which is a gravel road that runs along the edge of the Mogollon Rim, a plateau that rises to 7,000 feet (towering 3,000 feet above the valley below)! Below are two pictures I took from the Rim... They hardly do justice to the beauty there.

Mogollon Rim, AZ, photo by Robin Atkins
Among other fun things that day, we stopped in Pine (on Hwy 87) for lunch at HB's Place. We gave them 5 stars! Especially delicious was their Oatmeal Pie. I think it may have been similar to this recipe:
Amish Oatmeal Pie

1 1/2 c. milk
3 eggs, lightly beaten
3 tbsp. butter or margarine, melted
2/3 c. rolled oats
1 1/3 c. dark brown sugar
2/3 c. flaked coconut

Preheat oven to 425. Combine milk, eggs, butter, oats, sugar and coconut in a large bowl. Mix thoroughly. Pour into flour/nut pie shell and sprinkle with additional coconut. Bake for 10 minutes. Reduce heat to 350 and continue to bake for 30 minutes more or until a knife inserted in the center comes out clean.
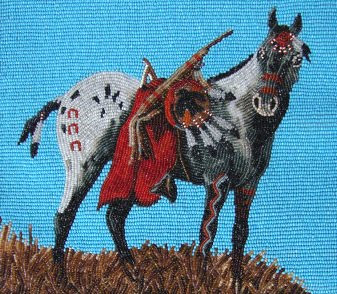
beaded bag, detail, contemporary Native American
And that about does it for Phoenix... a fun desert place, indeed... great beaders, love the Saguaro cactus, love Mogollon Rim and the fountain in Fountain Hills! I hope you've enjoyed this vicarious visit to the Southwest!

