

Just returned from a 3-day workshop taught by Chad Alice Hagen... Had a great time learning about felt and how to dye it using resist methods. Wanted to make more (many more) pieces of dyed felt to use in my various beading and collage projects. But after a day of dying, we moved on to book making, which (of course) was also way fun even though much of it was not new to me.
The reason I signed up for the class is because of the luscious, gorgeous, fantastically beautiful pieces of resist-dyed felt made by Christi C. (Sweetpea Path), two of which I've used for Bead Journal Project pieces (here and here).
I LOVE, LOVE the way Chad embellishes bits of dyed felt and creates books and pins with them. Below are a few of her pins... Notice the stitching details and bead embellishments, carefully chosen to enhance the dyed designs on the felt.


Some of her pins were for sale... I couldn't resist (ha! pun intended)... bought the one on the top left in the second picture. Difficult choice... I liked them all!
Below is one of her little Coptic-bound books... Ooooh, again, the stitching and beading makes it extra specially precious, don't you think?! Knowing we would be making one too, I just about couldn't contain myself!

The first day we felted two large "sheets" of wool, needle-punched, pre-felt bats. Imagine the din as twelve of us literally THREW wads of wet felt onto our tables! When the wool was felted, we cut it into pieces and started up the dye pots (4 baths, 3 color choices each bath).
For each dye bath, we clamped various things on our felt pieces (hair clips, paper clips, metal parts, Popsicle sticks, clothes pins, etc. etc. etc.) and then tossed the pieces into the dye pot. After their 45-minute dye bath when the clips, etc. were removed, the piece would be the dyed color except where the clips were pressing on the wool and resisting the dye. Here are the 11 pieces I dyed that first day.


Above, Chad is giving some feed back to students about their felt pieces. I'm a tad, just a tad, disappointed in my results. Maybe some of them look a little too much like 60s tie-dyed t-shirts for my taste. I really wanted to spend a second, less rushed, day... further experimenting with this method. However, we moved on.
Day-two, we chose one of our larger pieces of felt and constructed a small, hand-bound, wrap-cover journal. Here's mine... the felt, the bound spine and the finished book...


At the end of day-two, we selected felt from our stash to make an embellished mini-book with Coptic binding, like the one Chad made pictured above. That evening our home work was to complete the thread embroidery and beading on both the front and back covers of our books. Here is the felt I chose.

Two other students joined my roommate and me in our room... beading, stitching and talking until well past midnight. That was the most fun of the whole workshop for me!
Below are my two embellished covers ready to bind into a book.

Below are all the embellished, felt cover-pieces made by the students in our class.

Below are pictures of my book, which I finished on the late ferry home just last evening!
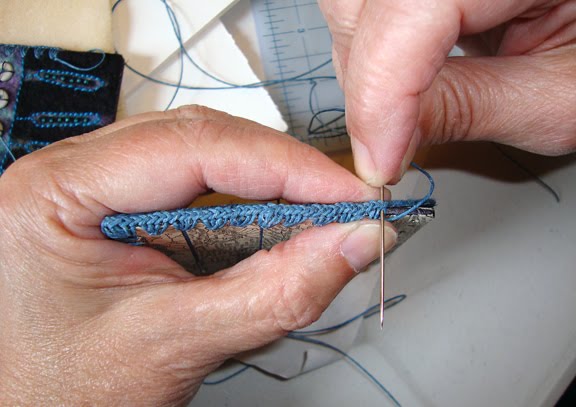
Notice that the covers have a hand-stitched edging. We did this with the same waxed linen cord that we used for binding both books. This took longer than any of the other steps and was quite difficult. None of the students finished their edging or had time to bind their books in class. Fortunately, we received good handouts with excellent illustrations which I was able to follow for the binding.


I love constructing hand-made books!!!! And I love working with hand-dyed wool felt. I'm not so sure I love the dying process, especially the chemicals, the need to carefully monitor time, temperature, water-acidity, etc. I don't think I'll be buying any dye... but I would happily join a dye party at the studio of one of the other students!


Gorgeous work !
ReplyDeleteWhat beautiful coloured felt and books! I also love the enhancements with the embellishments,
ReplyDeleteSounds you had a lot of fun during the workshops.
Greetings from then Netherlands
Hi from N.J ..Wow the embelisshed felt books are fantastic.I to love felt. I am a doll maker and use wool felt on many of them. I agree with you about the dye.
ReplyDeleteThat must have been the best workshop. I love your book. You can always change the felts you don't like-cutting, stitching, beading, painting, needle felting.
ReplyDeleteWhat fun! Don't be too quick to be disappointed in those pieces -- once you get some beads and thread on them, they'll be transformed!
ReplyDeleteI love your little book.
Your book is fabulous! It looks like it was a great class all around.
ReplyDeleteI love the different textures and patterns you achieved in your dying and the books the pieces have become. I can see you would have liked to experiment some more, but I am sure in time you will.
ReplyDeleteThey are all so beautiful!
ReplyDeleteWow, these are gorgeous! Thank you for giving me something new to think about!
ReplyDeleteThe workshop sounds like tremendous fun! Stunning, luscious work!
ReplyDeleteAmazing work, the felt looked so interesting but the embellishments took it to another plane. Thank you for sharing
ReplyDeleteOh, my! How gorgeous all this is! And inspiring, too.
ReplyDeleteWow! I so wish I could have been there, I would have loved the whole business including the dyeing. When I clicked on the photo that had everyones book covers in it, I saw one I told myself, "that must be the one the instructor made" but then I saw further down that it was the one you made. Fabulous!! I love them all! I have been working with needle felting myself lately, but not dyeing the felt. Maybe I need to move in that direction because surely I can fit one more project in....anyway, thanks so much for sharing so many photos of your workshop. They are great.
ReplyDeleteRobin, these are just wonderful!!! Each one is so unique and the stitching just adds so much to the books. I love each one of them..oh, how I wish I could take a class like this....again, your book(s) are great!!!
ReplyDeleteVery inspirational! You obviously had lots of fun and it all ties in beautifully with your work.
ReplyDeleteOh, Robin... first of all, I want to tell you that I absolutely love your felt pieces! And your book is fantastic!
ReplyDeleteSecond, I want to tell you that I am terminally jealous. ;-) I have a book by Chad Alice Hagen, and to have taken a workshop with her would have been divine!
I hear you about the dyeing, I don't dye my own wool. I do dye my own silk, though. It's a different process, I lay the silk out on a table with newsprint underneath and sponge on the dye colors. No timing, no soaking in a bath, not nearly as tricky as what you did. I think that's as far as I will go right now with the dye stuff. But I may try some simple shibori techniques with this method.
Anyhow, I absolutely love what you've been doing with the felt!!
Oh, these are beautiful and your books is especially scrumptious. I just wanted to reach out and touch each one. I'm not much for the dying process either -- my days of 'getting messy' are over -- but the results seems well worth the effort. Lucky you!!!
ReplyDeleteI love anything made from felt. The pins are very cute!
ReplyDeleteYou are one lucky Robin and your books is WONDERFUL!! Love the pic of all the felts -- what fun -- I'm sorry I couldn't fly over there and go with you.... *sniff
ReplyDeleteIt sounds like you learned so much in just 3 days! I love your books and your felt pieces...let them sit in your studio for a week or so and I bet you will fall in love with them (or at least figure out how to make them into what you like!)
ReplyDeleteabsolutely gorgeous! I so love these sweet little books...the stitching and beading are lovely. looks like the class was having a marvelous time--thanks for sharing!
ReplyDeletethis is crazy cool.
ReplyDeleteI am soooo loving your little book and all of the little felts. The colours and shapes are just deeeevine! I just unearthed a box full of rovings. While I don't have the prefelts or the dye, I could probably make something interesting with wet felting. One question? What's the edge stitch on the book called? I love the effect.
ReplyDeleteTo Anne Marie ~ Edge stitch on book...
ReplyDeleteYou asked about the name of the stitch... Chad didn't have a name for it. I think of it as the shell stitch, because it reminds me of scallop or shell edging in crochet. The thread path is the same. Here's a link for the croched version: scallop edge.
I can't find directions on line for how to do it with a needle. Maybe you could email Chad and ask her permission for me to send you the edging page of her handout. If that's appealing to you, email me and I'll give you her contact info... or you can get it from her website.
I want to experiment with this edging... try some different types of cord, waxed and unwaxed.
The transition when you run out of thread makes a bump that I don't like, so I also want to see if I can figure out some other way to end and start a new cord.
Super cool bags. Very colorful and I love how you make it. I wonder, can teach me how to make that bag. I really want to learn.
ReplyDeleteBeautiful, colorful and ever so lovely. I enjoyed all of the "eye candy" that you posted.
ReplyDeleteMakes me want to have a class to.
Interesting, I am thinking or wishing wouldn't it be lovely to have "artist's" come here to NM & do some classes with wonderful scenery & beautiful skies all around you.
that is soo pretty
ReplyDeleteid love to have a skirt felted like that
Nice work, i liked the way you utilized the scrap and also the bags :) they are really beautiful and technically constructed.
ReplyDeleteBeautiful Work Nice Post.
ReplyDeleteHave felted a purse I knitted, and did not like it. But now I see this, integrated with beading and stitching, I love the result! Glad I found you!
ReplyDeleteHow fortunate you were to be able to go on this course. I'm waiting to see if she will come to England. The edge stitch looks complex and I can't find any instructions on how to do one like it. Do you have any recommendations? I spin, felt and create things with fabric using naturl dyes,
ReplyDeleteOh such luciousness!!! Beautiful work and aI adore your book!! I think you will like your felted pieces will be much more to your liking as you cut them up to use for various projects!!!!
ReplyDeleteWhat a fabulous class!! I am lookingforward to taking a resist dye class with Chad in March in VA!!!! YAH!!