Showing posts with label resist dyeing. Show all posts

Wednesday, December 21, 2016

A Visit to an Indigo Fabric Dying Studio in Hungary

Kekfesto (blue dyed) fabric, Hungarian, 9 different patterns
This fabric is called Kékfestö in Hungarian, a word that roughly translates as blue-dyed or blue-dying. Producing these fabrics is a cottage industry in Hungary, which dates back several centuries. The dye is indigo; the cloth is cotton; and the long, arduous process results in a type of batik fabric. The photo above shows a small fold of each of the fabrics I bought at the blue-dyed studio shown below. (As always, please click on the photos if you'd like to see more detail.)

Kekfest (blue dyed fabric) studio in Hungary
When in Hungary in October, 2016, my quilting/travel friend (Lunnette) and I, as guests of my Hungarian bead sister, Anna Fehér, had the very exciting experience of visiting the hand-dying studio of Miklós Kovács in the little village of Tiszakécske, SE of Budapest. The studio, located behind his home, includes two rooms, one for printing the raw cloth with a wax resist, and the second for dying the printed cloth with indigo. In front of the building, you can see rods above the deck, which are used for hanging the fabric to dry after it is dyed, and a wagon loaded with printed cloth ready to be dyed.

Kekfest (blue dyed fabric) master craftsman, Miklos Kovacs
Meet Mr. Miklós Kovács, now in his 80s! Charming and animated, he is explaining his traditional, hand-dying process to Anna. Blue-dying has been the Kovács family's livelihood since 1878, each new generation being trained by the previous Master. It is strictly a family affair. Miklós, his wife, Margit, and their two daughters, Gabriella and Mária, currently produce about 10,000 meters of Kékfestö (blue-dyed) fabric every year. When Mr. and Mrs. Kovács retire, the business will pass to their daughters. This post shows how they turn plain white cloth into beautiful fabrics with white motifs on an indigo background.

raw cotton used for Kekfest (blue dyed fabric)
First, they need thousands of meters of fine-quality, tightly-woven, raw cotton cloth, which is rinsed to remove impurities, then carefully ironed and rolled onto wooden rods which fit onto the printing machine. This pile of untreated cotton cloth, manufactured in Turkey, is the remainder of a big shipment purchased at the start of the year.

printing blocks used for Kekfest (blue dyed fabric)
Next they need a print block or plate. These are made with wire pins of various diameters, which are pounded into blocks of dense wood. Here you see the many plate choices available in the Kovács studio, each yielding a different motif on the fabric. The length of each print block is the same as the width of the fabric; the width is the width of the pattern repeat, generally designed to be about 4.5 inches..

printing block used for Kekfest (blue dyed fabric)
This is the end of one of the print blocks, showing how the design is formed by setting metal pins of different diameters into the wooden block.

Kekfesto (blue dyed) fabric, Hungariant batik
And here is the fabric (after dying it with indigo, and removing the wax resist), which was printed with the block in the photo above it. Naturally, a half-meter of this one came home with me!

German machine used to print wax resist when making Kekfesto
This is the machine which is used to print the motif on the raw cotton cloth with a wax resist. Mr. Kovács keeps his printing machine, built in Germany 120 years ago, in good running condition with machinist skills he learned alongside his father.

You can see the sprocket, lower right, which is adjusted to advance the fabric through the machine in increments exactly the length of the pattern repeat. For most motifs, the fabric advances 4 to 5 inches after each time the print block is applied to the fabric, thus revealing the next short stretch of un-printed cloth.

German machine used to print wax resist when making Kekfesto
Here you can see many meters of raw cotton cloth, suspended on a metal rod at the back of the printing press. There is a leader of waste cloth stitched to the end of the roll which has been fed through the rollers of the machine to get the process started.

Kekfesto (blue dyed fabric), wax resist added to tray on machine
At the front of the printing machine, a worker swipes a tray with wax resist, which is tinted green so that it will be visible on the printed cloth. The printing block touches down on the waxed tray, picks up a coating of was, and then presses firmly against the fabric.

Kekfesto, printed with wax resist, hung to dry
After being imprinted with wax resist, the fabric is wound up and down through a drying rack located behind the printing machine.

Kekfesto, printed with wax resist, ready to dye with indigo
When it is dry, the printed fabric is folded and stacked until there is a sufficient quantity to begin the dying process. You can see that some of the raw cloth in this pile was pre-dyed pink, blue, or beige. After over-dying with indigo and removing the resist, the motif on these pieces will be pink, blue or beige with an indigo background, rather than the much more common white motif with an indigo background.

Kekfesto (blue dyed fabric),detail of fabric printed with wax resist
This close-up photo shows how the fabric looks after the wax resist (tinted green so that is shows on white cloth) is dry. This is the motif being printed while we were there. Liking the design a lot, I was very pleased to find finished fabric in this pattern available to purchase.

Kekfesto (blue dyed) fabric, Hungarian
And this is how the cloth will look after it is dyed with indigo, the wax resist removed, and the fabric washed and ironed. As you might have already guessed, a half-meter of this one came home with me!

Robin Atkins (on left) at Kekfesto studio in Hungary
As we watch the cloth passing slowly through the rollers of the printing machine, Lunnette holds a scrap of dyed fabric which was tied to the machine, indicating the motif currently being printed.

Kekfesto (blue dyed) fabric, preparing concentrated indigo dye
At last, we get to the dye pot!  Here on the burner, a concentrated indigo dye formula is being readied to pour into the dye vat.

Kekfesto (blue dyed) fabric, rubber gloves for dying with indigo
Don't forget to wear those heavy rubber gloves, or the skin on your hands will be tinged with blue for a long time.
Kekfest (blue dyed fabric) master craftsman, Miklos Kovacs
Mr. Kovács gave a long, animated talk (all in Hungarian, which I only slightly comprehend) about the whole process of blue dying. You've already seen how the cloth is printed with wax resist. The next step is to dye the background.

The cloth is dyed in a vat with the indigo dye-bath at 85 degrees C., then washed to remove the wax and rinsed to remove the excess dye. After rinsing, the cloth is looped over racks to dry outdoors, which completes the dying process. Sadly, he did no dying while we were there, so I don't have pictures or first-hand experience with precisely how it is done to share with you.

However the fabric is not yet ready to use. It must be starched, dried, and then pressed using both steam and steel rollers with heavy pressure, in order to create the traditionally desirable shiny finish on the cloth. Finally, the fabric is folded onto bolts for distribution to shops and end-users.

Kekfest (blue dyed fabric), templates for printing table cloths and runners
We learned how they hand-print motifs on cloth using a template, such that after dying, the fabric can be cut out and hemmed as a finished table cloth. You can see the templates hanging on the wall. The desired template is placed over the fabric, and a pencil used to mark the registration points for lining up the printing block. Fabrics which have already been printed are stacked in front of the templates. After being dyed, this fabric will be made into table cloths and runners of various sizes.

Kekfest (blue dyed fabric), hand stamped with wax resist for table cloth
This is a section of cloth which as been marked with a template, and hand-stamped with wax resist. After dying with indigo and removing the wax, it will be made into a rectangular table cloth with a lovely double border all the way around.

Kekfest (blue dyed fabric), hand stamped with wax resist
Mrs. Kovács demonstrates for us how she lines up the print block with the penciled registration marks, and then lowers it onto the fabric. With the stamp resting on the cloth, she lightly pounds it with her fist to set the wax into the fabric. It was obvious to us that carefully making each wax impression all the way around the cloth takes a lot of time and concentration. As you an see below, the results of her hand-printing are stunning!.

Kekfest (blue dyed fabric), round table cloth, hand printed
Here is an example of a hand-stamped, indigo-dyed fabric made into a round table cloth. Obviously, it came home with me, and is perfect for my kitchen table!  This fabric is quite wide, and takes a great deal of space and time to print. Yet, the prices were very reasonable!

Kekfest (blue dyed fabric), Hungarian batik yardage
After spending several hours in the studio, we were invited to the house for a shopping bonanza! Fortunately, hoping ahead of time that we would be visiting a Kékfestö studio when we got to Hungary, we had saved our allowances for some months, and were prepared to shop for future quilting and sewing projects. The prices, ranging $10 to $15 per meter depending on the width, seemed very reasonable considering the quality of the fabric, and the extreme amount of work that goes into producing it.

Kekfest (blue dyed fabric), Hungarian batik apron
In addition to yardage, both of us bought a table cloth and an apron. Mine is shown above.

What a totally delightful experience we had! Mr. and Mrs. Kovács are as friendly and nice as can be!  If you ever get to Hungary, you can find their fabrics and finished products in the picturesque town of Szentendre, just a short drive or train ride north of Budapest on the Danube River. Here is a website link.

Master craftsman of Kekfest (blue dyed fabric), Hungarian batik
To end our visit at the Kovács studio, here is a tribute photo of the elder Mr. Kovács, who during his boyhood in the 1920's was immersed in the world of his family's blue-dying business, and who continued producing Kékfestö indigo-dyed fabrics for his entire life, while training his own son to continue the trade.

Like his father, the younger Mr. Kovács has trained his daughters to continue when he retires, although I'm sure he has many more years to go, probably well into his 90s..

My last two photos in this post are a little surprise for you. Before falling in love with beading and quilting, my main passion was Hungarian folk dancing. I danced in a performance group for 10 years (and later became one of the group's choreographers), performing at many events in the Seattle area, including Bumbershoot and the Folklife Festival. We also performed at the World's Fair when it was in Vancouver, British Columbia. I and several of the other dancers in the group made most of our costumes using Hungarian fabrics and original costumes as patterns.

It was folk music and dance that first called my heart and soul into Hungary, where I have since spent a cumulative total of well over a year of my life, spaced over 14 different visits so far.

Robin Atkins, Hungarian folk dancer, wearing costume of Kekfesto (blue-dyed fabric)
So, here you go. This is me, wearing a costume I made with Kékfestö fabric for performing the dances of the Szatmár region, located in northeastern Hungary. This photo was taken in September, 1986 at the World's Fair in Vancouver, Canada, where we performed on two separate occasions.

Legenyes Hungarian Folkdance Ensemble, performance 1984
And this is me on stage at a festival in Redmond, WA, happy as can be, Hungarian folk music, song and dance, filling me with joy!  Michael Kappleman and I are the second couple from the left.

So you see...  Kékfestö and I go back a long way. Next, I'll be quilting with it!

*****
My apologies to Hungarians for not using the correct accent mark for the last letter of the Hungarian word Kékfestö. I spent 4 hours trying to do it, but could not get Blogger to accept anything I tried.

Wednesday, August 01, 2012

Natural Dye Day & Bundle Bash


Fabric dying is a love-hate sort of thing for me. I'm always attracted to felt and fabrics dyed by other people, especially Christi over at Sweet Pea Path. I get all excited about trying it, and take classes or experiment on my own. But the total unpredictability of it, the incredible number of variables that can throw the results one way or another, seems overwhelming sometimes. In the end, there's a daunting amount one needs to learn from others (like India Flint) and by experimenting PLUS lots of luck before one can expect to get pleasing results.

Still... when opportunity comes along, I always jump right in again....

This time, a group of Lopez Island fiber artists experimenting with shibori invited me to join them for a natural-dye play-day! We met July 13th, each bringing plant materials, fabrics and dye pots of various metals.


Here's my basket o' goodies: drift wood for wrapping the bundles, madrona leaves and bark, a bunch of flowers, leaves, berries, and some lichen. Being new at this, I didn't have a clue what might produce color on the fabrics. Fortunately other participants brought botanicals known to work.


Here's my stash of fabrics, all torn from used clothes purchased at our thrift store. Mostly it's linen, with a few pieces of cotton and silk. I boiled the linen and cotton fabrics in water + alum to pre-mordant them, making the fibers more receptive to taking color.


The thing that looks like a washcloth is blended cotton/silk yarn that I knit into this swatch. I threw it into the mordant bath as well. This is what I unraveled and used to wrap/tie all of my bundles, knowing it would take dye too (you'll see further down)!


Here are a few other things I planed to include in my bundles - rusty nails and washers, copper spirals, and tyvek tags for noting what I put in each bundle and what dye treatment it received.


And these are packets of spices - turmeric,  curry, cayenne, paprika, and yellow mustard. Why not give them a try too?


After wrapping our bundles, we put them in one of several dye pots. One was just a steam bath. Others included boiling mullein, boiling eucalyptus leaves, hot tansy ragwort, and cold berberis. The picture above shows my bundles after being in the dye or steam bath for an hour or two.
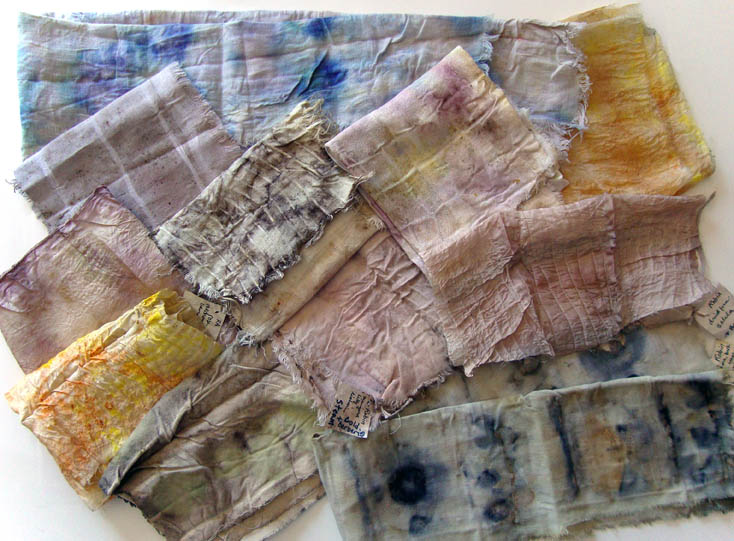

Then came the waiting and the mildew.  The bundles need to cure as long as possible. We decided to have a Bundle Bash, a grand opening of our collective bundles, on July 30. We agreed not to open the bundles until them. A problem developed with some of them... they started growing mold... black spots/areas, especially on the underside of the bundles. A second steam bath halted the growing, and a very slow bake in the oven to hasten drying seemed to prevent new growth.


So here we are two days ago, gathered like kids at Christmas, unwrapping our bundles, hard pressed to take even one moment to hold up a sample for the picture.


Here's a picture of all of mine. They need to continue curing for at least another week. Then I'll dip them in salt water (hoping to further enhance the colors) and let them air dry. Finally, after all that, I can wash/iron them, and see what they REALLY look like.

As I look at them together like this, they seem so muddy, so similar to old paint rags or maybe fabric scraps from making costumes for an end-of-the-world zombie movie. Harsh words, I know. That's what I mean by love-hate relationship.

On the love side, some of them, some parts of them, have potential. For what? I'm not sure... some sort of quilted, hand stitched fiber art, I guess.


This is the one made with the spices. It's the only bright one that I made, and it's much brighter than anything anybody else made. The fabric is silk and the dye bath was just steam. Obviously color from spices has potential. I'm thinking it could be sprinkled over leaves or other resist objects to leave patterns of un-dyed fabric showing. Hmmm... that's one to try!


This one is madrona leaves and rusty nails/washers on linen. The dye bath was tansy ragwort.


This one is eucalyptus and mullein leaves in a eucalyptus bath cooked in an iron pot. The fabric was some that Christi gave me; I think it's raw silk. I was surprised and pleased with the green color of the prints made by the eucalyptus leaves.


This one is clematis, lichen, and copper spirals wrapped with a pale lavender linen in a berberis bath. The clematis and lichen didn't seem to give very much color. But the mildew made some nice marks, don't you think?!


Lastly, here is the yarn I used to wrap the bundles. I expect this will be quite fun to use!

A lot of time and work went into getting this far. Is it worth it? I don't know yet.  But I can say this... I'm eagerly anticipating giving these a salt water bath next week, so I can get them washed and ironed!!!

....to be continued....

Wednesday, August 25, 2010

August BJP Finished!

Robin Atkins, visual journaling on resist-dyed felt
I started this one in July, before Aug. 1st when I would list my six words for the month. I needed a stitching project for a sew-day with friends, so why not begin a little early? Recently I got a new prescription for my glasses and they gave me the old lenses. I thought it might be fun to use one of them in the piece!

So first I picked one of the resist-dyed felts I made in Chad Alice Hagen's class that had a circle on it where I might be able to put the lens.

Robin Atkins, resist-dyed felt
Then I started stitching on the felt. This particular piece was quite thin, less than half the thickness of commercial felt. I needed some stiffener to keep my stitches from puckering. I suppose I could have used acid-free, interleaving paper (as I usually do), but this time decided to try a light-weight, non-woven interfacing fabric (which worked quite satisfactorily). Although I didn't finish that day, I worked on some of the stitching shown below.

Robin Atkins, visual journaling on resist-dyed felt, back stitch
The stitches are done with cotton buttonhole twist. I used mostly back stitch (above), but around the circle I used chain stitch and then filled in the centers of the chain with size 15 beads (below). The rock is a chip of slate from some steps we had made on the trail to the studio.

Robin Atkins, visual journaling on resist-dyed felt, chain stitch
After choosing my words on August 1st...

release
listen
talk
shift
risk
commit

I thought long and hard about how to add them to my piece. I wanted them to be under the lens, suggesting the need to really see the words, or even to magnify the importance of them in my current life... words to live by. I considered writing them on paper and then mounting the lens over the paper. That idea didn't seem quite right for the piece, as I wanted to preserve the mottled look of the felt in the circle area.

Finally I got the idea of writing the words on a somewhat transparent fabric, organza, then basting the fabric over the circle and embroidering the words with backstitch (through both the organza and felt). It worked pretty well! After finishing the words, I made a beaded bezel to hold the lens over the words, as per the instructions in my book, Heart to Hands Bead Embroidery. The last step was to cut the outside edges of the organza about a quarter of an inch away from the beaded bezel. I used my finger to scruffle and fray the edges of the organza. Here's how it looks...

Robin Atkins, visual journaling on resist-dyed felt, bead journal project
I used colonial knots (similar to French knots) to mount the felt onto my painted paper and added a twisted embroidery floss border (as on all of my BJP pieces for this year). The finished size is 7 x 7 inches. Here's how it looks...

Robin Atkins, visual journaling on resist-dyed felt, bead journal project

After finishing it, I got out all eight BJP pieces for the year, placed them in order on the table and took a good look at them. Conclusion? It pays great dividends to stick with a challenging technique or artistic concept! Step by step, piece by piece, improvement is seen.

This is the year I took on words... and collage too. I've been fascinated by other BJP members over the three years who so successfully use words in their work and who use paper collage techniques as inspiration for multi-media collage with fibers and beads. I was afraid my need for technical perfection and structure in my art would be a road block, which it was and to some extent still is. But definite improvement is there to be seen, each piece a small victory over the one before it. Yay!

Stay tuned, I'm finally back on the beadlust/BJP track again! My next post, in a couple of days, will feature a tutorial on finishing and after that a post showing my July BJP!

Sunday, June 20, 2010

Felting + Dying + Book Making = FUN!!!!

Chad Alice Hagen, hand-made wrap-style book, detail
Just returned from a 3-day workshop taught by Chad Alice Hagen... Had a great time learning about felt and how to dye it using resist methods. Wanted to make more (many more) pieces of dyed felt to use in my various beading and collage projects. But after a day of dying, we moved on to book making, which (of course) was also way fun even though much of it was not new to me.

The reason I signed up for the class is because of the luscious, gorgeous, fantastically beautiful pieces of resist-dyed felt made by Christi C. (Sweetpea Path), two of which I've used for Bead Journal Project pieces (here and here).

I LOVE, LOVE the way Chad embellishes bits of dyed felt and creates books and pins with them. Below are a few of her pins... Notice the stitching details and bead embellishments, carefully chosen to enhance the dyed designs on the felt.

Chad Alice Hagen, hand-made felt pins
Some of her pins were for sale... I couldn't resist (ha! pun intended)... bought the one on the top left in the second picture. Difficult choice... I liked them all!

Below is one of her little Coptic-bound books... Ooooh, again, the stitching and beading makes it extra specially precious, don't you think?! Knowing we would be making one too, I just about couldn't contain myself!

Chad Alice Hagen, hand-made Coptic book with embellished felt covers
The first day we felted two large "sheets" of wool, needle-punched, pre-felt bats. Imagine the din as twelve of us literally THREW wads of wet felt onto our tables! When the wool was felted, we cut it into pieces and started up the dye pots (4 baths, 3 color choices each bath).

For each dye bath, we clamped various things on our felt pieces (hair clips, paper clips, metal parts, Popsicle sticks, clothes pins, etc. etc. etc.) and then tossed the pieces into the dye pot. After their 45-minute dye bath when the clips, etc. were removed, the piece would be the dyed color except where the clips were pressing on the wool and resisting the dye. Here are the 11 pieces I dyed that first day.

Robin Atkins, resist-dyed felt
Chad Alice Hagen reviewing resist-dyed felt made by students
Above, Chad is giving some feed back to students about their felt pieces. I'm a tad, just a tad, disappointed in my results. Maybe some of them look a little too much like 60s tie-dyed t-shirts for my taste. I really wanted to spend a second, less rushed, day... further experimenting with this method. However, we moved on.

Day-two, we chose one of our larger pieces of felt and constructed a small, hand-bound, wrap-cover journal. Here's mine... the felt, the bound spine and the finished book...

Robin Atkins, felt used for hand-mand book, wrap style
Robin Atkins, hand-mand book, wrap style with felt cover, binding detail
Robin Atkins, hand-mand book, wrap style with felt cover
At the end of day-two, we selected felt from our stash to make an embellished mini-book with Coptic binding, like the one Chad made pictured above. That evening our home work was to complete the thread embroidery and beading on both the front and back covers of our books. Here is the felt I chose.

Robin Atkins, resist-dyed felt for making cover of Coptic book
Two other students joined my roommate and me in our room... beading, stitching and talking until well past midnight. That was the most fun of the whole workshop for me!

Below are my two embellished covers ready to bind into a book.

Robin Atkins, embellished felt for book covers
Below are all the embellished, felt cover-pieces made by the students in our class.

embellished felt for book covers made by students in Chad Alice Hagen class
Below are pictures of my book, which I finished on the late ferry home just last evening!

Notice that the covers have a hand-stitched edging. We did this with the same waxed linen cord that we used for binding both books. This took longer than any of the other steps and was quite difficult. None of the students finished their edging or had time to bind their books in class. Fortunately, we received good handouts with excellent illustrations which I was able to follow for the binding.

Robin Atkins, hand-mand Coptic book, binding detail
Robin Atkins, hand-mand Coptic book, detail edging stitch
Robin Atkins, hand-mand Coptic book, front cover
Robin Atkins, hand-mand Coptic book, back cover
I love constructing hand-made books!!!! And I love working with hand-dyed wool felt. I'm not so sure I love the dying process, especially the chemicals, the need to carefully monitor time, temperature, water-acidity, etc. I don't think I'll be buying any dye... but I would happily join a dye party at the studio of one of the other students!