Tuesday, November 12, 2013

Micro-Macramé - New Again - 50 Years Later

Macramé


If you're around my age, the word "macramé" conjures up a host of crazy, knotted memories from the late 1960s and early 1070s - Although the pieces shown below were not made by me, I certainly did some very similar work. Sadly, it's all gone and I have no pictures of it...

It started with one ball of string and a few plant holders,


which got bigger and fancier as we got hooked on knotting.

Belts and

purses were next for me,
followed by bottles!


We graduated to more and bigger balls of string
as we started making whole room dividers and curtains!

But after a year or two,
we grew tired of wooden beads, plain string and cramping fingers.
We moved along to something else, never looking back...
until now!

Introducing... ta-dah...

Micro-macramé!

This is a necklace designed and knotted by Joan Babcock, one of today's most talented and prolific macramé artists. I've been smitten with her work ever since a friend gave me a link to her website. This particular piece is an example of a type of macramé called Cavandoli knotting.

Needless to say, after seeing Joan's micro-macramé jewelry and sculptural pieces on her website, my interest in knotting was re-kindled! Thus I hounded the program chairman of our local textile guild until she booked Joan to come teach for us. A couple of weeks ago, she arrived, fresh and genuine from Santa Fe, ready to share her techniques, design process, and art with us for two days of class and a slide lecture.


The first day, we knotted this bracelet, using diagonal double half hitches and square knots. I found the knotting came back quickly, some sort of kin-esthetic finger memory from 50 years ago surfacing almost immediately!


The second day, we learned Cavandoli knotting,  a combination of horizontal and vertical double half hitches, and made this pendant. The cord is #18 nylon, sold in bead shops as S-lon or micro-macramé cord, available in more than 50 colors, a long way from plain old white cotton string we used half a century earlier. Cavandoli knotting results in a solid piece, with the colors variable. It reminds me both of fair isle knitting (where the non-active color of yarn is carried behind the work), and of needle point (where each stitch is distinct). The pendant is only an inch square, and there are 680 knots if you count each double half-hitch as two knots. Obviously, you have to like "small" to want to do this work, as the knots are each about as small as a size-15 seed bead, maybe a bit smaller.

If you know me, you know I like small. I am so hooked! Fortunately I have a stash of the cord in various colors (because it's what I use for finger weaving) and a few (LOL) beads. Because Joan's teaching and books are fabulous, clear, step-by-step, and enabling, I had no trouble at all getting started. Here's what I've made in the past two weeks...


First I made a couple pair of earrings to go with my corduroy "big shirts."
These took about 1.5 hours per earring to make.

Then, copying the design idea from a bracelet Joan was wearing while teaching, I started this bracelet to match the second pair of earrings. I ran out of the crystals along the outside two arcs before finishing it, and am waiting now for my order to arrive from Fusion Beads.

Three days before departing for this year's quilt camp, where we are supposed to wear name tags,
I got the idea of trying my hand at Cavandoli knotting to make a pin with my name done in knots.
At 6 AM the next morning, I was still knotting.
Yikes, talk about sore shoulders and fingers.
But the next day, I finished it! Ta-dah:


The knotted part of his one is 1.75 x 1.5 inches, a total of 1,536 knots! 


 I've sewn a piece of Ultrasuede to the back of the knotting, hiding the cord ends,
which are folded and stitched to the knotting.

The final step was to sew a bar pin to the back, by stitching to the front side between rows of knotting, invisible from the front, but secure. The bar pin is one I had in my stash for a long time. Unfortunately it broke immediately when I put on the pin at quilt camp. I had to temporarily sew a safety pin to the back in order to wear it.

Which brings me to the final point of this post....

Where can I find GOOD QUALITY bar pins?

They all seem so terribly cheap, all looking like the one I used,
all wanting to fall apart at the first touch.
Please comment with your recommendations!

Thank you, Joan! Your workshops, slide lecture, and books have inspired and pleased me beyond measure!


If you like what you see here, I recommend Joan's books and DVD. You can learn it from her even if you never got hooked in the 60s. Her kits are great too, wonderful for those who don't have a stash of beads/cords, and want to get started, to see if you like doing the knotting! Her kits are listed on her website on the same page as the books and DVD.  And, good news, she's working on her next book and more kits!

Tuesday, October 29, 2013

Bead Embroidery + Thread Embroidery + Eco-dyed Fabrics


Passing through the slump of divorce and moving, I'm finally starting on a new beaded pathway. Also, I've been taking a bunch of workshops, a pleasure I've postponed while busy with my own teaching career. These workshop experiences will be the subject of a later post, after I get the pictures out of my camera and ready to post. In the meantime, here's a little glimpse of my new work.


Back tracking over a year ago, a group of eco-dyers on Lopez Island blessed me with the opportunity to join them in wrapping plant materials and assorted metal objects into bundles of re-purposed silk, cotton and/or linen. After popping the bundles into a plant-material dye bath for a while, then waiting for days to unwrap them, we garnered for ourselves a supply of eco-dyed fabrics. Since the above two sentences are a gross over-simplification of the process, you might want to turn to other sources, such as India Flint or Sweetpea's Path, for more information about eco-dying.


At first my own bundles and resulting fabrics, seen above, reminded me of old paint rags or end-of-the-world costume fabrics for a tacky movie. Probably with a lot of experience and patience, one begins to get desired and almost predictable results. I love and respect the idea of eco-dying, the connection it builds between earth and human, the lovely plant memories captured and prolonged in the fabrics, which are also natural materials. But for me, although I'm always intrigued by dyeing and printing with dye, having previously been smitten with Ann Johnston's process and workshops, and a felt-dying workshop by Chad Alice Hagen, I never follow through with preparation of my own dye baths. Finding that I'd rather bead or stitch, dyeing is not quite compelling enough to keep me going.

However, I had this pile of eco-dyed fabrics, a pile I almost consigned to rags or took to the thrift store during the move. I also had an idea percolating in the back of my mind, an idea about making fabric collage with thread and bead embroidery, layering the fabrics and embellishing them, framing the results in a narrow, vertical frame.


So one day, examining the details in my pile of eco-dyed "rags," I noticed there were small parts of them that appealed to me, such as the prints made by inserting rusty washers in the bundles, visible on the left in the above picture. This piece of linen, taken as a whole was dark, and muddy or dirty looking. But if I were to cut out just the marks made by the washers, I might have something useable.

That thought was the beginning of this:


And this:


And this:

This is the final piece (you can click to enlarge), titled Trust:


The same wonderful eco-dyers on Lopez later invited me to join them for a day of dying with indigo and lac (red/rose/burgundy dye from an insect, some of which made the narrow pinkish stripes in Trust). My results that day, combined with some remnants of Kantha stitching on cotton fabrics, provided the materials for my second layered fabric collage.

Here's a detail:


Here's another detail:


Here is the final piece, titled Northern Lights:


Since making these two pieces, two more are in progress, one with layered kimono and obi silks and one with my indigo and lac pieces. I'm excited about this new pathway and hopeful about using more of my hand-dyed/hand-painted fabrics.

It's feels really good to have recovered a little of my former beading mo-jo. I look forward to the peace and quiet of winter, when traditionally I spend more time beading!

Monday, August 19, 2013

Hand-quilting Hexie Quilt


Thank the universe and libraries for books on tape! Without them, I don't think my Grandmother's Flower Garden quilt would ever get quilted. Last week, thanks to "Uncle Tom's Cabin," I got one corner finished, probably about 1/20th of the top. Here's how it looks (click picture to see details):


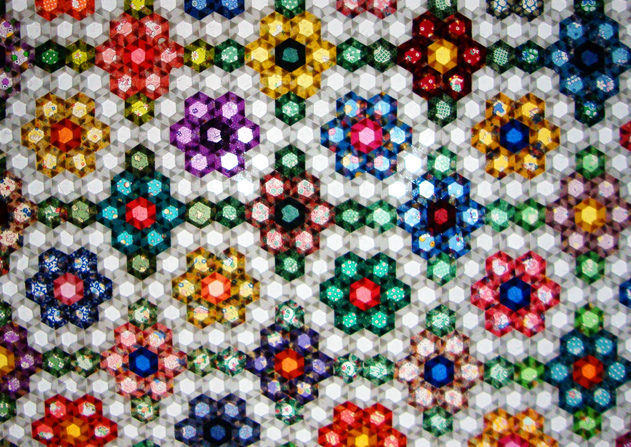
As you can see, the quilting around the petals doesn't show much, because I made a conscious decision to more-or-less match the thread color to the fabric. To me it seems the quilt is "busy" enough with over 400 different fabrics in it. I want the design, the placement of the flowers, leaves, and pathways, to be the dominate feature of the quilt, downplaying the hand-quilting.


Truth be told, there's another reason for downplaying the hand-quilting. I'm not very good at it... actually not at all good at it.  It feels like I've captured a bit of the fabric on the back with each stitch. Yet later, looking at the back of the quilt, I see "skipped" stitches where the thread didn't catch the backing fabric. Also, my stitches are uneven. I hope to improve as I continue quilting.


The pathway of my quilting stitches is shown above in hot pink. I'm emphasizing the flower shapes rather than the hexie shapes, which is the more traditional way to quilt hexie quilts. These are only 3/4 inch hexies, so the quilting is fairly dense. It probably isn't necessary to quilt around the white pathway (or outer flower petals). So I tried a couple of them just to see if it made a difference in the over-all appearance. Since it looks better that way to me, I'm going to invest a couple hundred extra hours to do it.


I really like how the quilting design looks on the back side, with the embroidered flower centers and the outlines of the petals and leaves in different colors. Isn't it sweet?!

Since I'll be listening to dozens of audio books (from a great selection at our local library), I thought it might be fun to give a little review of each one as the quilting progresses.  So here are the three best I've heard so far, all of them rated Thumbs Way Up in my opinion:

"Uncle Tom's Cabin" by Harriet Beecher Stowe, narrated by Richard Allen

Although very slanted toward Christianity, Stowe tells it like it was, developing characters and plot from real situations and people during the slavery years just prior to the Civil War. I learned a lot of history, both sad and hopeful. Richard Allen did a fantastic job of narrating this unabridged version of the book (16 CDs).

"Eat, Pray, Love" by Elizabeth Gilbert, narrated by the author

I very much enjoyed reading Gilbert's memoir shortly after it came out. It has a lot of meaning for me, as I am dealing with some similar issues in my own life; plus I enjoy her frank, often humorous, honest narrative. I wanted to hear the audio version of the book because I wanted to hear it in her own voice. Thumbs way up on her reading skills!

"Animals Make Us Human" by Temple Grandin, narrated by Andrea Gallo

Dr. Grandin concentrates on the emotional rather than the physical life of animals, although the two are clearly related. I was especially fascinated by her discussions of the "seeking instinct," described for dogs, cats, horses, pigs, cows, and wild animals, the roll it plays in their lives, and how we humans can understand them better and improve the quality of their lives by giving them opportunity to gratify this instinct.

Tuesday, July 16, 2013

Donkey Tale - Good News!

Even knowing this is an off-topic (no stitching or beads involved) tale, I just had to tell you the good news about Don-kee-oti, otherwise known as Sweetie.


Here we are three months ago when Don-kee-oti was pastured on the corner of Beaverton Valley and Egg Lake Roads, across from the painted rock. My "wasband", Robert, after discovering her by the fence one day, decided to ask her owners if he could feed her carrots. Receiving their permission and buying 4 pounds of carrots, which he kept in his pickup, he started feeding her two carrots each time he went to town.


Soon I joined in the fun, feeding her one of the carrots whenever we went to town in the pickup, gradually being allowed to pet her nose, then her ears, and finally her face and neck. Knowing the sound or look of both our vehicles, she would run to the fence every time we pulled up.

One time, Robert got out of the truck, held up her carrots, but, because of traffic, didn't immediately cross the road to give her the treat. Slowly, she started to work up her breathing and lungs, until after several loud "hees," she let out an earth-shaking bray. "GET OVER HERE, NOW!" she was saying.


Other than her adorable personality, we noticed that she didn't seem to be very healthy. Her coat was caked in mud, she had several skin lacerations. Then one day shortly after I moved 7 miles away to my new home, she disappeared. We feared something might have happened to her... and we missed her terribly. Kept in the truck with the hopes of her return, the remainder of her carrots rotted.


Fast forward to a week ago. There's a walk I enjoy from my house down a dirt road, one that turns into little more than a path through the woods and brush, one that climbs up and up, until it reaches a lookout, high on a ridge, with a nearly 360 degree look over the island and all the way across the Strait of Juan de Fuca to the Olympic Mountains.


Last Thursday, taking a slight wrong turn on my walk, I came face-to-face with a beautiful, well-groomed donkey standing in a fenced pen with a small shelter, located about 50 feet from a home. Reminding me of our pal from months ago, I queried, "Don-kee-oti, it that YOU?" Her ears jerking up and forward, she turned toward me and came to the edge of the pen as close as she could get to where I was standing, staring fixedly at me, and (I swear) smiling.


But this donkey looked younger, much more healthy, much lighter in color. How could it be she? We looked at each other for a few moments, until, fearing I was trespassing on somebody's property, I turned and walked on up the road.

A minute or two later it started, first the heavy breathing, then the repeated "hee," and finally the same sound-barrier-shattering HEE-HAW Robert described from when he delayed crossing the road. "WHERE ARE MY CARROTS?????" I knew it then. It must be Don-kee-oti! But how did she come here and how could she look so different?

Last night I got the answers to these questions by knocking on the door of a stranger, introducing myself as someone who loves donkeys, words tumbling fast from my mouth, about her braying, about the carrots, about how I thought she recognized me. The gentleman at the door, a little nonplussed at first, eventually warmed up enough to tell me about her.


They had gotten her 2 months ago, he said, and begun the process of cleaning her up... trips to the vet, a bath, daily brushing, a healthy diet low in sugars. His grandchildren, when they come to visit, ride her. "She's a gentle, sweet gal," he told me. "Yes, I know that," I replied and told him more about feeding her and our worry when she disappeared.  He gave me permission to give her 2 carrots every time I walk up that way, which of course, I'm now even more motivated to do! And to think... there she is, just a five minute walk from my front door! Don-kee-oti is back!

Wednesday, July 03, 2013

Hexie Quilt - Embroidery Quilting in Flower Centers

This is WAY, WAY fun! I'm listening to books on tape, sitting at my big bead tables, embroidering the centers of the hexie flowers on my Grandmother's Flower Garden quilt!!! The embroidery serves as both embellishment and quilting, although not all of the stitches go through all the layers.


Here's how one of the flowers looks. Of course you can see the basting stitches which hold the top, batting and back together while I quilt. I'm using a single strand of embroidery floss for each flower center. The longer spokes are just on the surface, while the center knot and short stamen (spokes) go through three layers, quilting them together. It looks fairly neat on the back.


Here's how a cluster of the flowers looks (click on picture to enlarge and see detail). As you can see, I'm matching the thread color (more or less) to the fabric color. At first I considered doing all the centers in various shades of yellow floss, but later decided I don't want the embroidery to be that obvious. Instead, I thought matching it to the fabric color would add a subtle detail, one that would only be noticed when viewing the quilt closely.

After finishing all the centers (estimate 60 hours), I'll begin to quilt around the flower petals with standard quilting stitches using a "harmonizing" color of 50 wt. thread.

Sunday, June 30, 2013

Hexie Quilt - Paper Pieces are GONE +Tips

I don't really know how I can spend so many hours working on this quilt, enjoyable hours, inexplicably engaging and not boring hours, time I crave almost like an addict craves a fix. It must be what I need right now, meditative, quiet time.

During the past two weeks, I starched and pressed the back, removed all of the basting stitches and paper pieces, sandwiched the quilt, and began the long hand-quilting process. Pressing and starching (with Best Press, the scent-free variety) helps the hexies to keep their proper shape while and after removing the paper pieces.


Snipping the basting threads and lifting the stitches back to the knots on each end was fairly easy with these fabulous seam-ripping scissors, which I believe are actually suture removal scissors. I highly recommend them! Even with this great tool, it took about 25 hours to get all the stitches removed and another 4 to remove all the papers.


After working for a few hours on it, I started saving the threads. Quite a pile, don't you think? I might try to make an art project with them, spreading them out on a heavy plastic sheet covered with a PVA glue/water mix, arranging them into some sort of picture and then, when dry, appliqueing them onto a background.

Back to the quilt, the next step was to remove the paper pieces. Checking the quilt carefully after finishing, I found 5 or 6 I had missed. Thinking they were all out, I again pressed the wrong side, finding 4 more un-removed paper pieces. Now I had them all... right? Wrong.

I certainly did not want to get the quilt all basted together, start hand quilting and find paper pieces still inside some of the hexies. So I got the idea to hang the quilt top over the edge of my work table in a darkened room with a couple of lights under the table.


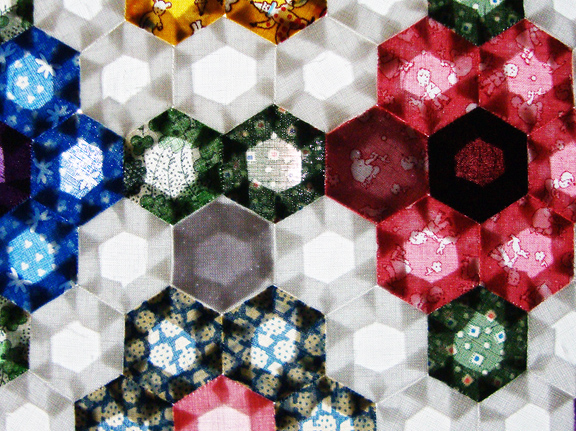
As you can see above, the effect was stunning, like a stained glass window in a cathedral (click on picture to see it bigger)!


Did I find more paper pieces hiding? Yes, three more showed quite clearly. In the photo above, you can see two of them, one in the white pathway of hexies, the other is one of the pink flower petals. The center of that same flower looks suspicious as well, but it was just the dark red fabric.


Now I'm willing to bet all the paper pieces are out. Of course I saved them to re-use on the next hexie quilt... Did I really say that? Eeeeeeek!

*    *    *    *    *    *    *

Basting Tip


I started basting the fabric around the paper hexie pieces using "junk thread," old cotton and polyester thread, bits and remains on nearly empty spools. I wasted a lot of time because the threads tangled and knotted, especially when I tried to use a longer thread. Using a shorter length (about 2 feet) helped a little with the tangles, but took longer to repeatedly have to thread the needle. I was using a regular sewing needle, one that was a little difficult to push through the card stock of the paper pieces.

Finally, I hit on the perfect thread/needle combination! Here it is, worth every penny of extra cost, and pennies sums it up, not dollars:


Basting thread - YLI glazed, 100% cotton quilting thread - I basted with lengths up to 48" long, and it never tangled or knotted, speeding up the basting process by at least 50%.


Basting needle - Foxglove Cottage straw needle, size 9 - Fabulous, strong, just the right length needle! It even kept its sharp point after basting through 100s of paper pieces. I used only three to baste over 4,000 hexies! Also, straw needles in size 10 were perfect for whip stitching the hexies together. I'll probably try them for hand quilting as well. Most quilting shops carry at least one of two brands, sometimes Foxglove Cottage, sometimes John James, both seeming equally good.

Friday, June 21, 2013

Hexie Quilt - To Fix or Not to Fix?

For the past few days, I've been hunkered down over my beading tables, tables currently cloaked with the top to my Grandmother's Flower Garden quilt, removing basting stitches from more than 4,000 hexies, a job that took about 24 hours.


Here's how it looked last evening with all the stitches finally removed. After taking the above photo, I ran my fingers lightly over the surface of the quilt top, looking, like a person reading braille, for any basting stitches I might have missed. They were there to be found, I assure you. I also found something else.


Do you see what I see? Oooops. How on earth did I get five hexies of one fabric and one from a different fabric in the same flower? See it, the one at center bottom? It's a slightly lighter blue print, one with little white flower, not little red flowers like the others.


Thinking I may have switched hexies in "stacks" for two different flowers, I located the flower made with the "little white flower" print. Ah, no problem there. It was as it should be. I guess it will always be a puzzlement to me how just one wrong hexie got into just one of the flowers.

Back to the problem flower, "to fix, or not to fix" questions buzzed through my thoughts. Would it bother me forever? Would I always notice that one hexie petal, the petal that didn't match its mates? Could it remain as a sign of humility, of acceptance that I am an inexperienced quilter, who like everyone else makes my share of mistakes? Would I offer apologies for it to friends looking at the finished quilt? What if I tried to fix it and cut the fabric of a neighbor hexie as I was removing it? Would it be difficult to replace?

As I do many time when facing a quilting question like this, I talked with my friend, Lunnette, who has been quilting much longer than I have. She too has been making a hexie quilt, although hers is not traditional like mine. One reason I like to consult with her is because she never seems to TELL me what to do. As usual, she just offered a few comments, telling me how she replaced one of the hexies in her quilt, finding it a fairly easy process, mentioning how she couldn't "live" with the way the original hexie looked. She reminded me that we knot at the beginning and end of each little seam, so that ripping it out wouldn't cause unraveling of adjacent seams. She told me how she lifts a stitch in the center of the seam with a pin so she can get the point of the scissors into it without risk of cutting the fabric, unraveling the seam from there with the pin or a seam ripper.

OK! Searching through my 30's reproduction fabric stash, I found the correct fabric, cut a new hexie, basted it, removed the problem hexie following Lunnette's method for ripping the seams, and stitched it in place.  Here you are! All better!


Truth be told, I probably would have been fine with it the way it was; after all, even after stitching the flower, stitching the white hexies around it, and stitching the quilt top together, I hadn't previously noticed it. But, I'm glad I decided to fix it, because of the value of the learning experience. What would you have done and why?

Next step? Turn it over and remove all 4,000+ paper pieces from the back side, another tedious and time-consuming job, one that I completed today!

My next post will be all about Tips for Hexie Quilts, things I've discovered, mostly the hard way, things I don't want to forget if I ever decide to do another one of these, things that might even help you if you're making a paper-pieced hexie quilt.

Thursday, June 13, 2013

Hexie Quilt Top Almost Finished!

I began making three-quarter-inch hexies for a traditional Grandmother's Flower Garden quilt on March 6, 2012.

In the following 15 months, approximately 910 hours of work later, I have nearly completed the top!!!!


Here I am holding up the top, peeking through the last few feet of the last seam still to be sewn. Holding it as I whip stitch along each 3/4" seam, joining hexie to hexie, takes a tremendous amount of finger strength because of the weight of the rest of the quilt pulling it out of my grasp. The weight is more than you'd imagine because the paper pieces are still in each of the hexies.


When I finish this seam, the next step is to iron the top, and possibly spray starch it. Then I'll remove the basting stitches and the paper pieces. Does anybody have any thoughts about the spray starch? Is it a good idea? Is there a brand or type you've used successfully?

Then I have to find a place where I can lay out the back, the batting, and the top on a large floor space or tables. I plan to baste the layers together rather than pin because I think know it will take me a L-O-N-G time to quilt and the pins might leave permanent holes in the fabrics. Yes, I'm going to hand quilt it. I've made a faithful reproduction quilt so far and want to keep it that way if possible. Yes, it will be hugely challenging and character building. Oh well...

Just in case you're interested... here are the steps and the approximate time to complete each of them.


There are 4,428 hexagon-shaped pieces (hexies) in this quilt top. The size of each hexagon is 3/4" measured along one edge.


I used approximately 330 different prints and solids, all of them reproductions of 1930s fabrics. To wash and iron these fabrics, plus cut and baste 4,428 hexies took approximately 270 hours. That's almost 7 solid work weeks just to get the hexies ready to stitch together!


The most fun part was making the flowers, choosing a solid color for the center, and stitching the hexie petals around the center. There are 238 flowers in the quilt. Each flower is a different fabric, although I only used about 20 different colors for the centers. I estimate it took me about 100 hours to stitch the flowers. I'd do this step again in a heart beat, because they are small enough to be easy to handle, relatively quick to sew, and ever so pleasing, each different, each precious in its own way.


The next step was a little more boring... sewing the plain white pathway hexies around 130 of the flowers, which added another 130 hours of hand stitching.


I didn't count the hours it took me to layout all the flowers in a pleasing arrangement and decide which green hexies I would match to which flowers (to suggest leaves) in alternate rows. I'm going to guess about 10 hours, maybe more, because I did it in several stages. The picture above shows the last stage of the layout process, after I'd already stitched many of the flowers together in sections of about 12 flowers.


Making the flowers and stitching the white borders around them is easy lap work. Sewing them together starts to get difficult. I wrote the row number and column letter on the back of each flower after laying them out, so I could keep them in the right order as I sewed them together. I first made large sections, like the one pictured above, about 4 rows deep and 4 to 6 flowers across.


At this point, I decided to add a double border around the whole quilt. Working with the outside sections, I added the border hexies. Then I sewed the sections into larger sections that went all the way across the quilt, still 4 rows deep.There were 7 units spanning the width of the quilt top. The last step was to sew these 7 units together. The picture at the top of this post shows me holding up the quilt with just under half of the last seam yet to sew. This process got more and more difficult as the pieces got larger... It's difficult to hold (very tired fingers, can't sew more than 1 or 2 hours at a time), heavy, takes up a lot of space (no longer a simple lap job... plan on the whole sofa). Time for joining the flowers together to complete the quilt top? It took about 400 hours.

The finished size (before quilting) is 71" x 93", which is a nice blanket size for a single bed, or big enough to use as a topper for a full or queen bed. Total time to hand-sew this quilt top was approximately 910 hours, which is equivalent to 22.75 work weeks, or nearly 6 months on the job.


Why do we do this? Why spend so many hours hand sewing one quilt? I don't know if I would have accepted the job if I had realized how many hours it would take. However, it has been engaging most of the time. Plus, I am able to watch movies or programs on TV while I'm sewing, and many of the hours were spent in the enjoyable company of my quilting buddies. (Some of them are also working on hexie quilts.) All in all, I'd give it close to 5 out of 5 stars as jobs go.

I'm a tad worried about hand quilting it. I hope it's manageable, that my hands will hold up to the effort of it, and that I don't get too bored. I'll keep a time sheet on it and report back after a while.

Oh, and by the way, now you understand why I haven't been blogging much during the past year and a half. It also explains why I haven't finished my Bead Journal Projects for 2012 or 2013. That's the real drawback to making a quilt like this, the one regret I have about it.