Saturday, May 16, 2015

"Square Dancers" - Shimmer Quilt

Kitty Sorgen, quilter extraordinaire, and Jenny Bowker, the pattern developer, are to blame for this madness! Shimmering Triangles Jenny calls it, and shimmer it does. In fact, it can be over done to the point where it's difficult to look at. But not Kitty's... Kitty, a member of our local guild and the best colorist I know, brought her shimmer quilt to Wednesday night quilting a few months ago, and

WHAMMMO!

I fell in love, bonkers, totally in love with her quilt. This isn't a great photo, but here it is, Kitty's shimmer quilt...

Shimmer quilt by Kitty Sorgen

It's so complex, at first I couldn't even figure out what was a block, squares looking like diamonds, color everywhere, blending in some places, shimmering in others. That day, on the spot, enough of us signed up and paid, filling a one-day class instantly.

Kitty Sorgen teaching shimmer quilt for our local guild


The class was on Feb. 21, 2015. Most of the students got a block finished in class, some even finished two blocks. Each block is 16" square (finished), and has 69 pieces. Below is one block, showing the construction of it.


Robin Atkins, shimmer quilt, block construction

Me? Nope. I didn't sew a stitch. Long after the other students had finished arranging their fabrics on the design wall, I was still struggling with the concept, of how to get shimmer, but not too much shimmer, still arranging my fabrics (photo below).

Robin Atkins, shimmer quilt, tentative layout

It was really difficult to imagine what would shimmer, what might be too contrasty and shimmer too much (for my taste), and what would have too little contrast and thus not shimmer at all.


Robin Atkins, shimmer quilt, final layout
At home, I laid it all out on my work tables again, rearranging and rearranging the fabrics over and over again. The trick, in my opinion, is to work the diagonals. I began with a layout of focal fabrics, in my case "painterly floral prints," leaving space between them for the companion fabrics. Then choose companion "read as solid prints," placing them at the corners of the focals. Like Kitty, I decided to repeat the companions diagonally between two focals. I don't know if this even makes sense, but maybe you can see it in the layout above.


Robin Atkins, shimmer quilt, completed block
Silly me, I thought sewing it, once I got all the fabrics placed, would be a piece of cake. NOT! Well, technically speaking, sewing it is OK. Although it does take some time and attention to detail to get all the half-square triangles square, and the points nice and pointy.


Robin Atkins, shimmer quilt, completed block
But cutting the triangles is another matter. To make the colors and shapes flow, it's important to blur the line of the focal square by blending the design/color outward through the half-square triangles. Above is an example of one that worked pretty well, because you can only barely discern the square of focal fabric in the center of the block.


Robin Atkins, shimmer quilt, cutting fabric for half-square triangles
And here is some fabric I turned into Swiss cheese trying to get triangles that would bring the focal fabric design outward, tricking they eye, making it look like a diamond rather than a square. (Sorry, I didn't take a picture of that particular finished block.)

Robin Atkins, Shimmer quilt, paper piecing

I make the half square triangles using paper piecing, with a free, downloaded template printed on 16 pound copy paper. Paper piecing has a learning curve, yes, but it does make for very accurate piecing, such that I didn't have to trim any of the finished blocks at all!

Robin Atkins, shimmer quilt, four completed blocks

Here is a picture of four finished blocks. You can see the way the companion fabrics repeat diagonally to form a 4-patch block between the focal fabrics. These two fabrics need to be close in value and color. If there is too much contrast, it draws the eye away from the focal fabrics and shimmering triangles. In the case above, I think the orange and pink contrast a little too much. Also on the left the lighter and darker green is also a bit too contrasty.  Fabric choices are difficult and important... Any one companion fabric has to work with two focal fabrics and the adjacent companion fabric, which in turn has to work with it's two adjacent focal fabrics. Sound complicated and challenging? It is!

Robin Atkins, shimmer quilt, ten completed blocks

It took many days (lost count) to finish the first half of the blocks (10 of 20)... and many more to finish the last 10 blocks... a bit character building. Many times, I told promised myself I would never do paper piecing or make another shimmer quilt again in my whole life!

Robin Atkins, Shimmer quilt, auditioning border fabrics

Here I've finished all 20 blocks. I've moved all the furniture out of the studio, and put it on the floor to "audition" border fabrics. Most of the shimmer quilts I've seen do not have borders, but I wanted to make it a bit bigger so it could be used for a bed quilt.


Robin Atkins, Shimmer quilt, before quilting
This is how it looks all finished, before quilting it, 90 x 74 inches.

Since the throat of my old machine is much too narrow to free-motion quilt a piece this size, I decided to get a professional to quilt it. But first I agonized some about how to do it. At first I thought it would be good to fussy quilt, making flowers in the companion fabric areas and vertical vines with leaves over the focal fabrics. This was my sketch for the idea.

Robin Atkins, Shimmer quilt, tentative quilting design

But then I saw a few quilts done like that, and the fussy quilting looked too busy, competing too much with the shimmer. So finally, I decided on using a double-leaf, free-motion edge-to-edge design. I named my quilt Square Dancers, because of the colorful costumes, movement, and squares.

Now that it's finished, guess what?  I started gathering fabrics for my second shimmer quilt. I want a spring-summer quilt for my bed in softer, lighter colors. It needs to be bigger than the first one, at least 36 blocks, to work on a queen size bed. Here are some of the fabrics I've found so far:

Robin Atkins, focal fabrics for next shimmer quilt

Robin Atkins, focal fabrics for next shimmer quilt

Robin Atkins, focal fabrics for next shimmer quilt

Robin Atkins, focal fabrics for next shimmer quilt

These are mostly designs by Philip Jacobs, one of the Kaffe Fassett Collective designers. I love his colors and designs! I will use other fabrics in my stash, but more than half of the 36 focals will be like these.

It will be fun to try this again, to apply what I've learned on the first one, to try to improve my fabric choices, always with the goal of some shimmer (but not too much) and good flow throughout the quilt. I'll also try to pick up my speed a bit, without sacrificing accuracy in the piecing.

Expect a post about #2 shimmer quilt in a couple of months. Right now, I'm still gathering fabrics.


Tuesday, May 12, 2015

Finished "Chicks" Quilt (Sue Spargo Wool Applique)

A week of finishing!!! Oh my, it feels good to finish things, doesn't it?!

Robin Atkins, chicks, wool applique, bead and thread embroidery, finished wall quilt

Last October, I started the applique process, stitching chick bodies and wings cut from felled wool onto the wool background fabric. Seven months later, 16 chicks, embroidered with threads and beads, run free! Please click the picture to enlarge it, so you can enjoy the fanciful details.

If you are new to this process, you can see the various steps and pictures of the chicks on these posts. Of course, they are inspired by Sue Spargo's exhibit at the La Conner Quilt Museum, by her book, Creative Stitching, and by taking a one-day class from her to get me going. Along the way, other books, embroideries, and drawings also inspired me.

Robin Atkins, chicks, wool applique, bead and thread embroidery

As you might guess, most of the chicks have at least a few beads. Here is one with the main motif embroidered with beads.

Robin Atkins, chicks, wool applique, bead and thread embroidery

And, here is one with just a few beads, the center of the "flowers," and one with no beads at all.

Also note that I've quilted the piece with Danish Flower Thread in a shade which closely matches the background color.

At first, I thought it would be pleasing to embellish the areas between the chicks with flowers, vines, and leaves using three close shades of the background color. Here is an example.

Robin Atkins, chicks, wool applique, bead and thread embroidery, hand quilting

It looks OK when you look at just four chicks with the flower/vine motif in the center. But when I had finished 6 of the areas (sorry no photo), some of them with larger spaces and larger vines/leaves, it looked too busy. It took away from the chicks. I couldn't tell if I was supposed to look at the chicks or the flowers. So I picked out the vines and leaves, leaving just the flowers, which weren't such a distraction.

Robin Atkins, chicks, wool applique, bead and thread embroidery, binding

After sewing on the binding, the chicks seemed to need a little warming around them. So I added a line of stem stitch in variegated pearl-cotton in a magenta color. It pleases me!

wall mount display case

Oh, and one more thing... This is a quilt, designed to hang on the wall, with lots of details to enjoy as you view it up close. But what happens to wool felt when it is out in the open? MOTH DAMAGE and DUST are the enemies. My solution? Find, buy, or have somebody make a wall-mounted display case, with a hinged door. Hang the quilt inside the case, which remains closed except when somebody wants to take a closer look. The above, found on the internet, is close to what I have in mind, with a white background of course.

Robin Atkins, wool applique ready to embellish with bead and thread embroidery

What's next in chick-land? Well, my dear niece just got married... Here is the start of her wedding gift... I'll post a finished photo soon.

Tuesday, May 05, 2015

Exhibition of my Beadwork!


Robin Atkins bringing beadwork to La Conner Quilt & Textile Museum for exhibition
Bringing my beadwork to the Museum
Many, many moons ago, when I first started beading, I made an important decision about my future beading career. I decided not to be in the business of selling my beadwork. That’s a huge and somewhat uncommon decision for an artist, because most feel that in order to justify the time it takes to do beadwork and the cost of materials, it has to be sold. Many also take sales of their work as a marker of their skill as an artist… “if it sells, then I am an artist; if I sell lots of it, then I am a successful artist; if a gallery takes my work, then my work is good,” etc.

Pre-opening demonstration of bead embroidery process by Robin Atkins, with Becki Applegate and Christy Hinkle
Demonstration prior to the Opening on April 1st.
Robin Atkins with a visitor at the opening of Beadlust exhibition


Robin Atkins - Beadlust, exhibition at La Conner Quilt Musuem - Opening reception
My dear friend, Liz, drove to La Conner for the opening!
Those are tempting thoughts, aren’t they?! However, I had previously been a metalsmith, making one-of-a-kind silver and gold jewelry for 5 years. During those years, I experimented with various methods of selling my jewelry – craft fairs, home shows, commissions, galleries – and found that I hated all of them. Marketing my work, talking about it, looking in people’s eyes as they walked by my booth without stopping, answering questions about how I made something, knowing the person asking was also a metalsmith and might copy my ideas – all of that was like a millstone around my neck, depressing, daunting, and no fun at all.

Beadlust - exhibition of Robin Atkins bead embroidery at La Conner Quilt Textile Museum

So, when beadlust jumped in my heart, I almost immediately decided I would not sell my work. Instead, I would make my living by selling beads and beading supplies, teaching others how to bead, and writing books about beading. It’s been a great pathway for me, almost always fun, challenging, exciting – and, it has paid my bills and given me the means for many beady adventures. To be sure, I have sold some of my beadwork, especially jewelry, here and there. But it’s always when opportunity comes to me, not when I’ve struggled to be accepted for a show.

Beadlust - exhibition of Robin Atkins bead embroidery at La Conner Quilt Textile Museum

Twenty-seven years later, I am looking back down my beaded pathway with great satisfaction, pleased as punch about my initial decision. Twenty-seven years later, I also own a substantial stash of beaded objects that I’ve made over the years – beaded jewelry, bags, books, dolls, wall art, sculptures, and quilts. While many of them decorate my studio and home, some live in boxes, stored away in cabinets. I feel a bit guilty about those poor babies. Shouldn’t I get them out, brush the dust off, and sell them? Oh yeah, I forgot, I hate selling/promoting my beadwork.

Beadlust - exhibition of Robin Atkins bead embroidery at La Conner Quilt Textile Museum

All of the above is to introduce a fabulous and unexpected opportunity that came my way recently… The curator of the La Conner Quilt & TextileMuseum contacted me to ask if I would be willing to exhibit my beaded quilts and other beadwork in a one person show at the museum for the month of April, 2015. WOW! Would I be interested? You bet I would!!!!

Beadlust - exhibition of Robin Atkins bead embroidery at La Conner Quilt Textile Museum

Twenty-eight pieces! Once I cleared the pieces for the show out of my studio, the nearly empty walls and display counter was depressing. Guess what happened?  I opened up those boxes, and brought out things I hadn’t ever displayed, or at least hadn’t displayed for a long time. What great fun to see them every day this past month! I love it!

Beadlust - exhibition of Robin Atkins bead embroidery at La Conner Quilt Textile Museum

Beadlust - exhibition of Robin Atkins bead embroidery at La Conner Quilt Textile Museum

Beadlust - exhibition of Robin Atkins bead embroidery at La Conner Quilt Textile Museum

Beadlust - exhibition of Robin Atkins bead embroidery at La Conner Quilt Textile Museum

Two days ago the show closed (waaa), and my work is back home again. Here it is, all piled up on my studio tables. Nice to have it home; not so nice to decide which pieces go back into boxes.

Robin Atkins studio - Beadlust exhibition closed, beadwork back home
Exhibition closed - beadwork back home again
And then there is the question of what is to become of it in the long run. I am 72 years old. It might be time to start thinking about that. Some will go to my beady friends, and some to my nieces and nephews (if they want it). And, I’d die happy if I knew that some of the best pieces were in the permanent collection of a museum or two. Rosie, The Uncaged Hen, for example should be in a museum, don’t you think?

bead emroidery by Robin Atkins - Rosie The Uncaged Hen
Rosie, The Uncaged Hen
Having the show in La Conner, seeing my work so beautifully displayed there, gives me the energy to start thinking about the future of my beadwork, to make a list of my all the pieces, place an "insurance value" on them, and start talking to acquisition curators about it. Although the idea of this task seems a little like “selling my work,” the show in La Conner makes it worth the effort.

La Conner Quilt & Textile Museum, photo by Robert Demar
La Conner Quilt & Textile Museum

Sunday, April 19, 2015

Grandma's Flower Garden - 3/4 Inch Hexie Quilt - Time Study

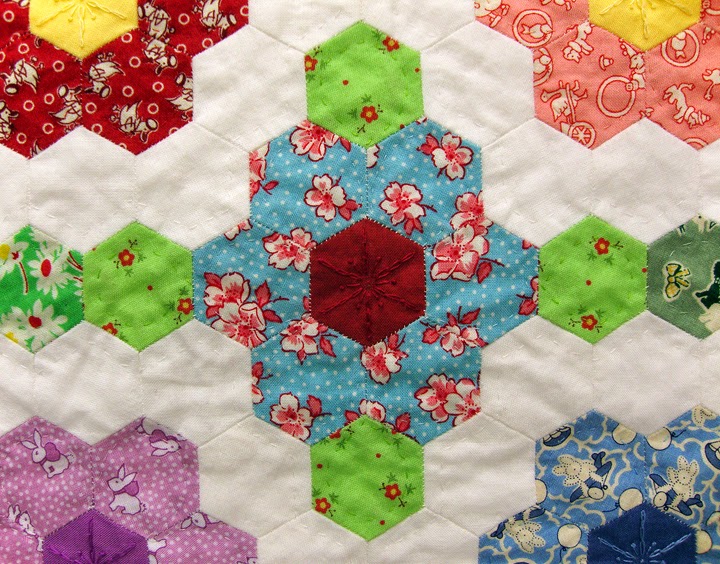
Grandmothers Flower Garden hexie quilt, Robin Atkins, flowers

As followers may recall, I started hand stitching hexies for a Grandmother's Flower Garden quilt in March, 2012... three years ago. Watching my friend, Christy, basting sweet, reproduction fabrics around paper forms, making little stacks of 3/4-inch hexagons, I just couldn't resist! These Beadlust posts show the various steps to making the quilt top and the start of  hand-quilting in more detail than this post.

Although I'm still hand-quilting, the end is in sight now. I'm hoping to finish in time for our County Fair in August.

In this post, I thought it might interest you to look at how much time it takes to complete each of the steps in hand piecing and quilting a 3/4" hexie quilt, and the total number of hours involved. I'm basing time estimates for all of the repetitive steps on how long it takes me to do a large number in one sitting, after having practiced... in other words, at my best speed.

Step 1 - Planning the Quilt and Getting Fabrics - time: 20 hours

I decided to make a version of the traditional 1930's Grandmother's Flower Garden quilt that is less common than the one with a path or ring around each of the flowers. I chose this design. Note the green hexie leaves, which form a vertical-horizontal grid.

Grandmothers Flower Garden hexie quilt, Robin Atkins, layout

The final size is 72 x 92 inches, a comfortable size for a twin bed, a total of 4,694 hexies. I wanted to use as many different fabrics in this quilt as possible.
  • flowers = 280 different print fabrics with any background color except green or white.
  • leaves = 150 different print fabrics in green
  • flower centers (repeats OK) = 25 different solids
  • double border = 1 print + 1 solid
Although I had collected 30's reproduction fabrics for a few years, I certainly needed more. From a selection of fabrics given to me, fabrics purchased in an eBay auction, and my stash, I found enough to make each of the flowers unique. Although there were not enough greens to make the leaves unique, I had about 60 different green prints, such that each is not repeated more than 3 times in the quilt. So, in the end the quilt includes more than 360 unique fabrics!

Grandmothers Flower Garden hexie quilt, Robin Atkins, fabrics for flowers

Step 2 - Wash and Iron all of the Fabrics - time: 15 hours

Yikes! A few of the fabrics I wanted to use were already washed; most were not. Knowing it should be consistent, and worrying that the reds might bleed, I decided to pre-wash and iron all of the fabrics. Doing this step in stages, as I acquired fabrics, I'm not really sure how long it took, perhaps quite a bit more than the above estimate.

Step 3 - Cutting and Trimming all of the Hexies - time: 28 hours

For each of the  4,694 hexies, I cut a 2" square of fabric, and trimmed off the four corners. Of course, I cut and trimmed in multiples, except for a few that I fussy cut individually. Again, since I did this step in stages, the above time estimate is a bit rough.

Step 4 - Basting the Fabric to the Paper Hexie Forms - time: 235 hours

Grandmothers Flower Garden hexie quilt, Robin Atkins, basting hexies
Once I learned that using YLI quilting thread for basting makes it go much faster than using regular sewing thread, I was able to baste 20 hexies per hour.

Step 5 - Stitching Hexies Together to Make Flowers - time: 105 hours

Grandmothers Flower Garden hexie quilt, Robin Atkins, whip stitching flowers
Averaging 2.5 complete flowers per hour, it took me about two and a half 40-hour-work-weeks to whip-stitch all 238 full and 42 partial flowers. There are 14-17 whip-stitches per 3/4 inch seam.

Step 6 - Stitching a White Hexie Ring Around 130 of the Flowers - time: 130 hours

Grandmothers Flower Garden hexie quilt, Robin Atkins, ringed flowers
On average, it takes me 1 hour to whip-stitch 12 white hexies around each flower.

Step 7 - Layout Flowers for Quilt Top; Note Position on Each - time: 4 hours

I didn't fuss too much about the layout, spreading out the flowers randomly, making sure the red ones were evenly spaced, and that no areas were overly dominated by one color. Assigning each row a letter and each position within the row a number, I marked each flower on the back (writing on the center paper piece).

Step 7a - Half Flowers and Double Border All Around - time 90 hours

This is an update, added Feb. 2018. (I can't believe I forgot this important step when writing the original time line.) To make 42 partial flowers to fill in the gaps around the edges of the top, I cut fabrics, basted hexies, joined petals, and then stitched the partials into the gaps. To make the outer border, I made 522 individual hexies, stitched them into rows, and then stitched the rows onto the top.

Step 8 - Sew Flowers into Small Groups - time: 90 hours

Grandmothers Flower Garden hexie quilt, Robin Atkins, flowers stitched together in small groups
To assemble the quilt top, I grouped 8-12 flowers, and whip-stitched them into a solid piece. There were 30 pieces, which took about 3 hours each to complete.

Step 9 - Sew Small Groups Together to Complete Quilt Top - time: 123 hours

Grandmothers Flower Garden hexie quilt, Robin Atkins, rows stitched together
I first sewed the small groups into rows, then stitched the rows together. As the sections got larger, the stitching took longer, making it difficult to estimate the time with total accuracy. I did a couple of time tests at different stages of the process in order to figure the above total. I completed this step on March 1st, 2013, one year after basting the first hexie.

Step 10 - Iron/Starch Top, Remove Papers and Basting Stitches - time: 33 hours

Grandmothers Flower Garden hexie quilt, Robin Atkins, pulled basting threads
Removing all the basting stitches and papers took a lot longer than I would have guessed. But when I look at the pile of basting threads, it begins to make sense.

Step 11 - Assemble Quilt Layers, and Baste - time: 12 hours

Christy and Lunnette helped me layout the back, batting, and top on the floor; then baste in a 4 inch grid. I think we pinned it first, then basted, then removed the pins. On our knees for most of the time, it sure was wonderful to have their help!

Step 10 - Quilt and Embroider the Flower Centers - time: 70 hours

Grandmothers Flower Garden hexie quilt, Robin Atkins, embroidered/quilted flower centers
Choosing a floss in a similar color to each flower center, I embroidered a flower. Intentionally, some of the stitches act as quilting stitches, while others slip between the layers and don't show on the back. Around the edges of the quilt, it took about 15 minutes per flower center. Toward the middle of the quilt, it took about 20 minutes per flower center.

Step 11 - Quilt Flower Petals - time: 106 hours

Grandmothers Flower Garden hexie quilt, Robin Atkins, quilted flowers
Quilting around the petals of each flower requires turning the quilt 270 degrees for each petal, which is why it takes at least 20 minutes per flower, longer toward the middle of the quilt when the whole weight of the quilt must be constantly shifted. There are 238 whole and 42 partial flowers. I'm figuring an average of 25 minutes per whole and 10 minutes per partial flower.

Step 12 - Quilt Around White Rings - time: 65 hours

Grandmothers Flower Garden hexie quilt, Robin Atkins, quilted rings
Like quilting the flower petals, quilting around the outside edge of each of the 130 white rings requires turning the whole quilt as I work, which adds a lot to the time it takes. I believe quilting the entire top in a diagonal grid of straight lines would take about half the time it takes to follow the curved, zig-zagging path of the hexie flowers, leaves, and rings.

Step 13 - Quilt Around Each of the Leaves - time: 79 hours

Grandmothers Flower Garden hexie quilt, Robin Atkins, quilted leaves
Not only does this step require turning the quilt as I stitch 360 degrees around each leaf, it also requires knotting and burying the tail at the start and finish of each leaf. Also I'm changing color of thread to more or less match the fabric color for each set of 4 leaves. Around the edge, it takes about 9 minutes per leaf; toward the center 11 minutes per leaf. There are 474 leaves total, at an average of 10 minutes/leaf.

Step 14 - Assemble Hexies for the Border Facing - time: 37 hours

Grandmothers Flower Garden hexie quilt, Robin Atkins, hexie strips for border facing
To face the double (print + blue) border on the back of the quilt requires 522 hexies. To sew them together, forming the border strips, takes about 1 hour per 14 hexies.

Step 15 - Trim Backing and Batting; Blind-stitch Facing to Border - time: 13 hours

There are 264 hexies around the outside edge of the quilt top. Since I have not done this step yet, the time estimate (blind-stitching 20 hexies together per hour) is somewhat rough.

Step 16 - Remove Paper Pieces and Basting from Border and Facing - time: 10 hours

Again, since I have not done this step yet, the time estimate is based on the time it took to remove paper pieces and basting threads from the quilt top.

Step 17 - Blind-stitch Facing to Quilt Back - time: 13 hours

Step 18 - Quilt Around Print Fabric Border - time: 13 hours

Step 19 - Blanket Stitch Around Outside Edge of Quilt - time: 10 hours

* * * * * * * * * * * * * * * * * * * * * * * * * * * * * * * * * *

Total Time to Complete Hand-Piecing the Quilt Top: 873 hours

This is equivalent to nearly 20 weeks or 5 months on a 40 hours/week job. It took me a year. Mostly the time flew by as I basted and hand-stitched the little hexies together. Always there was a new print to enjoy, a new stack mounting in size to admire, a growing quilt top to thrill me.

Total Time to Complete Hand-Quilting: 428 hours

Since this job isn't completed yet, the time is only a rough estimate, based on the times it took to do some of the already completed steps. In all, hand quilting will take the equivalent to 10 or 11 weeks of full-time work. I find the quilting rather very boring. After taking a break for more than a year, I started working on it again and hope to be finished by August this year. Audio books are the answer to the tedium for me.

Total Time, Start to Finish: 1,301 hours

With Steps15-19 still to complete, the total is a rough estimate. Still, it is obvious that making a quilt like this, start to finish, requires more than 1,300 hours or the equivalent of over 8 months of full time work. If I were to be paid only minimum wages (2015, Seattle, WA - $11/hr.), the cost of the quilt would be $14,311 + about $500 in materials, or a total of $14,800.  Good thing I intend to keep and use it myself!


UPDATE, July 4, 2016

Grandmothers Flower Garden quilt by Robin Atkins, detail

By June, 2015, I completely finished one corner, an area big enough to photograph so I could submit an entry form to the 2015 La Conner Quilt Festival, sponsored by the La Conner Quilt & Textile Museum. On August 7th, 2015, I received notice that it was juried into the show. Wow! That sent me into high gear for sure. After working non-stop, 7 days a week, and an average of 10 hours per day, I inserted my needle into that quilt for the last/final time on Aug. 24th, 2015, just days before delivering it to the museum. It took me 3 years and 3 months, start to finish!

Grandmothers Flower Garden quilt by Robin Atkins

I was surprised, honored, and incredibly pleased to find out it won the Curator's Award of Excellence, one of the top awards, which then qualified it to be shown at the museum for the month following the Festival. Note, the finished size is 71 x 93 inches, and there are 4,700 individual hexagons in it.


Big work for both hands, but sooooo satisfying!

733 hexie flowers, ready for design wall

In fact it was so satisfying that I've started another hexie quilt... Can you believe it? So far, I've made 733 hexie flowers for it! Although they are the same size hexies, there are no reproduction fabrics and the arrangement will be anything but traditional. Don't know why I love the hexagon shape so much... but it's certain that I do.