Wednesday, September 23, 2009

Ten Great Colors for Fall!

handmade books by Robin Atkins
One of my lesser known passions is making books by hand. The pages in these two books are all hand-painted papers. I painted the papers and constructed the book in a 2-day (whirlwind) class taught by Albie Smith at Art & Soul in Portland, OR a few years ago.

I'm showing the books because of the fall color palette I used.

I'm a great fan of Margie Deeb! I love her books about how to find and use many wonderful color combinations, especially her most recent book, shown below.

Margie Deeb, Beaders Color Palette, book cover
Forget the color wheel! Margie gives fun and easy to follow color palettes ~ everything from predictable to waaaay out of the box ~ and examples of beadwork (some of which I contributed to this book) showing how specific palettes might be interpreted with beads .

Margie asked me to review her latest Color Report, which explores the possibilities for the ten Pantone colors predicted (check out this fun Pantone link) to be popular this fall and winter, a forecast formulated long ago and used by clothing and assessory designers for fashions released now and into the late fall. You can explore the beady possibilities for this palette of ten great colors with the help of Margie Deeb's latest color report: Fall/Winter 2009 Color Report for Bead & Jewelry Designers, which is available to purchase on line here.

Below are the ten colors. (Color on the internet is always variable depending on your monitor and computer settings. These are approximations of the exact Pantone colors, which are specified by the numbers shown.)

American Beauty, #19-1759, a feel-good color

Pantone color, American Beauty
Purple Heart, #18-3520, refinement and sensuality

Pantone color, Purple Heart
Honey Yellow, #16-1143, classic color of autumn

Pantone color, Honney Yellow
Iron, #18-1306, a grounding color

Pantone color, Iron
Burnt Sienna, #17-1544, earth and sunsets

Pantone color, Burnt Sienna
Nomad, #16-1212, bridge between grey and beige

Pantone color, Nomad
Rapture Rose, #17-1929, vibrant yet soft

Pantone color, Rapture Rose
Warm Olive, #15-0646, touch of sophistication

Pantone color, Warm Olive
Majolica Blue, #19-4125, exotic flair

Pantone color, Majolica Blue
Crème Brûlée, #13-1106, timeless neutral color

Pantone color, Creme Brulee

The names of the colors are by Pantone, but in her report, Margie supplies the numbers for matching Delica beads, gemstone names, etc. She invited seven guest artists to work with her, creating jewelry where the color choices are based on various combinations of these ten colors. There's something here for everyone.

Even me! I'm not much of a fall colors person (except in nature and books). I rarely wear fall colors. However, as I read through the report and looked at all the gorgeous examples, I couldn't help getting really excited about playing with some of these colors. Inspired by Margie's color report, I made my own palette as shown below.

fall colors palette using some of Panetone forecast colors for fall-winter 2009
I wouldn't bead this exact design, but will probably stick to the proportions of color. OK! Now I have to go check my beads and fabrics to see what I have in these colors for my next bead embroidery project. Whooohooo, this will be a blast! I'm on my way to my stash right now!

Oh, and YES, I give an A++ to Margie's report. If you want to play with color, it's a grand place to start. Not only for beaders, it will also work well for quilters, painters and anybody using color in their art!

Monday, September 14, 2009

BJP Finished for Year!

bead journal project, robin atkins, bead embroidery, heat gone haywire
Heart Gone Haywire is the title for my August BJP piece.

Starting in July, I began having episodes where my heart beat rapidly, sometimes very rapidly and sometimes quite irregularly. When it kept happening, I finally went to our clinic and did the EKG thing. It looked normal, so they put me on a Holter Monitor (EKG you wear for a day). On that particular day, I only had two very brief episodes.

So, long story short, I'm now wearing a King of Hearts Monitor for 4-6 weeks. It looks like a pager, clipped on my jean's pocket and it's wired to my chest with snap-on adhesive pads (nasty). Whenever I have an episode, I push a button to record a minute of EKG. It's a smart monitor, because it can also auto-detect and record episodes (when I'm sleeping or not noticing). Once a day, I telephone an 800 number to send the recordings.

After he reviews the recordings next month, I'll meet with my cardiologist and we'll decide what to do about this. In the meantime, it's disturbing and a bit worrisome. Although I understand that modern medicine does heart fixes really well, my remote island location contributes to my concerns. Don't know if it's the heart or the worry (or both), but I'm feeling slow and tired most of the time now.

bead journal project, robin atkins, bead embroidery, heat gone haywire, totem animals detail
So this piece is all about my heart, showing its electrical system misfiring and my two totem animals (rabbit and tiger) who are there to comfort and guide me through this process. The white eye-lash trim around my heart is protective and healing (I hope).

Please note: I wrote three short posts today! Scroll down to see the other two or click here (teaching - last chance) and here (BJP presentation - Portland, OR).

Teaching Bead Embroidery

Just a reminder that I'm teaching a two-day Improvisational Bead Embroidery workshop and a half-day Beaded Button class in Phoenix, AZ - Oct. 2-4... Specifics are here.

I'm winding down my teaching career now, so this may be the final opportunity to take my two-day bead embroidery workshop.

After teaching beading (especially my favorite subject - bead embroidery) for 20 years, I still love to teach... still love to turn the creativity up a notch for both beginning and experienced beaders. However, the travel and prep are now highly dreaded and stressful for me. It feels like the time has come to let go of the teaching part of my beading career.

BJP - Portland Bead Society Meeting - Sept. 16

If you're in the vicinity of Portland, Oregon, you're invited to the Bead Society Meeting - Wed, Spet. 16th - 7 PM, in the Portland General Electric (PGE) Building - 3700 SE 17th, Portland (between Holgate and Powell on SE 17th).

I will be showing pictures of 200 Bead Journal Project pieces from the first year created by 42 of our members!!! Also, I will have all of my pieces for both years and the work of 3 other members on display!

If you are or were a BJP member and will be attending the meeting, PLEASE bring your BJP pieces for show'n'tell.

Hope to see you there!
Robin

Saturday, September 05, 2009

Work of the Artist ~ The Space Between

Pacific Madrone, madrona trees in our yard
These Madrona (aka Pacific Madrone, aka Arbutus) trees like our 5-acre, ridge-top property and we are quite happy to have them, even though they shed piles and piles of leaves every year - woody leaves that can take many years to decompose.

We are especially fascinated with their bark and the way it changes throughout the year. We love the way its colors are highlighted by the warm light of afternoon sunshine or glisten and become saturated after a rain shower.

Pacific Madrone, madrona trees red orange bark
Here is how the bark looks in the spring... red-orange, really quite a deep color. Then in the late summer, the bark fractures and peels, revealing a new, yellow-green bark color.

Pacific Madrone, madrona trees yellow green bark
Above is how it looks after the peeling is complete and before it begins to turn red again.

Pacific Madrone, madrona trees, shade side bark on trunk
Even the more dense bark on the north (or shaded) side of the trunk fractures a little in the heat of summer.

Last evening Robert and I were headed to town to hear a lecture at the community theatre. On the trail to our garage, we simultaneously stopped in our tracks to investigate and admire three small fractures that were highlighted in the glow of sunset. I didn't have my camera with me then, but this is how the spot looks today at noon.

Pacific Madrone, madrona, fracturing bark
The PowerPoint presentation we attended after our Madrona moment was by James Hubbell, a visionary artist and architect. We had also attended a "conversation" (Q & A) session with him the previous day. I was struck by his wisdom, especially regarding the work of the artist.

In several different ways, he explored his belief that
the space between the edges of two different things is where beauty, understanding and energy resides. The work of the artist is to create a bridge between these edges - between dissimilar and/or opposing elements... sad and happy, love and hate, east and west, Russia and USA, poor and wealthy, red and green, Venus and Mars, soft and harsh - and to examine the space between them.*
Like the Madrona bark!

His words make me think about my beading and how/if/where I might have created a bridge or studied the space between. The best example is probably my BJP piece from last spring showing the part of my husband's personality that is deeply affected by his parents' alcoholism and the part of him that is clean, sober and public. You can read/see more about it here.

improvisational bead embroidery by Robin Atkins, bead journal project, the wall
I guess in this case, the space between is a narrow, wiggly wall with small holes in it where light enters dark and dark enters light. I recall feeling really good about this piece... it was compelling and important from start to finish.

Maybe Mr. Hubbell is onto something significant about art, worthy of consideration. In the future, as I contemplate a new piece and a tickle of an idea comes forward, I will think about the edges of the idea, where it meets something else. Will I find more energy there? I think so!

Pacific Madrone, madrona, fracturing bark
Is the photo above (the one that most clearly explores the edges and space between old and new bark) the most interesting of the Madrona pictures on this post? What do you think? What space between have you explored recently?
_ _ _ _ _ _ _ _ _ _ _ _ _

* The statement above is my interpretation of Mr. Hubbell's words, not a direct quote.

PS ~ Sept 6th ~ The comments on this post add several intriguing threads to the topic... Please take the time to read them!

Tuesday, August 25, 2009

Memory Box and How to Make It

Memory Box


memory box, bead journal project, robin atkins, bead embroidery
Stitching my Bead Journal Project piece for July on neckties I had made for my Dad (here), gave me the idea to create a Memory Box I can use to safe-keep letters, photos and other remembrances I have of my parents.

The box, made from scratch using book board, fabric, thread and beads (no glue!), is 10" x 13" x 5" high, which should be large enough to hold most of the dearest things I have.

I'm going to show pictures and write about how I made it.
But first I just want to say that it's not so much a tribute to my parents (although that's part of it). More significantly, this box, with thousands of hand stitches and hundreds of hours in its making, represents a connection with them. In my mind and heart, each stitch binds us together - birth, memories, history, love, good-bad-ugly-quirky-beautiful, death - all that we were and are to each other symbolized by all the stitches in this box. I put me in the box too, in the form of quilted rabbits and hearts all around the inside. You'll see.

Many Ways to Make a Box ~ Here's One of Them
To make the box... I used a rather improvisational or just do it approach, since I've never made one before and didn't have a clear idea about how to do it. One step at a time... do what I know and figure out the rest later. That's one of my guiding lights. The other is: it doesn't have to be perfect.
First I decided on the finished size. Using a box-cutter, I cut the pieces for the box and lid from heavy, dense, book board (Davey board). The lid pieces are about 1/8" larger all around than the bottom pieces.

Then I chose some fabrics that I loved and picked one of them to cover the inside bottom of the box. I happened to be going to an all-day quilting sewcial at our local Sr. Center and needed something to do. So I decided to quilt the bottom of the box. I sandwiched thin cotton quilt batting between the bottom fabric and some muslin and then stitched using embroidery floss.
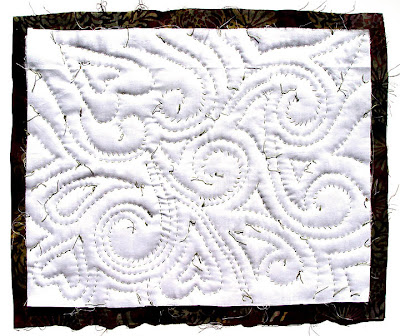
quilted fabric, bottom of memory box, back side, by robin atkins
Here's how it looks. It's improvisational quilting... I just made a spiral shape in the center and worked my way out using a running (quilting) stitch and some embroidery stitches.
Some of the quilters wondered why I was bothering to quilt the inside-bottom of the box (where it won't show) and with a thread color that hardly shows. I didn't really know why at the time... now I think it's part of that stitching Mom, Dad and me together thing I mentioned above. Seeing it isn't as important as doing it.
quilted fabric, bottom of memory box, detail, by robin atkins
This is a detail.

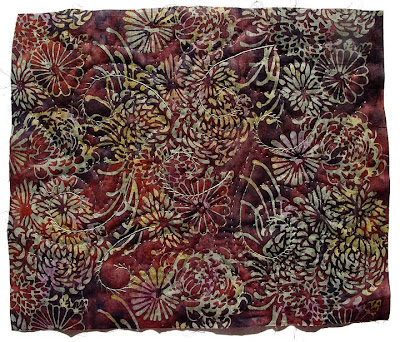
quilted fabric, bottom of memory box by robin atkins
This is how it looks on the back side.

Quilting the bottom was fun! I enjoyed it so much that I decided to quilt the inside of the sides too!
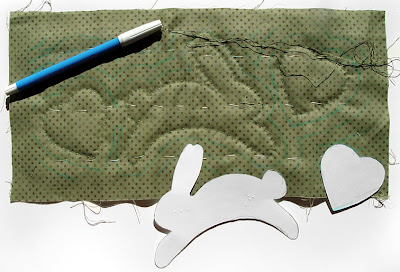
quilting pattern for sides of memory box by robin atkins
I cut a template of a rabbit (my totem animal) and a heart (my favorite symbol) from stiff paper and drew around them on the fabric with a water-erase marking pen. This is the start of one of the sides.

quilted side of memory box by robin atkins
Above is one of the finished sides. Again, my quilting was fairly improvisational and I added some embroidery stitches as well. Each side is different.

quilted side of memory box, back side, by robin atkins
This shows the back of the same side. To add a little more dimension to the rabbits and hearts (so they would show more), I cut the shapes out of stiffened felt and whip-stitched them to the back as you can see above.

easy felt
Stiffened felt (Easy Felt), such as I used to pad my quilting, is also great for beading - inexpensive, stiff and easy to stitch through. I get it at Michaels.

Now came a part that I didn't photograph... sorry.

I made a tight-fitting sleeve for the bottom of the box and each of the four sides. To do this, I cut the outside fabric, laid the cut out book board on the wrong side and drew around the book board. Then I put the quilted inside fabric and the outside fabric right sides together and sewed just outside the drawn line on three sides. After turning it so the seams were inside, like a pillow case, I slipped the book board into the sleeve.

The fit needed to be snug. One sleeve was too snug and I had to rip one of the seams. Another was a tad too loose and I had to re-stitch inside the previous stitching on one seam. It was a learning process... I got better at it by the time I did the lid. These seams I stitched by machine.

Next, I turned under the remaining edges and whip-stitched the sleeves closed by hand, completely covering each of the box pieces.

picot edge stitch, drawing by robin atkins
To attach the sides to the box bottom, I decided to use the picot edge stitch. Above is a drawing showing how to do this stitch. I first attached one side to the bottom. With each stitch I tried to catch 4 tiny bits of fabric - one from the inside side, one from the outside side, one from the inside bottom and one from the outside bottom. Although this took quite a bit of time, I think it made a strong join.
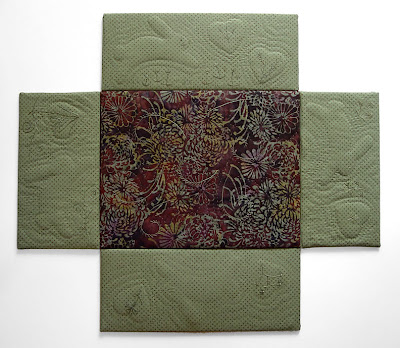
four sides of box attached to bottom, memory box by robin atkins
Here's how it looks with the four sides attached to the bottom. This is the inside.
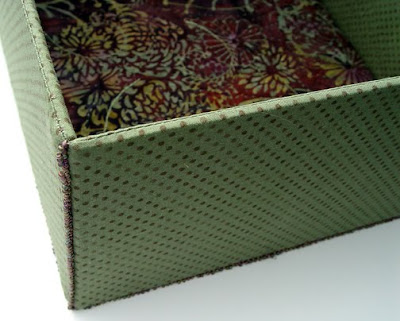
sides of box joined with picot edge stitch, memory box by robin atkins
Then using the same method, I joined the side pieces together. Above is a detail showing one corner of the completed box. If you click to enlarge, you can see the picot edge stitch on the sides and bottom. I am satisfied with how this looks and think it will be as strong as any other method. I like it that I didn't have to use any glue.

Making a Lid for the Box

Now the lid! Oh boy, I was terrified that my calculations about the size of the lid would be off and I wouldn't know it until I finished the whole thing... Hours and hours of work! It was only because I wanted to finish the box in time to enter it in our County Fair that kept me going.

Before making the fabric sleeves for the lid pieces, I had to figure out how to attach my two bead journal pages to the top of the lid. First I needed to finish off the two pages. I decided they needed fabric borders made with the same fabric as the sides of the box.

So I cut narrow strips of fabric and hand-stitched them to the sides of my beading. The pictures below show the right and wrong side of two strips sewn to the butterfly piece. This is like log cabin quilting.

bead embroidery, adding fabric borders, by robin atkins
Next, I thought it would be good to have my beaded pieces slightly raised on the surface of the box lid. So I turned again to Easy Felt, cutting out a piece just the size of the beaded area (4" x 6").

bead embroidery with fabric borders, back side, by robin atkins
Then I folded the fabric border to the back side, so that just 1/2" showed on the front. I tacked it down with running stitches to the Easy Felt on the back side. I finished each BJP piece with picot edge stitch around the outside of the fabric border.

bead embroidery, mom's butterfly, with fabric border, by robin atkins
Here's Mom and Me ready to attach to the lid.
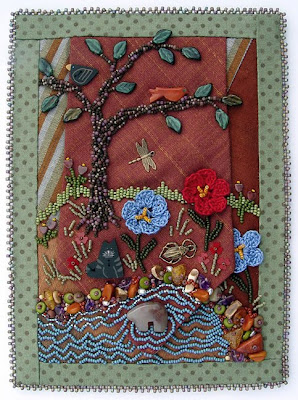
bead embroidery, dad's tie, with fabric border, by robin atkins
Here's Dad and Me ready to attach to the lid.

Next I stitched the finished BJP pieces to the cut out lid fabric (brown batik), using two lines of tiny running stitches - one at the outer edge and one at the inner edge of the fabric borders.

detail of box lid showing quilting stitches, by robin atkins
Before I made the fabric sleeve for the lid top, I decided I needed something to integrate the BJP pieces with the lid. A little quilting might do the trick. So, I made a sandwich of fabric, batting and muslin. I began quilting straight lines of stitches about 1/4" out from the BJP pieces. Nope. It looked too square, too formal. So rip, rip... out came the straight lines and back to improvisational quilting... Ha! Way better... a little spiral, some curved lines, more spirals... It worked!
The picture below shows the quilting, but even if you click to enlarge, it's a bit hard to see since I quilted with the same color thread as the fabric.

stitching bead embroidery to fabric, detail, by robin atkins
Then, finally, I made the lid the same way as the bottom of the box - machine sewn sleeves, whip-stitched closed, sewn together with picot edge stitch.

At last, came the test. Will the lid fit over the box? Will it be too loose? Ah, my lucky day! It fits perfectly. Here is a top view of the finished lid.

memory box lid showing attached bead embroidery by robin atkins
Important TIP!!!

My bead embroidery is very textural and both of these BJP pieces have parts that open to reveal books of pictures inside (see pictures at end of post). Think about stitching around these pieces to sew them to the lid fabric and about stitching the lid pieces together. Can you imagine how many times one could get the stitching thread tangled in the beads, around the butterfly wing or the flap of the necktie? It's a nightmare to contemplate.

So here's the tip! I stitched the butterfly wing closed and the antennae down. And I covered the entire necktie piece with fine netting, basted to the surface, as you can see below.

beadwork covered with netting to prevent snagging with thread while stitching to lid
It really helped! The thread got caught a few times around the crystals in the butterfly wing. (Guess I could have covered that piece with netting too.) Yet all-in-all, I had very little hassle. When finished, I removed the stitches holding the wing, antennae and netting.... good as new!

Ribbons at the County Fair

I finished the box just in the nick of time to get it entered in our County Fair last week. I wasn't surprised that it won a blue ribbon (1st place), but blown away that it took Best of Show in the Needle Arts Division!!! Here it is with the ribbons...

bead embroidery, quilting, memory box by robin atkins wins ribbons at fair
Remembrances

Now it's home again and I get to tie olive-green ribbons around packets of letters and pictures, and find my mother's wedding gloves and other remembrances of my parents to tuck into the box for safe-keeping. I also plan to use more of the green polka-dot fabric to make a fabric case to protect the box.

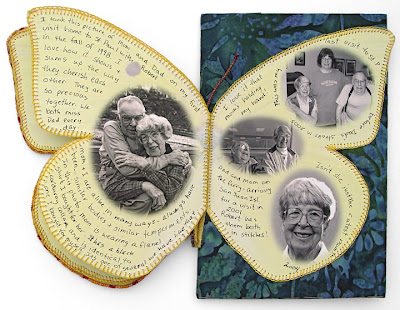
In case you didn't see these pictures in previous posts, here are a couple pictures of the butterfly piece, my November BJP, about my Mom. She's 92 years old and still doing fairly well in assisted living. She lives in St. Paul, MN. I plan to spend a week with her in October.

bead embroidery, bead journal project, mom's butterfly, by robin atkins
And below are pictures of the necktie piece, my July BJP, about my Dad. He died three years ago on July 13th. Although I miss him every day, more than I can say, the beading and stitching help me to feel connected with him in a way that is special and comforting.
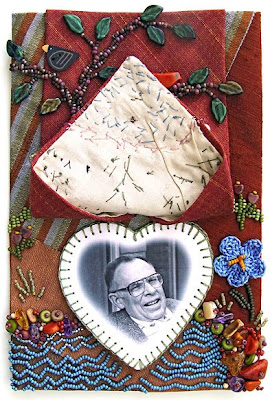
bead embroidery, bead journal project, dad's tie, by robin atkins

Using Two of My BJP Pieces

Making this memory box required that I take two of my BJP pieces for the year out of sequence. That means I have 10 remaining pieces and can not show them all together in one group as I did last year. I feel a little separation anxiety about this.... But the memory box is important to me, so it's OK.

Now that my BJP set is already in two parts, I may continue with that thought and put the four pieces that have to do with spirituality together (make something with them... haven't decided what yet) and the three pieces that have to do with my relationship with my husband together. That leaves three fairly unrelated pieces... Maybe I'll frame them individually... or??? We have four months between now and when the BJP begins again. Lots of time to see what happens with my 10 remaining pieces!

Saturday, August 22, 2009

Why Blog? - - - And 3 More Short Subjects!

bead journal project, bead embroidery by robin atkins, detail
Why Blog?

While reading Willow Manor last night, I stumbled on her post (here) about comments and whether they are an obstacle or catalyst to readers. Willow has over 1,000 followers and it's not uncommon for her to have 50-100 comments per post. It boggles my mind, yet I can see why people like her blog. I do too.

Anyway, some of the 125 comments on the post about commenting (LOL) and her more recent post (here) about blogging being a transformative moment for her, got me to thinking (again) about why I blog.

For me, blogging started (3 years ago) as a diary or journal... just a place to keep a written and visual record of my life. My husband partakes and is interested in only part of my life... I needed to honor the other parts in some way (I guess)... and blogging became the way. Besides it was technically challenging and fun.

Somewhere along the way, in a barely noticeable progression, my motivation began to change. Rather than doing it for myself, I began to respond to the blogging community by trying to tailor my posts to my readers, finding subjects and adding images that I hoped would appeal and draw comments. Ah, comments! Yes, I craved them and thrived on them, the more the better.

Now, in the past few months, I'm noticing another shift in motivation. Do you recall my recent post about witnessing (here)? One of the email responses to this post called it deep listening. Isn't that a great term? My recent shift is toward trying to develop a community of deep listeners.

OK, I don't mean that every post and every comment needs to be deep. (Wouldn't that be a headache!) But that the general focus of the community (both me posting and you commenting, or just reading) tends toward witnessing, deep hearing and inner truth. Yikes! That sounds a bit daunting. Yet, I think it's my motivation at this time.

A Few Reader Thoughts about Witnessing

Susan said: Interestingly enough, my online blogging has helped me connect better with my family and friends who choose to read. Those non-stitching friends have begun to understand what I stitch, why I stitch and how important it is in my life. ~Me too, including my husband!~ ...my public witnessing of myself and my own feelings leads to others witnessing not only my feelings but their own as well. Some of my favorite online exchanges have occurred because of my most private, public posts. ~Again, me too... This is what I mean about building a community of deep hearing people!~ If someone is interested in witnessing my life, they comment. If they aren't, they move on. We tend to attract those who have the same values and are struggling with the same issues. We ... tend to group ourselves and that is a beautiful phenomenon. So, rather than us choosing our witnesses, our witnesses choose us. They choose to spend the time getting to know us and writing a meaningful comment -- because they care and they want to -- and those feelings are real and very, very healing, supportive and loving. ~How true, Susan, and well said!

Jacquie pointed out that witnessing for her is a validation of time spent pouring out my heart of hearts. ~I agree and also think blogging can be self-validating.

Penny says: witnessing, when it comes from the viewers heart and spirit, when they are really and truly engaged with what they are looking at - can be a motivating process. It opens not only me up to them, but them up to me and that is a gift that they give to me also. ~That's how I look at it too... as an exchange and as a gift.

Pegnard wrote: Am I willing to share my spirit, in a spirit of aloha, on a blog? I started one, but don't write there too often yet. I hope people will be kind. I've experienced so much joy from reading other blogs, felt such a kinship. I'd like to share back. ~Again, it's the exchange thing... the sharing back... the give and take of blogging that appeals to me now.

Carolyn emailed: ...we only expose ourselves to those we completely trust to like us even after they see/witness "who we really are." And that usually only means one or two special friends and no one else, especially family members. Blogs allow us to safely allow others to know who we really are and safely identify with like emotions and feelings. ~Yes, I think there is an element of anonymity or distance that makes blogging feel safe. The level of safety, developing slowly for me as I wrote and read, is quite high now.

Sabine wrote: Blogs, and especially the BJP have a lot to do with letting people witness through art and thoughts presented, and they have a whole lot to do with trusting people. ~I agree, trust is so much a part of this.

Post, comment, witness, exchange, trust, validate and transform... that's what blogging is all about for me at this point.

Teaching in Phoenix - Bead Museum is there!

Right around the corner... October 1-5, I will be in Phoenix, Arizona teaching bead embroidery and giving two presentations!

Oct. 2nd will be a whole day at the Bead Museum! I've never been there previously, but have heard lots of praise for their huge collection of beads and beadwork and the way it's displayed. This museum is currently the only bead museum in the country (in the world???), since the one in Washington DC closed. A few months ago the economy almost forced our only remaining bead museum to close its doors. Fortunately, various Bead Societies and private concerns around the country donated sufficient funds to keep them going for a little while longer.

I'm telling you this, because IF you have the time and can get there, this may be a good opportunity to see the museum! I'll be teaching a 1/2-day Beaded Button class (great introduction to bead embroidery), giving a slide show about how glass beads and buttons are made and signing books... That's Oct. 2nd at the Museum. The contact information is here, on my website.

If you'd really like to go deeply into bead embroidery, consider taking my 2-day Improvisational Bead Embroidery class on Oct. 3 & 4, also in Phoenix but held at the Farm at South Mountain. More than a techniques class, this one is all about tapping into your original, creative self through beading. A side-benefit of taking the class is that you get to attend my presentation about Visual Journaling with Beads, Fibers, Threads and Fabrics for free! Contact information is here.

Introducing A Friend's Website & Blog

bountiful herbs farm, gayle and dennis hazelton
This is my neighbor, walking-buddy and friend, Gayle with her husband and pupdog. Gayle asked me to build/design a website and blog for her herbal farm business. I'm no website designer, but together we developed a simple site, which is now live!!! At Bountiful Herbs Farm, you will find natural, hand-made soaps and many other wonderful things your body and home will love. Enjoy cooking and gardening??? Gayle likes to share favorite recipes on her blog, Herb Crazed... plus useful gardening tips. Thanks for giving her a visit and a taste of what it's like to receive comments!!!