Friday, May 07, 2010

Metal & Beads ~ New Book Giveaway!

Metalwork and beads compliment each other so beautifully!

bead embroidery and copper charms by Robin Atkins, bead journal project, detail
Artists who combine their own metal components (whether silver, copper or bronze) with beads always seem to have a competitive edge in the market place. Their work seems more original, more unique, more precious to me.

doll by Kaite, metal and indigo, bead journal project
And it's not just jewelry. Above is a Kaite's April BJP doll, Metal-Indigo. Kaite made all of the little copper squiggles and dangles in a workshop. Don't they add great character to her doll?!

Back in the 70's, I was a metalsmith, fabricating silver and gold jewelry. Below are a few examples of my work.

metalsmith, sterling silver zipper necklace by Robin Atkins
metalsmith, man's ring by Robin Atkins
metalsmith, picture jasper necklace by Robin Aktins
I learned metalworking skills from three sources: 1. Community college and art college classes, 2. from my friend Liz who was getting a college degree in metalsmithing and 3. from several books (best one was The Complete Metalsmith by Tim McCreight, which is still available). I made and sold jewelry for 5 years, loved working in my shop, loved forming metal!

Later, when I shifted into beads, I used my metalworking skills to create findings and components for my beaded creations (two examples below). Handy!

bead necklace with copper charms by Robin Atkins
bead necklace with copper and sterling hand by Robin Atkins
I also taught wireworking and developed a unique style of fibula pins (below), which have sold well over the years.

fibula pin by Robin Atkins
Frequently beaders have asked me, "I want to learn metalworking... what book do you recommend?" Until now, I have had to answer, "Sorry, there is no decent metalworking book for beaders. Get Tim McCreight's book and figure out for yourself how to apply the skills to beadwork."

At last Candie Cooper has given us beaders a really fabulous book on metalworking!!!!!

Metalsmithing 101 for Beaders, book cover
I like everything about this book! Candie's instructions seem easy to follow, yet thorough. She takes you through all the basics... tools, marking, sawing, filing, riveting, soldering, texturing, patinas... everything needed to create findings and components to compliment beads. Plus she gives many wonderful design ideas, projects and patterns.

Good how-to pictures and drawings...
Metalsmithing 101 for Beaders, setting saw blade
Exciting design ideas... fun fish pin...
Metalsmithing 101 for Beaders, fish pin project
Elegant earrings...
Metalsmithing 101 for Beaders, earrings project
Unique charms...
Metalsmithing 101 for Beaders, handmade charms
...and many more!

I read every word of this book (something I rarely do)... I found it entertaining (not expected), accurate/complete (also not expected) and it made me crave the feeling of the tools in my hands, working the metal, transforming wire and sheet metal into beautiful objects again. I give this book FIVE STARS ++++! Bravo to Candie and Lark Books!

This post is a giveaway! I have one copy of Metalworking 101 for Beaders, by Candie Cooper to send to somebody who writes a comment on this post. Please, include your email address in the comment, so I can notify you if you're the winner!

I shall select the winner randomly on May 20th from those who comment... that's two weeks from today. If you can't wait or don't win, you can buy it here or at your local bead shop.

Sunday, May 02, 2010

March BJP ~ Finally Finished!!

It seems more difficult to do, yet I think the work is getting a bit better... does that make sense? Here is my March BJP, finished!

bead embroidery collage by Robin Atkins, bead journal project, butte at Grand Canyon
Sometimes I look at the finished piece and think it looks like a boat or submarine. Wrong! Actually, it represents a butte in the Grand Canyon, as seen from the South Rim. In March, my husband and I went to AZ and the Canyon for our first real vacation in many years (see pictures here). The foreground objects are things I either found on the ground or bought while we were there.

Although I wrote them on March 1, two weeks before we flew to AZ, all six of the words manifested during our time there. We explored as much as we could of the state, learned a great deal about geology and cactus, built a strong relationship with the desert, reflected on the magnificent beauty at the Canyon, one of the world's greatest natural wonders, danced in our hearts every day, and flew over the Canyon on the way home! I hope that my piece reflects at least a little of the awesome beauty we found there.

If you've been following my BJPs for this year, you know my plan is to incorporate 6 words (chosen improvisationally on the first day of the month) into the piece, along with fabric, felt, beads and decorative papers that I paint with acrylics. The size (not counting the black background) is 7 inches square.

bead embroidery collage by Robin Atkins, bead journal project, fabrics, trims, beads
I constructed the butte first, before even knowing what else I wanted to do with the piece. A dear friend (thank you, Elaine!!!) gifted me with a beautiful packet of coordinated fabrics, threads, trims and beads, which looked perfect for the SW. I layered the fabrics, pleating and stitching them, to suggest the various geological layers found in the land formations of the area. I tea-dyed the rickrack and one of the fabrics and used the wrong side of two of the fabrics to get the effect I wanted.

bead embroidery collage by Robin Atkins, bead journal project, detail of layered fabric butte
I've struggled (to put it mildly) each month with the words. This month was no exception. At first I was going to write them somehow on the found objects in the foreground at the bottom of the piece. Yikes! I gave myself a headache trying to think of how to put words on these objects in a way that would look like they belonged there.

bead embroidery collage by Robin Atkins, bead journal project, detail of word clouds
Finally one day, I got the idea of writing the words in the sky, which at that point was painted blue and aqua (no clouds). After playing around with a few ideas that failed, I tried cutting some cloud shapes out of paper toweling and writing the words in marking pen on them. No cigar. But the basic idea was good. So next I tried rubber stamping the words on paper toweling, cutting out the clouds and then separating the towel layers so that the final clouds were thin and somewhat transparent. Voila! I used matte medium to apply the word-stamped clouds to the background sky.

bead embroidery collage by Robin Atkins, bead journal project, detail of beading
Once the sky, clouds and butte were set, the last part was easy. Of course... it was the part to be beaded!!! I thought you might like to see some detail pictures and read about how I attached the various objects to the background, which is dark brown wool felt...

bead embroidery collage by Robin Atkins, bead journal project, detail of arrow point
I first stitched the arrow head to the felt using Nymo thread (for strength) and then covered the Nymo with embroidery floss (one direction) and with a section of fuzzy trim (in the other direction). The foundation of the trim was a tightly woven thread cord. Every two inches or so there was a "fuzzy flag" of thread. I used it a lot, as you'll see.

bead embroidery collage by Robin Atkins, bead journal project, detail of bezel holding ceramic shard
The glazed pottery shard was tricky because the edges and point were very sharp. I constructed a bezel by joining the tops of stacks of beads stitched around the shard. My first attempt failed. The white clay of the pottery showed between the stacks and I was worried about the sharp edges cutting the thread. So I took it off, sanded the edges and used colored pencils to color the clay to more-or-less match the beads I used in the bezel. It's not perfect, but looks better actual size than how it looks in the above picture.

bead embroidery collage by Robin Atkins, bead journal project, detail of rusty key
The rusty key is attached the same way as the arrow head, first with Nymo for strength, which is then covered with more of the "fuzzy flag" trim.

bead embroidery collage by Robin Atkins, bead journal project, detail of ancient pottery rings
These ancient pottery rings are also attached with Nymo, which is then topped with "fuzzy flag" trim.

bead embroidery collage by Robin Atkins, bead journal project, detail of rusty plate
I used beads to attach the rusty metal part, stitched through the existing holes at each end.

bead embroidery collage by Robin Atkins, bead journal project, detail of rolled silk beads and fuzzy trim
These are tube beads made by rolling triangle-shaped pieces of hand-dyed silk organza impregnated with matte medium on knitting needles. The edges of the fabric are sealed by burning, which is what makes the dark lines on the beads. While they are somewhat fragile, they held up well even when I caught the thread on them repeatedly as I sewed the brown background beads in place. I attached the beads by stitching from both of the outside edges a short distance into the bead and then through the bead wall into the felt. Between the tube beads is more of the "fuzzy flag" trim. I snipped one end close to the fuzzy part and sealed the tip with bead tip cement. Then I couched the other end (about an inch of the cording) in place.

I'm relieved to have this one finished and posted. Now I just need to find some time to do April and May, so I can be back on track by June. I hope that the word thing isn't such a struggle... I would give it up, except that I think I'm actually making some progress and I really want to get better at collage with words.

In case you missed them, here are links to my January and February BJP pieces.

Friday, April 30, 2010

Felting, Dyeing, Beading, Stitching ~ Exciting Workshop in June!!!

June 17, 18 and 19, yours truly will be on lovely Lopez Island to learn all about making and embellishing hand-bound blank books with resist-dyed, felt covers. Oh be still my heart!!!

handmade books by Chad Alice Hagen, hand bound, resist-dyed felt covers
This intensive workshop, taught by nationally-recognized felt artist, Chad Alice Hagen, is brought to 12 lucky students through the efforts of Jan Scilipoti, a felt and quilting artist who lives on Lopez Island (one of the San Juan Islands in NW Washington state). Thank you Jan!

handmade book by Chad Alice Hagen, hand bound, resist-dyed felt cover
Just in case you're starting to get that itchy feeling (the way I did when I first heard about this event from Sweetpea, who also will be attending), yes, there are still a few openings!!! Contact Jan to get all the information (she'll email you a pdf flyer), ask questions and register. But don't wait too long...

handmade books by Chad Alice Hagen, hand bound, resist-dyed felt covers
The first day will be all about resist dyeing on needle-punched prefelts... Imagine, 15 dyebaths and oodles of ideas for creating uniquely patterned felt!!!

handmade book by Chad Alice Hagen, hand bound, resist-dyed felt cover
The next two days are all about creating at least two books each, using our dyed felt for the covers. I've made and Coptic-bound a few books and done a bit of beading (LOL) in the past, but never with felt. I'm looking forward to the feel of the felt in my hands as I work the embellishments and binding! We should have lots of delightful hours surrounded by color, texture, and the companionship of like-minded, wool-dye-bead-book-crazy gals. (OK, men too, if any dare to join us!)

If you'd like to join us, for sure, Lopez Island, mid-June is the place to be! You can see more pictures on Chad's Flickr photostream. And here is Chad's blog, which is waaaay fun!

Wednesday, April 28, 2010

New Hoffman Batiks are Out!!!!! I LOVE Them!

batik fabric, Hoffman, Paradise G2178
The first two years of the Bead Journal Project I used at least one batik fabric (sometimes 3 or 4) for each of my monthly pieces. I LOVE batiks. This year, I'm stitching on felt and find that I really miss my batiks...

batik fabric, Hoffman, Juniper BPN006
I love to buy batiks in fat quarters. They come in so many delicious colors and patterns. I love that they are hand-dyed and printed.

batik fabric, Hoffman, Petal G2215
I buy batiks wherever I am... fabric shops, quilt shows and conferences, and online. My favorite online supplier, by far, is Batiks Plus. They measure a yard at 40 inches, a lovely bonus, and gift their customers with free fat quarters for larger purchases. Their website is fabulous, listing and showing over 3500 fabrics! The pictures are good and the colors true. The pictures in this post are all from their website.

batik fabric, Hoffman, Teal G2220
These fabric swatches are from Hoffman's newly released line of batik prints. You can see them all, arranged in "designer groupings" on the Batiks Plus blog. Put on your bib, gals... you'll be a droolin' for sure! Oooooh, the new colors are soooooo exquisite!

batik fabric, Hoffman, Petal G2232
The pictures in this post are a few of my favorites from Hoffman's new line! Hmmmm, now don't I have a birthday coming up soon???

batik fabric, Hoffman, Paradise G2227
If you are viewing this blog on Internet Explorer, you can hover your mouse over the fabric swatch to get the color name and pattern number for each design.

batik fabric, Hoffman, Smoke G2220
Aren't they just yummy!!!

Thursday, April 22, 2010

6th Photo Challenge ~ FUN!!!!

Mortira over at Inspirational Beading, invited me to participate in a candid look at the past in a "photo challenge"... What fun! How could I resist?
The idea is to go back in blogtime to your earliest posts and identify the 6th picture you posted. The next task is to critique your own photo, explain what you would do differently now, and then pass on the challenge to 10 other bloggers. I'm not big on passing along, because of the sense of obligation that might be felt, so the challenge is extended to anybody who's interested!
I started blogging in 2006... (Yikes! Time flies!)... My 6th photo appears here in my 3rd post, dated May 9, 2006.

The post is about a 4-day workshop I taught at Valley Ridge Art Studio in Wisconsin... Beads, Books & Paint was all about creating a hand-bound book with painted decorative papers and bead embroidery inset into the cover. I still vividly recall the glorious time we had. Exhausted and exhilarated, all of the students left the last day with a finished book, which you can see here (worth the time to look - they're fabulous!). And below is picture #6... my students victoriously holding up their finished books!

book arts class by Robin Atkins
Wow! This is bringing back so many wonderful memories for me!!!!! What a treat to see these smiling faces and review the beautiful books they made. We were utterly exhausted, having worked all day and well into the evenings for four-loooong-days. Yet, we all had a great time, got to know each other and felt a huge surge in our creativity as we worked together. How can I critique this photo when it is brimming with such realized potential?

Not easy, yet there's much I've learned in nearly four years about photos and blogging... Looking at my 6th photo, here are a few pointers that come to mind:
  1. Save a LOT of frustration by centering photos and not trying to format them in blogger like books with text on one or the other side of the photos.
  2. Size photos before uploading to 105-200 KB at 72 dpi, so that they will be click-to-enlarge. I wrote a post about taking, editing and sizing photos here.
  3. Learn Photoshop or Elements or some other photo editing program. Take a class or on-line tutorials so that you can crop, correct errors, sharpen, delete background shadows, etc.
  4. Add photos to a post AFTER it is written and spell-checked. I add them in the "edit Html" mode, as they are easier to place without Blogger inserting automatic code that flubs up the spacing.
  5. When taking photos, allow time to pay attention to details. Remove distracting elements. Be sure your primary subject is well-lit but not in glaring light.

Just for fun, I returned to my original of the 6th photo and re-worked it a little in Photoshop. It wasn't a great photo in the first place. I obviously didn't pay attention to details as two of the faces are hidden and the back lighting in the room did nothing for the photo. Below is the revision (the best I could do with a poor original image), which unlike my 6th posted photo, is sized correctly. I also used shadow/highlight and the dodge tool to lighten the faces a bit.

book arts class by Robin Atkins, revised image
OK, now it's your turn!!! If you're reading this and have blogged for a while, please accept the challenge to take a look at your 6th posted photo!!!! And if you have a moment, leave a comment here that you've done so... With pleasure, I'll come take a look!

Wednesday, April 21, 2010

Inspiration

I've been reading blogs today and am finally inspired to bead. Yay! My March BJP piece will have something to do with the Grand Canyon...

sunset, grand canyon, photo by Robin Atkins
To the studio....

PS. Report, 4 hours later... all's well in beadland... Robin's back!

Saturday, April 17, 2010

How to Blend Bead Colors

Kali recently posted this picture of her beautiful March BJP piece, called Dancer.

Dancer, bead embroidery by Kali Tal, March BJP piece
She wrote:

The first thing I learned is that, no matter how many different colors of beads you’ve got, it’s never enough. As a painter, I’m used to mixing my own colors, and it’s a bit tougher with beads. Next time, though, I’m going to try mixing some bead soups to supplement my color palette.
Like Kali, if you're working with glass beads, you'll soon learn that there are only so many colors and those you have can't be mixed like paint. Even the Delica line, which has by far the most colors, is limited in some areas. And, for bead embroidery, Delicas are less than wonderful because of their large holes and tubular shape.

When you need a color you don't have, you might try changing the appearance of the color with the thread color. For example, if you have transparent yellow beads and you want them to appear lime, you can stitch them with green thread. This only works with transparent beads.

Here's another way to "blend colors" that works with any beads (matte, opaque, transparent). I discovered it 25 years ago when my bead thing was making multiple strand necklaces such as the one below. (Note, all the pictures in this post can be clicked-to-enlarge so you can really see the details.)

kimono necklace by Robin Atkins, blended red and black beads
Notice how this is a red and black necklace, yet in the center of the necklace the red and black blend together making a smooth transition from one color to the other. The chart below shows the basic technique for accomplishing a blend between two colors (click to enlarge).

pattern for blending bead colors by Robin Atkins
The pattern is: 5B, 1T, 4B, 1T, 3B, 1T, 2B, 1T, 1B, 2T, 1B, 3T, 1B, 4T, 1B, 5T. This variation of the pattern takes 36 beads to go from one to the other color. But it can be done with more or less. For example, the center section of the pattern only takes 14 beads (3B, 1T, 2B, 1T, 1B, 2T, 1B, 3T) to achieve the transition. While one could make a random blend, I often use a variation of this pattern.

Let's look at the red/black necklace in detail. Below is how the strands look before attaching the clasp.

kimono necklace by Robin Atkins, strands of red and black beads
And here is a detail showing just the center part where the colors are blended. By changing where the blend happens in each strand, I also achieve a vertical blend from strand to strand.

kimono necklace by Robin Atkins, center section, strands of red and black beads
Below is the red side of the necklace. Notice there are no black beads in the upper part of it. I tried, but they were such a strong contrast in value that they made the eye go right there. I wanted the eye to come to the center of the necklace and enjoy the blending of the two colors.
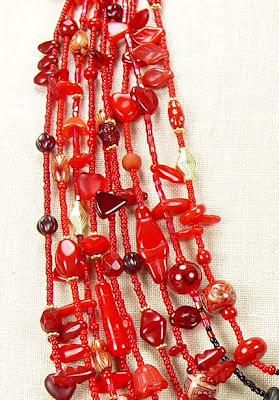
kimono necklace by Robin Atkins, detail, top of red side
Below is the black side of the necklace. Here I have put some red beads in with the black because without them it seemed unbalanced in value, too dark.

kimono necklace by Robin Atkins, detail, top of black side
And below is a detail showing how the center of the necklace looks when worn.

kimono necklace by Robin Atkins, detail, center where black and red beads are blended
I've used this technique in many multiple strand necklaces over the years and have always liked how it looks. When I began stitching beads on cloth, I often needed colors I didn't have or that don't exist. Could I use the successful stringing blend for my bead embroidery?

beaded butterfly by Robin Atkins, bead embroidery, bead journal project
Yes! Above is my November BJP (2008-9). Wanting to bead a fairly realistic butterfly, I needed to blend the colors, especially on the edges of the wing and where the wing meets the body.

beaded butterfly by Robin Atkins, detail, bead embroidery, bead journal project
By using backstitch and changing bead colors in a similar way to the chart above, I was able get the look I wanted. When you backstitch several lines of beads next to each other that all have color changes in them, you can create a beautiful blended look. I also blended colors in the short stacks that make the body of the butterfly.

bead embroidery, landscape, by Robin Atkins, waterfall and skunk cabbage
For my April BJP (2008-9), I used this method to blend colors in the waterfall and flowing creek water.
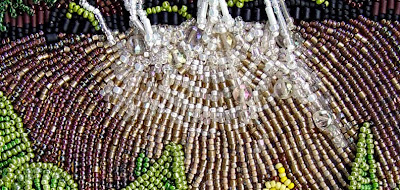
bead embroidery, landscape, by Robin Atkins, waterfall detail
Above is a closer look at the water. It's actually only 3 colors (white, clear and smokey topaz). I used a dark brown thread color where I wanted it darker and white thread for the lighter areas. Plus I blended the colors in each line of beads, similar to the pattern shown on the chart above.

bead embroidery, landscape, by Robin Atkins, skunk cabbage detail
For the skunk cabbage, I used a different method for blending. Again using backstitch, I stitched a line of beads in one color, a different color next to that, and a third color in the ditch, on top of the other two lines. This gave both texture and a subtle shift in color to stems, leaves and flower. I've marked the places where I used this method with white arrows.

bead embroidery, landscape, by Robin Atkins, skunk cabbage detail
Below is a detail picture showing one of the other skunk cabbages.

bead embroidery, landscape, by Robin Atkins, skunk cabbage detail
I've probably only scratched the surface of what is possible in the color blending department. If some of you have found other ways, I'd love to read about it on your blog!

FYI

I designed the red/black necklace based on colors in a Japanese kimono as a project for Margie Deeb's book, The Beader's Color Palette. See pages 91-93 for step-by-step instructions how to make it. Also, if anybody is interested, I might be willing to sell Kimono Necklace.

I also designed several other pieces for Margie's book as projects or to illustrate specific color palettes. Two of them also involve color blending: pages 55 and 163.

If you don't have this book and have any interest in expanding your color comfort zone, Margie's book is a must have... at least check it out from your local library!